Upgrade MRTK3
First things first: upgrade to the latest version of MRTK3. There is no two ways about it; otherwise, you will run into issues with the Magic Leap MRTK3 package. Check if your app still works on HoloLens 2 after that.
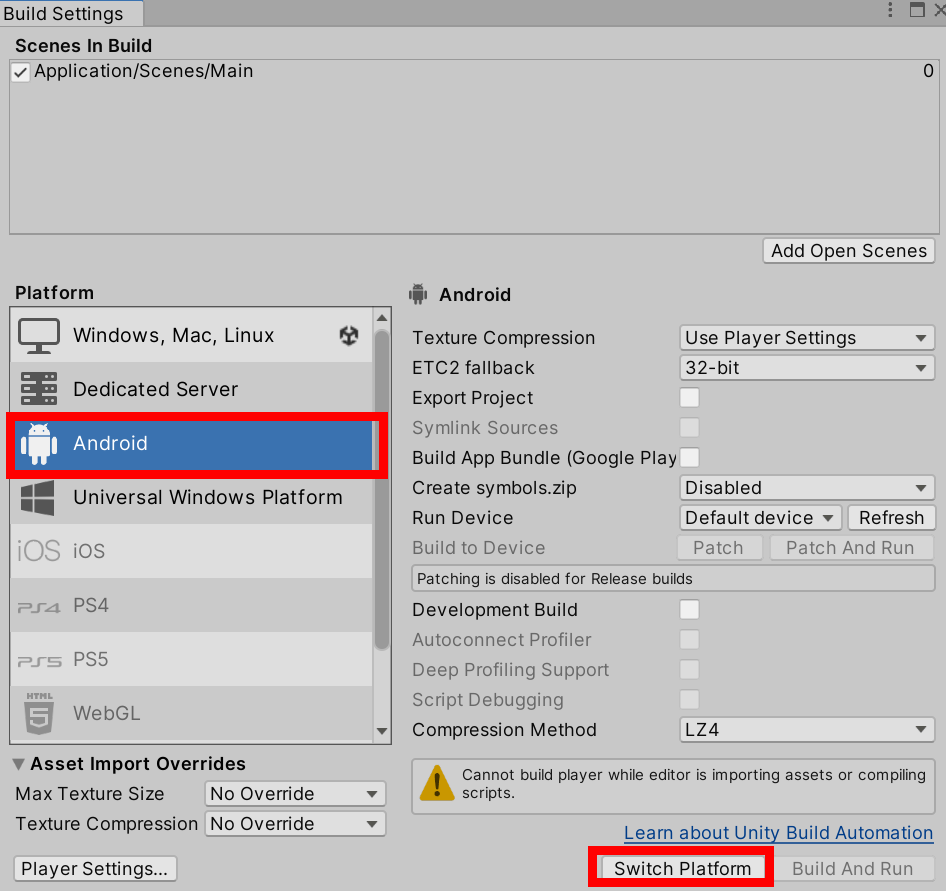
Switch build target to Android
This is a simple step: switch the build target to Android and close Unity.
Identify and add necessary packages
I found the MRTK3 setup instructions for Magic Leap 2 not very clear, and after a failed upgrade, I devised an alternative strategy.
You first need to pull the template Magic Leap MRTK3 project, which is actually a fork of MRTK3 made by Magic Leap, from GitHub.
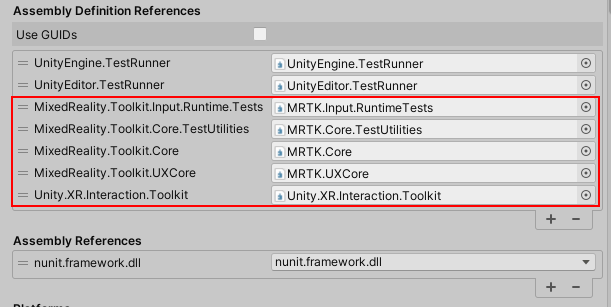
Then, compare the manifest file of the template project with the manifest file of your project using the little tool I made for my previous blog post. You will find the dev template manifest in MixedRealityToolkit-Unity\UnityProjects\MRTKDevTemplate\Packages. Use the Magic Leap MRTK3 manifest file as the first argument, and your manifest file as the second.
Finally, you will need to add the Magic Leap scope and the missing packages as described and explained in my previous blog post.
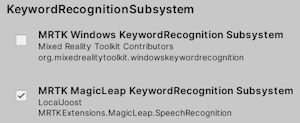
Set Magic Leap audio settings
Open Unity again, and let it import all the packages we just added in the manifest file.
When it’s done, you will see these two message boxes pass by:
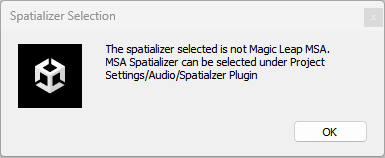
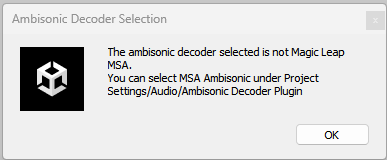
Click OK in both cases. In the end, the package manager will pop up, informing you a scope has been added.
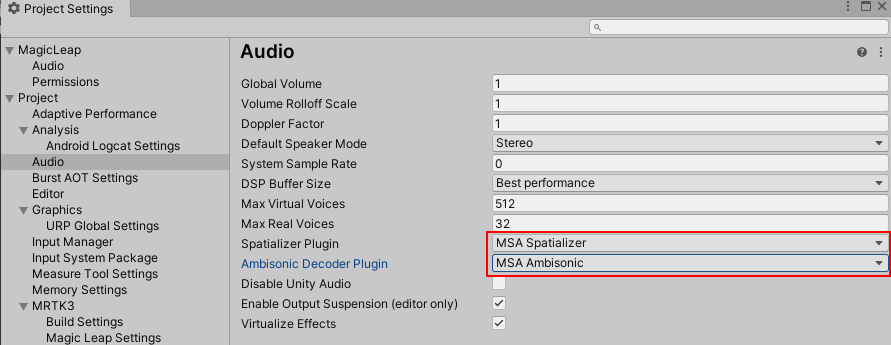
To prevent you from getting those two messages about audio every time you open the project, select “MSA Spatializer” and “MSA Ambisonic Plugin” in the audio tab of the project settings.
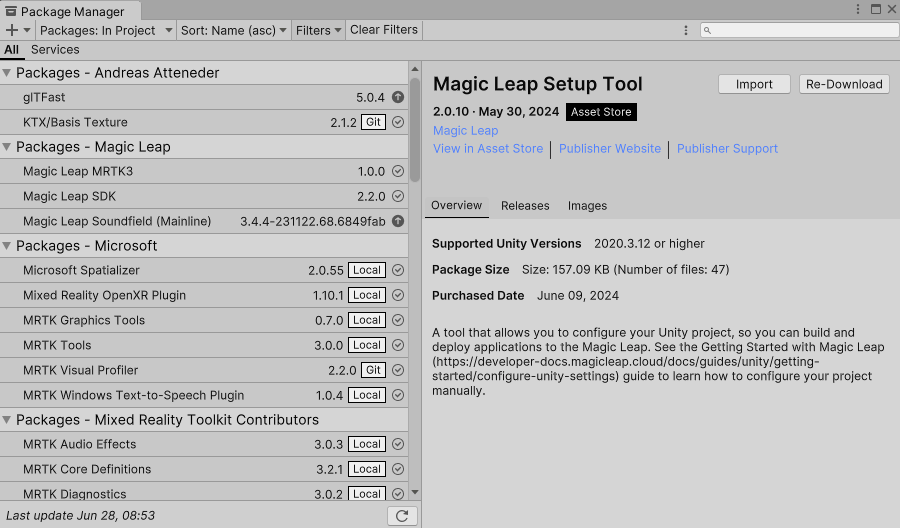
Install Magic Leap Project Setup Tool
Now it’s time to install the Magic Leap Project Setup Tool from the Unity Asset Store. At the time of this writing, you will get version 2.0.10.
After it’s done importing, this box will pop up:
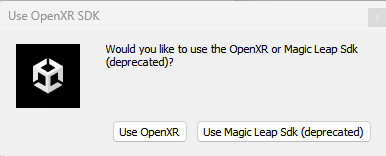
The choice is yours, but I prefer to go with OpenXR, and in any case, the Magic Leap SDK is deprecated, so that’s a dead end anyway. This tutorial uses OpenXR, so I’d suggest you click “OpenXR.”
The Project Setup Tool will pop up, and all kinds of stuff is being imported into Unity. Wait till it’s done. Then it asks again the same question:
s
Click OpenXR again. Then nothing seems to happen for a while (be patient), but finally, the Project Setup Tool shows a bunch of green and yellow buttons.
Configure settings using the Project Setup Tool
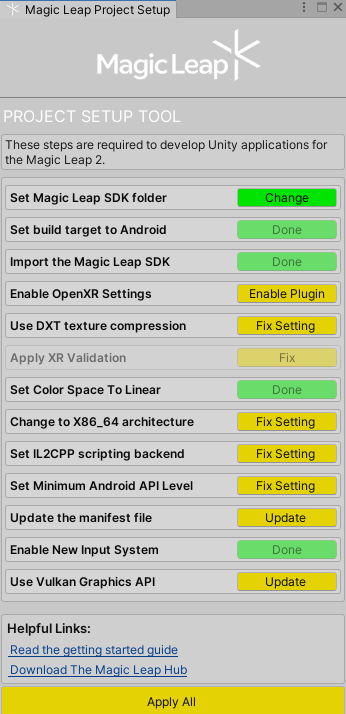
It’s very tempting to click “Apply All”, but my experience is that things usually work out better if you press the buttons one by one and wait for the result.
- “Enable plugin” will pop up the XR Plugin management; put that aside and continue.
- “Use DXT Texture Compression” will open a progress box that will close again.
- “Apply XR validation” will do something, whatever it is, but the button turns green.
- “Change to X86_X64 architecture” changes the architecture; you will see nothing happening but the button turn green.
- “Set Minimum Android API level”: Set API level to 29 (currently), no visual clue but green button.
- “Update the Manifest file” will undoubtedly add something to the manifest, although I don’t know what - button turns green.
- “Use Vulkan Graphics API” - set the graphic API, button turns green.
At this point, all the buttons should be green.
Setting necessary permissions.
Now it’s time to review the permissions. We know these in HoloLens as capabilities. Some capabilities are just granted when they are selected - like internet access - but some require explicit user consent - like microphone access. But all the capabilities for HoloLens 2 are in one list; you can’t really see which require consent or not - but in any case, HoloLens 2 will automatically ask for consent when necessary.
Magic Leap 2 knows a similar concept called permissions. The difference is: they are explicitly divided into two groups: normal and ‘dangerous’ permissions. Dangerous permissions need explicit user consent. It’s neat you can easily see what permissions are considered dangerous - although it’s also rather odd spatial maaping is considered a dangerous permission. Magic Leap is a Mixed Reality device, and the very point and USP of such a device is the ability to interact with reality. It feels a bit like buiding a boat but not putting it into water without special permission. I can’t really see how it possibly would open doors to surreptitious activities like, for instance, getting microphone access would - but hey, whoever makes the devices, writes the rules. Anyway, the Magic Leap 2 can also ask for permissions automatically, provided you actually set that option.
Anyway, we need (or want) to use the app with hand tracking, and we also require spatial mapping as we want to be able to put the map on the floor:
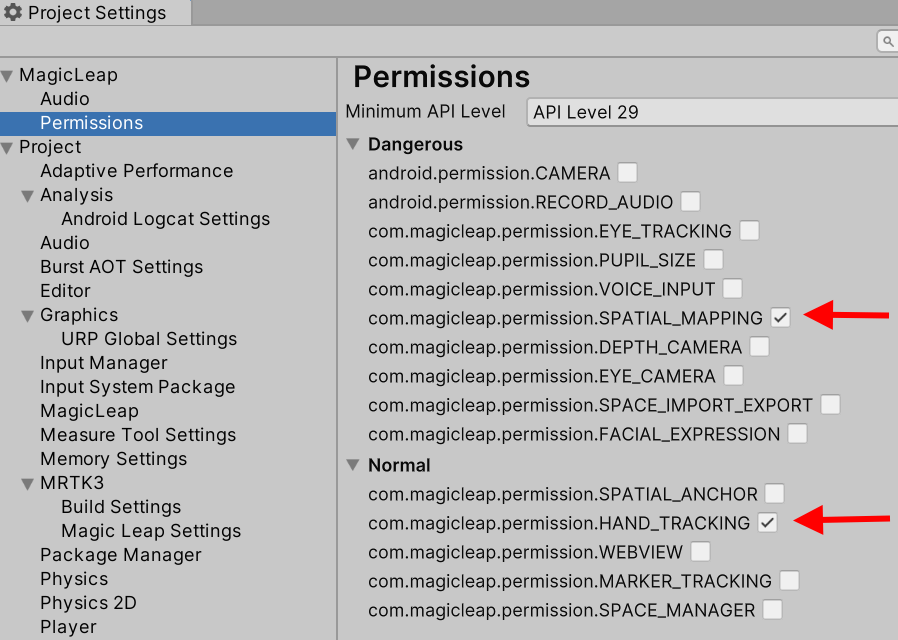
Also different is that permissions need to be set twice, in two different places - on the Magic Leap level, and the MRTK3 level. These are not always nicely in sync. Make sure they are in sync before proceeding.
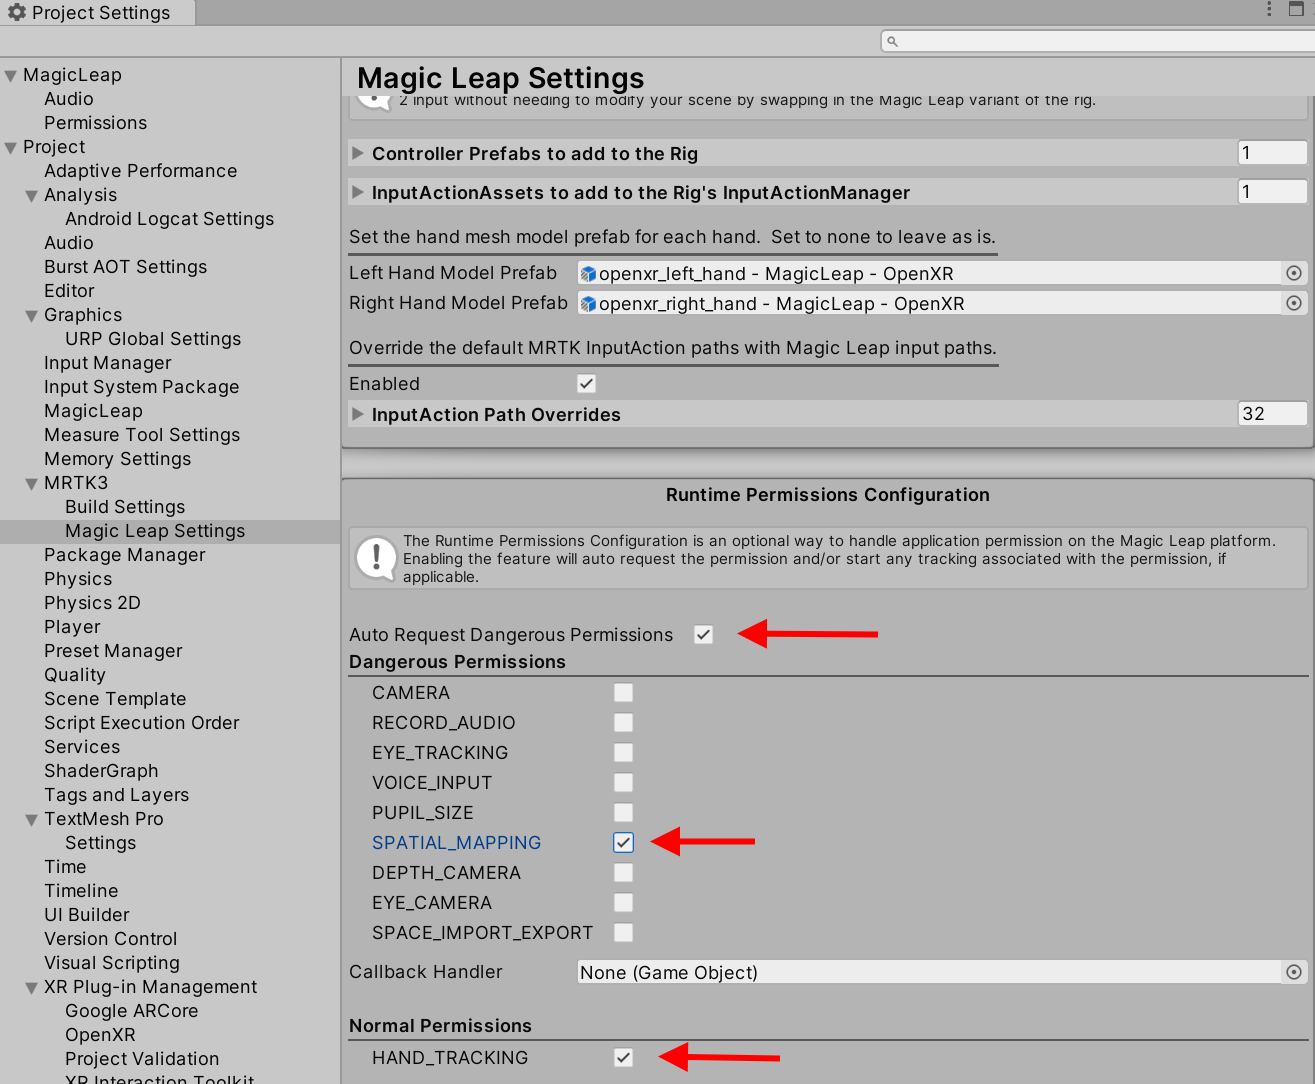
Notice the “Auto Request Dangerous Permissions”. Do not forget to set that.
Setting the MRTK 3 profile
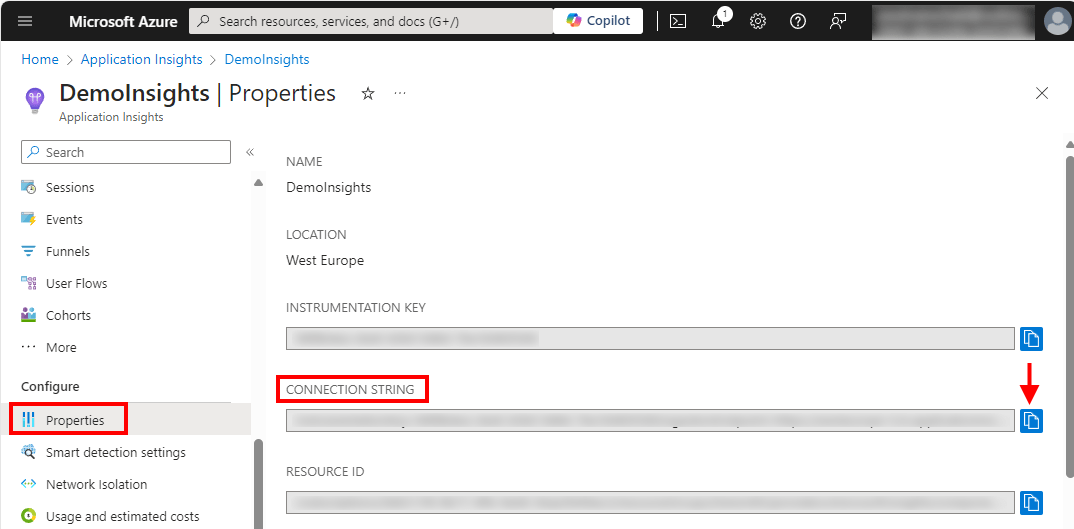
The MRTK3 cannot work without a profile. So we need to select one.
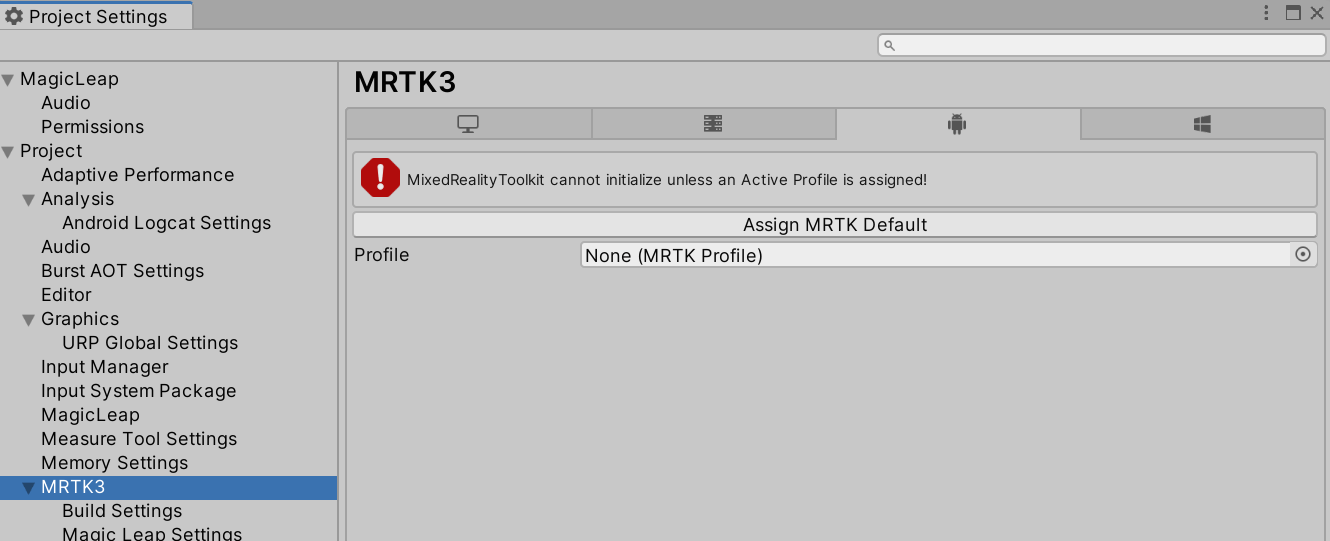
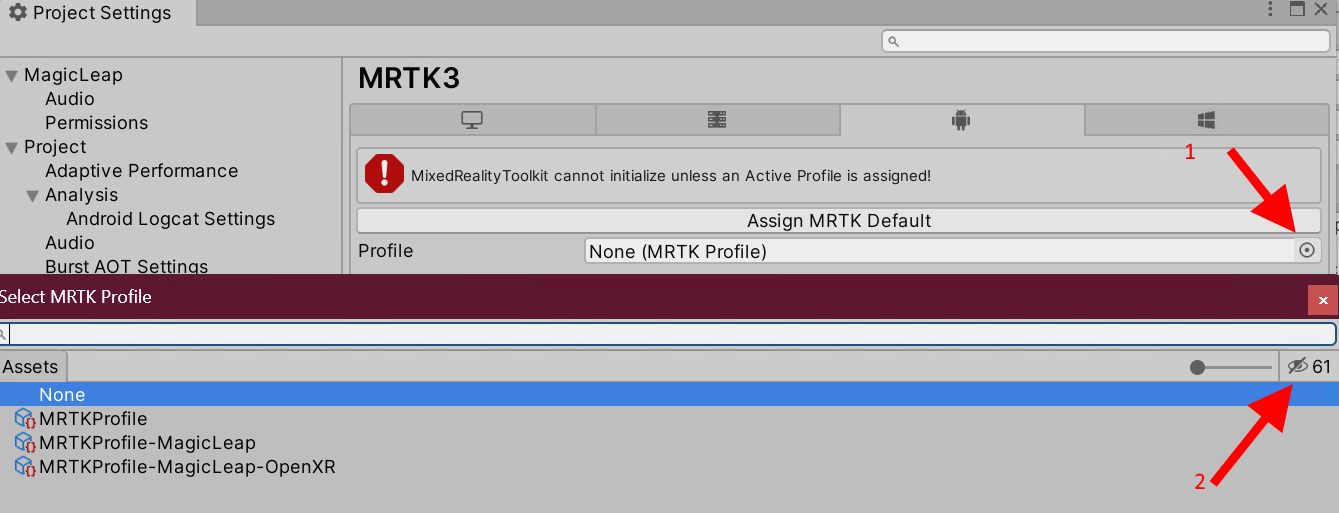
If you click the tempting button “Assign MRTK default,” it looks like you are done with it - but alas, you will set the MRTK default profile, which is wrong. You see, Magic Leap 2 uses different subsystems. So to be sure you don’t get any nasty surprises, you need to select the little dot on the right (marked 1) and then the eye icon on the right of the popup window - and you will see no less than 3 MRTK profiles. As you might have guessed, we need the MRTKProfile-MagicLeap-OpenXR.
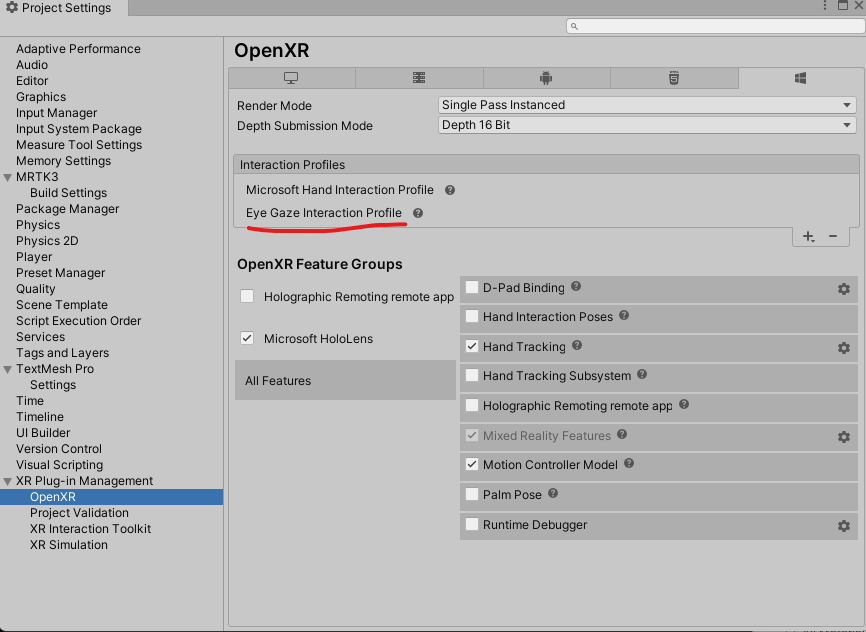
Configuring Magic Leap OpenXR settings
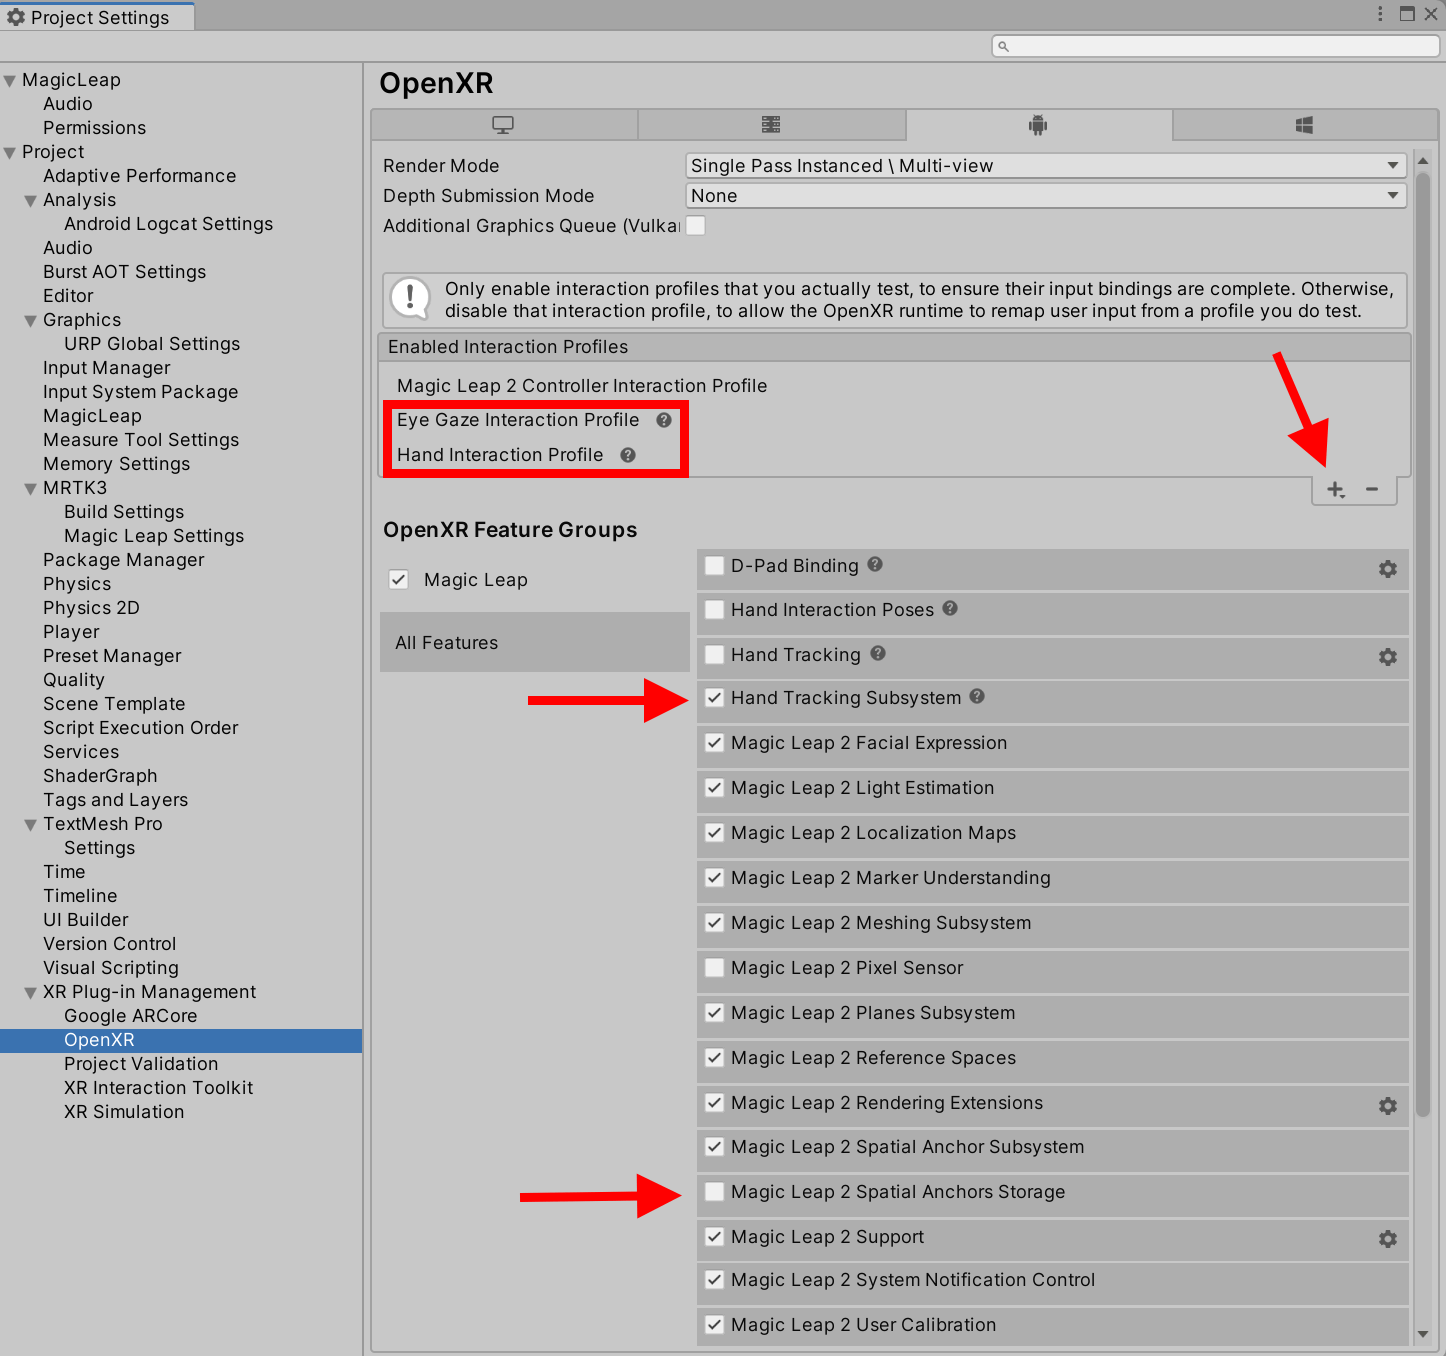
I added the two interaction profiles in the red square by clicking the little plus icon indicated by the arrow top right, and turned on the Hand Tracking System. I turned off the Magic Leap Spatial Anchor Storage because I noticed a lot of errors in the Unity Application Log when I checked that using my ServiceFramework-based FileLoggerService. The Pixel sensor thing was already off by default, so I left it off. I am not sure whether you can turn off other things and still have it work, nor what kind of advantages that might have. I haven’t gone deep into this.
Turning off the old Unity Input System
If you build and get this error:
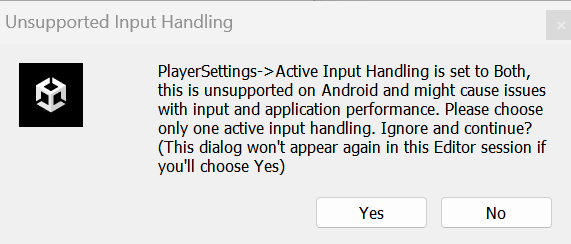
Change this in Other settings (in Player settings comment_issue_id: 472)

and restart the editor.
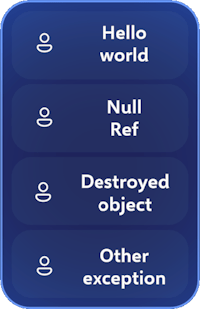
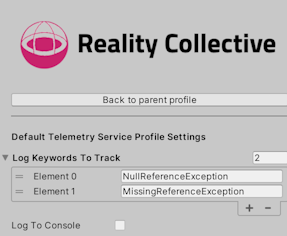
You will then have to check if you have a nifty help function like this one, that shows the hand menu in the editor by simply pressing the “H” key. Because this particular one is between #if UNITY_EDITOR preprocessor tags, it will not hurt the app, but by golly, does it keep the Unity console busy with errors. So best remove functions using stuff like this:
#if UNITY_EDITOR
private void Update()
{
    if (Input.GetKeyDown(KeyCode.H))
    {
        var menu = visuals.transform.GetChild(0);
        menu.gameObject.SetActive(!menu.gameObject.activeSelf);
        visuals.transform.position =
           LookingDirectionHelpers.CalculatePositionDeadAhead(0.3f);
        visuals.transform.LookAt(Camera.main.transform);
        visuals.transform.Rotate(Vector3.up, 180);
    }
}
#endif
Change some input settings
These are not mandatory but highly recommended. Go to Player Settings/InputSettings/Other settings and change these settings:
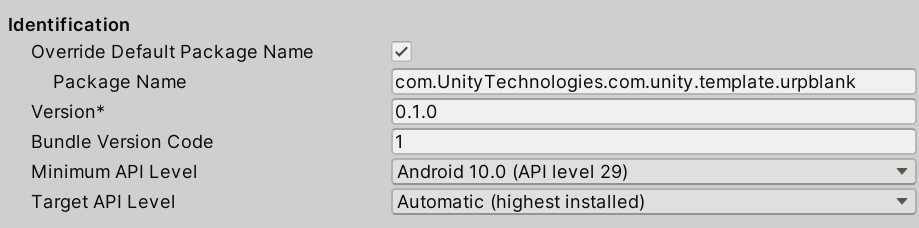
You never saw this before if you only did HoloLens development, but in Unity for Android, you need to set a package name. Don’t use the default, but enter a real package name.
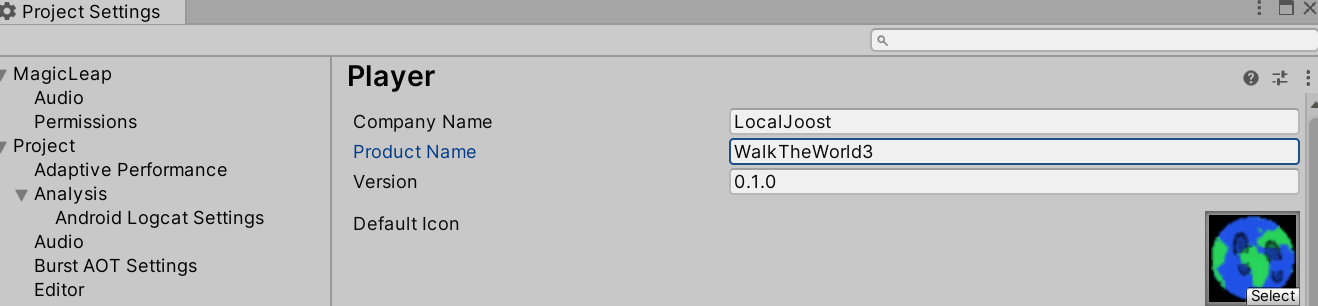
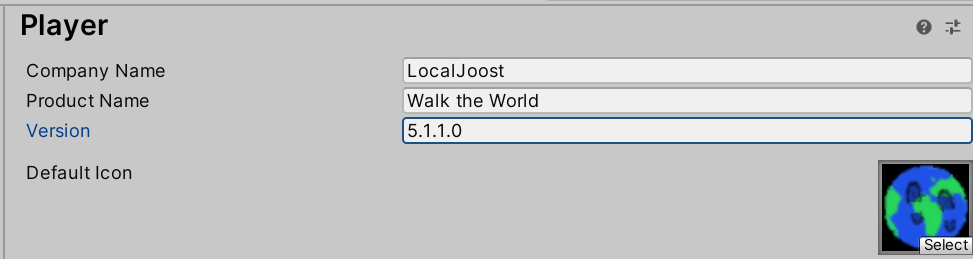
Then we have this thing. In HoloLens 2 apps (or rather, UWP apps), the name of the product is not necessarily the text that appears on the label behind the icon. In Magic Leap 2 apps (or rather, Android apps) it is, so if you have some random project name, please change it into something that looks nice, like I did.
Upgrade packages
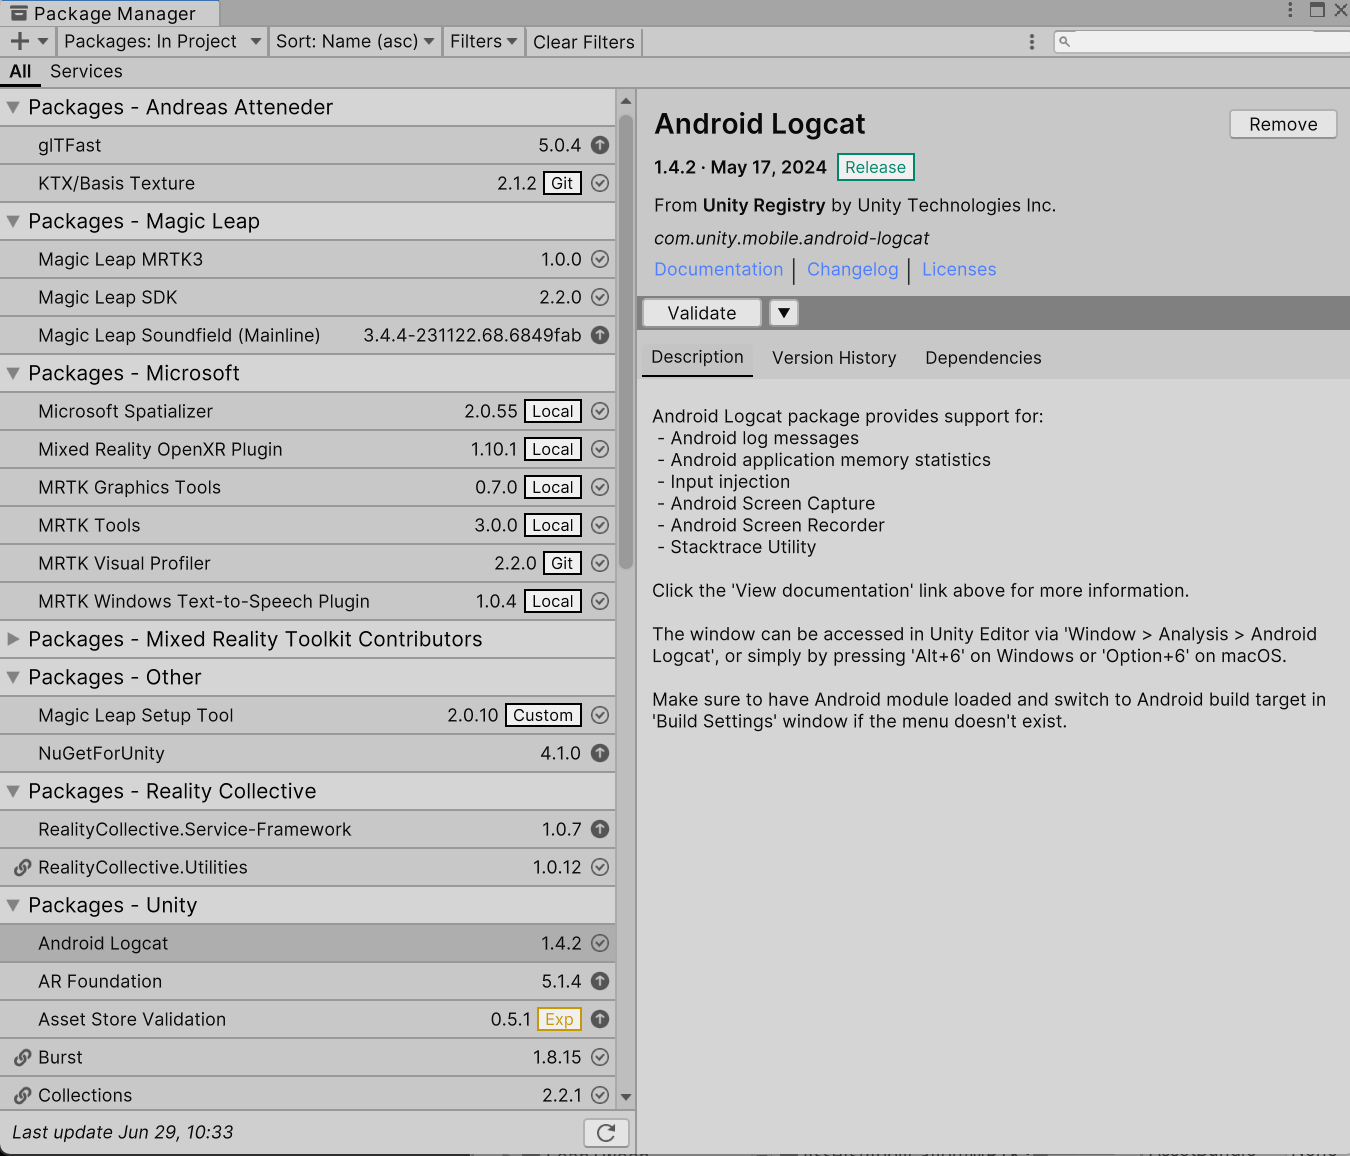
Also not mandatory but recommended: after you have confirmed the app runs, you might also consider looking at the package manager to see if any packages can or need to be upgraded. My package manager says some packages have slightly new versions indeed. I upgraded most of them, and it still works. Not sure what I gained.
Concluding words
After you have completed the mandatory steps, your app should simply be able to compile, and you should be able to deploy and run it on Magic Leap 2. Of course, your mileage may vary if you use very specific HoloLens 2 functionality, like iris login or tracking QR codes.
A word of warning: when I got the Magic Leap 2 some time ago, it was running OS 1.4.0. In the mean time, we had at least 4 upgrades and are now at 1.8.0. When I initially developed this app (on 1.7.0), I could not get the automatic “ask for permission” to work, the wrong controller model showed up, I did not get hand visualization, and I could not operate canvas buttons with the controller. I tested it with 1.7.0 and 1.8.0. After a lengthy discussion with the folks on the ML2 forums, who could not repro my problems even if sent them an APK, It was concluded there might be something with the device. That was the right call - a factory reset made all my issues disappear without having to change any code. Maybe I did something wrong during update; I also remember at one point having a preview installed. Long story short: if you see weird stuff like this, and someone else does not: factory reset!
Enjoy your cross-platform XR development. If you use this ‘recipe’, let me know how it worked out for you.
]]>