
 MVP Profile
 Try my app HoloATC!
  HoloLens 2
 Magic Leap 2
 Android phones
 Snap Spectacles
 Buy me a drink ;)
 BlueSky
 Mastodon
 Discord: LocalJoost#3562
Measuring temperatures using an UWP on a Raspberry PI 2
Part 3 of Reading temperatures & controlling a fan with a RP2, Azure Service Bus and a Microsoft Band
Intro
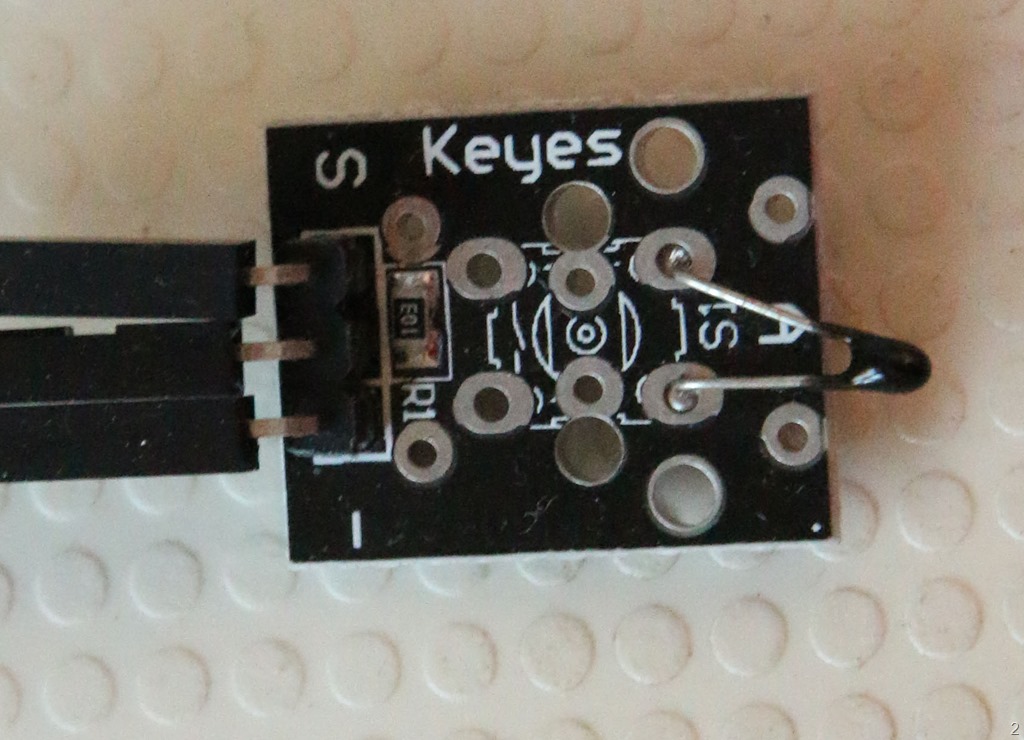
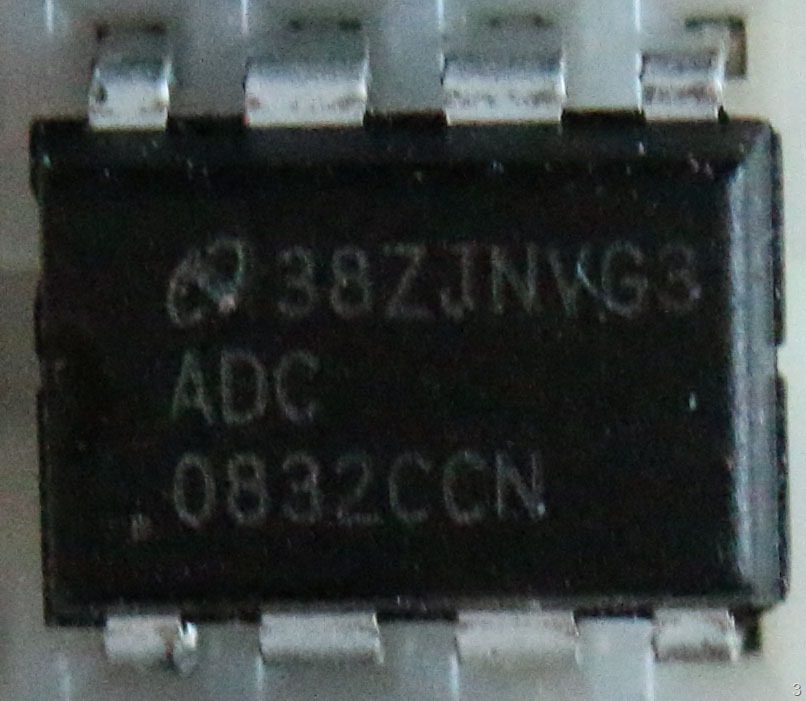
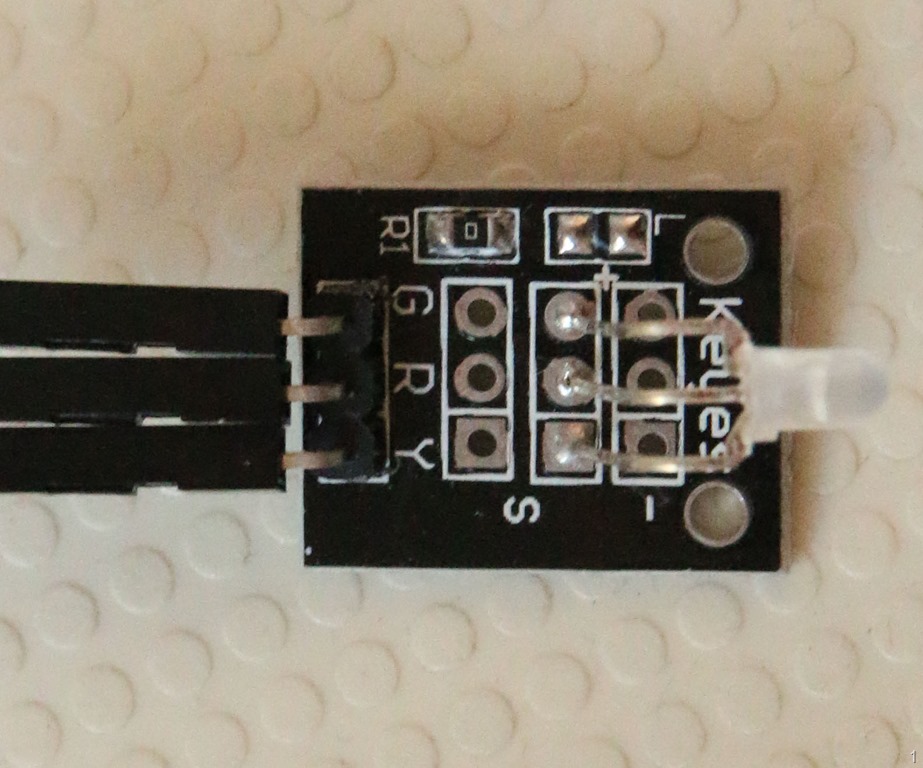
In this article I will show how you can measure temperature on a Raspberry PI2 using an Universal Windows Platform App. To this extent we will use a Keyes Analog-temperature sensor and an ADC0832 analog-digital-convertor, as well as a 2-color (red-yellow) LED to show what's happening (and whether anything is happening at all) when running headless
The hardware configuration has already been detailed in the first post of this series, this post will only detail a part of software.
Basic app setup
I have built this app using dependency injection, although not a very fancy sort, inspired by a colleague and some things I saw recently in code. The app that is intended to run on the Raspberry PI2 is called TemperatureReader (I have never been good at original names) and (mostly) TemperatureReader.Logic. You can find all the code in the demo solution. But of course I will highlight the way it's done.
All the UI that ss in the app it this single big TextBlock showing the temperature:
<Grid >
  <TextBlock Name="TemperatureText"
             VerticalAlignment="Center"
             HorizontalAlignment="Center" FontSize="100"></TextBlock>
</Grid
for I assume this device to run headless, but if it does not, it is nice to see something, right. In earlier post I already alluded to setting up this app as the default apps on a Raspberry PI2, which implies that whatever it does, it should start automatically. And although the UI does not amount to much, I have used the MainPage.xaml.cs to create all objects that are necessary and 'connect the dots' between them. You will see there's actually very little functionality there. In the MainPage_Loaded I first create all 'actors' in this dance of IoT controlling objects:
var gpioService = new GpioService();
var fanSwitch = new SwitchDevice(gpioService, Settings.SwitchPinId);
var controller = new AnalogTemperatureSensorController(gpioService);
var thermometer = new Thermometer(gpioService, controller);
var poster = new TemperatureQueueClient(QueueMode.Send);
var fanCommandListener = new FanSwitchQueueClient(QueueMode.Listen);
I have grayed out two lines, as they will be part of the next blog post. Then, a little bit lower, you see how these objects interact:
thermometer.OnTemperatureMeasured += async (thObject, data) =>
{
  data.FanStatus = fanSwitch.IsOn ? FanStatus.On : FanStatus.Off;
  await poster.PostData(data);
};

await poster.Start();
await thermometer.Start();
I use a bit of primitive dependency injection here, and keep the separate tasks - well, separated - and use only events and/or interfaces to loosely couple these objects. You will see all major objects have interfaces defined on them, and are only accessed using those interfaces - for instance, the constructor of the AnalogTemperatureSensorController expects an IGpioService, not a GpioService.
Anyway, I first create a base object GpioService, that will allow for some low level access to the Gpio pin. Then I create a low-level controller for the analog temperature controller, which is also pretty low level - and actually more controls the A/D converter than the temperature sensor itself. This uses the Gpio service (via it's interface) so it does not have to new up all that stuff itself. The Thermometer class is the class that actually exposes the temperature to the outside world, and also gives an indication of things happening using the LED. Finally, the TemperatureQueueClient, connected to the Thermometer by an OnTemperatureMeasured event subscription, simply posts temperature data on the Azure Service Bus queue as explained in the previous blog post
You will also notice there's another method in MainPage.xaml.cs is connected to the Thermometer.OnTemperatureMeasured but that is only used to display the temperature on the screen, and make the text in red and show some debug data when new data is received (so you can even see it's still posting data when the temperature has not changed):
private async void OnTemperatureMeasured(object sender, TemperatureData e)
{
  Debug.WriteLine(
   $"MainPage.OnTemperatureMeasured {e.Temperature}: {e.IsValid} at {DateTime.Now}");
  if (e.IsValid)
  {
    await Dispatcher.RunAsync(CoreDispatcherPriority.Normal, async () =>
    {
      var brush = TemperatureText.Foreground;
      TemperatureText.Text = $"{e.Temperature}°C";
      TemperatureText.Foreground = new SolidColorBrush(Colors.Red);
      await Task.Delay(250);
      TemperatureText.Foreground = brush;
    });
  }
}
The Gpio Service
This is actually a very simple class, and it's intent is to remove the necessity of calling Windows.Foundation.Metadata.ApiInformation.IsTypePresent every time you need a GpioController. You can now simply check whether the Controller property isn't null, which is a bit easier and shorter.
using Windows.Devices.Gpio;
namespace TemperatureReader.Logic.Devices
{
public class GpioService : IGpioService
{
public GpioService()
{
if (Windows.Foundation.Metadata.ApiInformation.IsTypePresent(
"Windows.Devices.Gpio.GpioController"))
{
if (Controller == null)
{
Controller = GpioController.GetDefault();
}
}
}
public GpioController Controller { get; private set; }
}
}
The Controller property unfortunately is defined as it's implementing class type in stead of an interface - there is, in fact an IGpioController class but that's internal. I have no idea why.
The AnalogTemperatureSensorController
This is the heart of the beast, the crux of the matter, or however you want to call this. A Raspberry PI2 cannot do much with an analog temperature sensor, as it is essentially a digital device. So as I explained before in the first blog post, we need to place an Analog/Digital converter in between and talk to that. And this converter is what this class talks to. It tries to read a temperature every five seconds and does this by
- Initializing a read session
- Initializing the the A/D converter
- Read two sequences of data from the converter
- If the result of those sequences are equal, a successful temperature reading was made
- The value is converted into degrees Celsius (sorry folks in the USA)
- The temperature is sent to all subscribers of the OnTemperatureMeasured event.
public AnalogTemperatureSensorController(
  IGpioService gpioCtrl,
  int adcCsPinId = Settings.AdcCsPinId,
  int adcClkPinId = Settings.AdcClkPinId,
  int adcDigitalIoPinId = Settings.AdcDigitalIoPinId,
  int delayMilliSeconds = Settings.DefaultTemperaturePostingDelay,
  int maxRetries = Settings.MaxReadRetry)
{
  _gpioCtrl = gpioCtrl;
  _adcCsPinId = adcCsPinId;
  _adcClkPinId = adcClkPinId;
  _adcDigitalIoPinId = adcDigitalIoPinId;
  _delayMilliSeconds = delayMilliSeconds;
  _maxRetries = maxRetries;
  IsMeasuring = false;
}
And all you have to provide is the Gpio service. The rest has default values that come out of the Settings definitions. You will see three pins connected to the A/D converter (5, 6 and 13, see the first blog post), the time between temperature reading (5000, or 5 seconds) and the maximum number of retries the component should try before admitting failure and telling that the outside world.
The "start" method kicks the whole process off
public bool Start()
{
  if (_gpioCtrl?.Controller != null)
  {
    IsMeasuring = true;

    if (_adcDigitalIoPin == null)
    {
      _adcCsPin = _gpioCtrl.Controller.OpenPin(_adcCsPinId);
      _adcClkPin = _gpioCtrl.Controller.OpenPin(_adcClkPinId);
      _adcDigitalIoPin = _gpioCtrl.Controller.OpenPin(_adcDigitalIoPinId);
    }

    if (_task == null)
    {
      _cancellationTokenSource = new CancellationTokenSource();
      InitReadSession();
      _task = new Task(async () =>
        await ExecuteMeasuring(_cancellationTokenSource.Token));
      _task.Start();
    }
  }
  return IsMeasuring;
}
It basically initializes the pins the component needs, then creates a task that runs indefinitely and measures the temperature every 5 seconds:
private async Task ExecuteMeasuring(CancellationToken cancellationToken)
{
  while (!cancellationToken.IsCancellationRequested)
  {
    var timePassed = DateTimeOffset.UtcNow - _lastExecutionTime;
    if (timePassed > TimeSpan.FromMilliseconds(_delayMilliSeconds))
    {
      var retries = 0;
      var readStatus = false;

      while (!readStatus && retries++ < _maxRetries)
      {
        readStatus = ReadData();
        _lastExecutionTime = DateTimeOffset.UtcNow;
      }

      if (retries >= _maxRetries)
      {
        OnTemperatureMeasured?.Invoke(this, new TemperatureData {IsValid = false});
      }
      _lastExecutionTime = DateTimeOffset.UtcNow;
    }
    else
    {
      var waitTime = _delayMilliSeconds - timePassed.TotalMilliseconds;

      if (waitTime > 0)
      {
        await Task.Delay(Convert.ToInt32(waitTime), cancellationToken);
      }
    }
  }
}
It looks rather complicated, but all it does is run indefinitely (until cancelled). It reads data (temperature) every five seconds. If reading fails, it tries again for 10 times (_maxRetries, supplied by constructor) and if it still fails, it will notify the outside world. In any case, it will wait for the rest of the _waitTime (5 seconds) before a new cycle of trying to read temperature again.
The ReadData method then is implemented as follows:
private bool ReadData()
{
  int sequence1 = 0, sequence2 = 0;
  _adcCsPin.Write(GpioPinValue.Low);

  InitReadSession();
  var waiter = new SynchronousWaiter();
  InitAdConverter(waiter);

  //Read the first sequence
  for (var i = 0; i < 8; i++)
  {
    _adcClkPin.Write(GpioPinValue.High);
    waiter.Wait(2);
    _adcClkPin.Write(GpioPinValue.Low);
    waiter.Wait(2);
    sequence1 = sequence1 << 1 | (int)_adcDigitalIoPin.Read();
  }

  //Read the second sequence
  for (var i = 0; i < 8; i++)
  {
    sequence2 = sequence2 | (int)_adcDigitalIoPin.Read() << i;

    _adcClkPin.Write(GpioPinValue.High);
    waiter.Wait(2);
    _adcClkPin.Write(GpioPinValue.Low);
    waiter.Wait(2);
  }

  _adcCsPin.Write(GpioPinValue.High);

  if (sequence1 == sequence2)
  {
    OnTemperatureMeasured?.Invoke(this,
      new TemperatureData { IsValid = true, Temperature =
        Math.Round(((255 - sequence1) - 121) * 0.21875,1) + 21.8,
        Timestamp = DateTimeOffset.UtcNow});
    return true;
  }

  return false;
}
It is important to understand that the A/D converter spits out data digital - but can do so only one bit at a time. So the whole stuff is done serially, that is: first one bit, than the other, via the _adcDigitalIoPin. But what you see are two loops. The _adcClkPin is turned on, then we wait for two milliseconds, then we turn it off again, then we wait for two milliseconds again, and then we read the _adcDigitalIoPin pin's value. We do that for every of the 8 bits. As a kind of parity, the second byte is read in the same way, but shifted in a different way into the resulting sequence variable. When the resulting integer values (sequence1 and sequence2) are the same, we have successfully read a temperature. I am not a bit shifting hero myself, so don't ask me the details, but this works. Now we only need to convert that to degrees Celsius.
From the Sunfounders manual I took a bit of code to do that, and got totally bizarre results. So I took a digital thermometer, made measurements on different times of the day and on different temperatures, and found out that the formula at the bottom of the ReadData method quite adequately converts the value the A/D converter spits out into temperatures (albeit it's mostly like 0.5-1 °C too high, but that's details. If you rebuild this with your own sensor, you might have to get some measurements yourself first to correct conversion values.
There are two important methods left: the InitReadSession method, that sets the drive mode for the three pins of the A/D converter to output
private void InitReadSession()
{
  _adcClkPin.SetDriveMode(GpioPinDriveMode.Output);
  _adcCsPin.SetDriveMode(GpioPinDriveMode.Output);
  _adcDigitalIoPin.SetDriveMode(GpioPinDriveMode.Output);
}
no rocket science there, just standard Windows 10 CoreIoT stuff - and then this gem, that is basically translated from C code in the Sunfounders manual
private void InitAdConverter(SynchronousWaiter waiter)
{
  _adcCsPin.Write(GpioPinValue.Low);
  _adcClkPin.Write(GpioPinValue.Low);
  _adcDigitalIoPin.Write(GpioPinValue.High); waiter.Wait(2);
  _adcClkPin.Write(GpioPinValue.High); waiter.Wait(2);

  _adcClkPin.Write(GpioPinValue.Low);
  _adcDigitalIoPin.Write(GpioPinValue.High); waiter.Wait(2);
  _adcClkPin.Write(GpioPinValue.High); waiter.Wait(2);

  _adcClkPin.Write(GpioPinValue.Low);
  _adcDigitalIoPin.Write(GpioPinValue.Low); waiter.Wait(2);
  _adcClkPin.Write(GpioPinValue.High);
  _adcDigitalIoPin.Write(GpioPinValue.High); waiter.Wait(2);
  _adcClkPin.Write(GpioPinValue.Low);
  _adcDigitalIoPin.Write(GpioPinValue.High); waiter.Wait(2);

  _adcDigitalIoPin.SetDriveMode(GpioPinDriveMode.Input);
}
Presumably, this in some way programs the A/D converter. The three pins get turned on and off and then there is a wait period of 2 milliseconds. What kind of instructions it gets - I have really no idea. I am guessing the 2 milliseconds have the same function as a semicolon in C# - end of statement. I hope that someone who reads this blog can enlighten me. But if you initialize the A/D converter this way, it will read temperature data in a intelligible way - that is, one that is compatible with what ReadData needs.
SynchronousWaiter
During the previous paragraph you may have noticed there are several calls to a SynchronousWaiter class. This is because I struggled with timings using await Task.Delay, but waiting for 2 milliseconds using that isn't really 2 milliseconds - it's usually more because of the callback overhead that's hidden under the hood of the await keyword. So here's SynchronousWaiter, a class the really only waits for the allotted number of milliseconds
using System.Diagnostics;

namespace TemperatureReader.Logic.Utilities
{
  class SynchronousWaiter
  {
    readonly Stopwatch _stopwatch;
    public SynchronousWaiter()
    {
      _stopwatch = Stopwatch.StartNew();
    }

    public void Wait(double milliseconds)
    {
      var initialTick = _stopwatch.ElapsedTicks;
      var desiredTicks = milliseconds / 1000.0 * Stopwatch.Frequency;
      var finalTick = initialTick + desiredTicks;
      while (_stopwatch.ElapsedTicks < finalTick)
      {

      }
    }
  }
}
and I won't pretend I wrote this myself - I was stuck on Task.Delay problems (albeit for a different sensor) and then a Microsoftie came to help
Thermometer
This class is best described as a wrapper hiding the intricacies of the AnalogTemperatureSensorController - and it handles the 'display' too, that is - it shows when data is read by blinking a LED either green or red, depending whether the temperature was successfully read or not. In addition, it shows a red/green blinking sequence when it starts up. The constructor follows the pattern we have already seen - most of what it needs (GpioService,and AnalogTemperatureSensorController) is injected to it from outside, and the pinsettings and other settings are optional and imported from the Settings class.
  public Thermometer(IGpioService gpioService,
    IAnalogTemperatureSensorController temperatureSensorController,
    int errorPinId = Settings.ErrorPinId, int dataPinId = Settings.DataPinId,
    int longFlashTime = Settings.LongFlashTime,
    int shortFlashTime = Settings.ShortFlashTime)
  {
    _gpioService = gpioService;
    _errorPinId = errorPinId;
    _dataPinId = dataPinId;
    _longFlashTime = longFlashTime;
    _shortFlashTime = shortFlashTime;
    _temperatureSensorController = temperatureSensorController;
  }
The start method initializes two pins for the LED, calls the ShowStartup method, then waits a few seconds, connects an event to the AnalogTemperatureSensorController and starts said controller (it assumes it is not started yet)
public async Task Start()
{
  _errorLed = new StatusLed(_gpioService, _errorPinId);
  _dataPinLed = new StatusLed(_gpioService, _dataPinId);

  await ShowStartup();
  await Task.Delay(WaitTimeBeforeStartup);

  _temperatureSensorController.OnTemperatureMeasured +=
     HandleTemperatureMeasured;
  _temperatureSensorController.Start();
}
The HandleTemperatureMeasure of the Thermometer class is basically just passing along the event to the outside - and blinks the LED according to the data provided by the AnalogTemperatureSensorController
async void HandleTemperatureMeasured(object sender, TemperatureData e)
{
  if (e.IsValid)
  {
    await _dataPinLed.Flash(_longFlashTime);
    OnTemperatureMeasured?.Invoke(this, e);
  }
  else
  {
    await _errorLed.Flash(_longFlashTime);
  }
}
The ShowStartup method, finally, shows the startup sequence.
private async Task ShowStartup()
{
  for (var c = 0; c < 3; c++)
  {
    _errorLed.SwitchOn(true);
    await Task.Delay(_shortFlashTime);
    _dataPinLed.SwitchOn(true);
    _errorLed.SwitchOn(false);
    await Task.Delay(_shortFlashTime);
    _dataPinLed.SwitchOn(false);
    await Task.Delay(_shortFlashTime);
  }
}
That is, it blinks the LED red-green for a couple of times. Note this is a yellow-red light, so turning the R pin only makes it red, turning on both both pins makes it green.
SwitchDevice
This is a class that is a logical wrapper for a 1-pin device that can be either turned on or off. It sports a constructor that turns the device off by default, a Switch method that sets the device to the desired state, a Toggle method that switches state, and an IsOn property that will allow you to check whether it's on or not:
using Windows.Devices.Gpio;

namespace TemperatureReader.Logic.Devices
{
  public class SwitchDevice
  {
    private readonly int _pinId;
    private readonly IGpioService _gpioCtrl;
    private GpioPin _pin;

    public SwitchDevice(IGpioService gpioCtrl, int pinId)
    {
      _pinId = pinId;
      _gpioCtrl = gpioCtrl;
      SwitchOn(false);
    }

    public void SwitchOn(bool @on)
    {
      GpioPin pin;
      if ((pin = GetPin()) != null)
      {
        pin.Write(@on? GpioPinValue.High : GpioPinValue.Low);
      }
    }

    public void Toggle()
    {
      SwitchOn(!IsOn);
    }

    public bool IsOn
    {
      get
      {
        GpioPin pin;
        if ((pin = GetPin()) != null)
        {
          var currentPinValue = pin.Read();
          return currentPinValue == GpioPinValue.High;
        }
        return false;
      }
    }

    protected GpioPin GetPin()
    {
      if (_pin == null)
      {
        if (_gpioCtrl?.Controller != null)
        {
          _pin = _gpioCtrl.Controller.OpenPin(_pinId);
          _pin.SetDriveMode(GpioPinDriveMode.Output);
        }
      }
      return _pin;
    }
  }
}
The private method GetPin makes sure the pin is initialized and sets it to the right (output) mode. But as you can see, I don't use a SwitchDevice, but a StatusLed.
StatusLed
A very simple child class of SwitchDevice that has an extra method Flash that turns on a LED for a certain number of milliseconds, then turns it off again. Easy as cake.
using System.Threading.Tasks;

namespace TemperatureReader.Logic.Devices
{
  public class StatusLed : SwitchDevice
  {
    public StatusLed(IGpioService gpioCtrl, int pinId) :
       base(gpioCtrl,pinId)
    {
    }

    public async Task Flash(int milliseconds)
    {
      SwitchOn(true);
      await Task.Delay(milliseconds);
      SwitchOn(false);
    }
  }
}
Conclusion
As you can see, by using loosely coupled high level components you can hide a lot of the low level complexity that is going on under the hood and let those components play together in a way that makes you can still understand after returning to your code after a while. Having said that, the low level things themselves can be quite daunting and I must admit that for some things I just clung to examples in C that worked - and then translated then to C#. It does not really matter - I quite often use software libraries a well whose inner workings I don't quite understand, but I feel a bit like threading on thin ice.
Yet, I still find it awesome I can just deploy this app to a Rasbperry PI2 that is connected via WiFi, remote, directly from Visual Studio, and debug it while it runs on the device. Be aware, though, that doing so while running time-critical code like in the AnalogTemperatureSensorController will introduce all kinds spectacular error. TL;DR - don't put breakpoints in that kind of code ;)
Thanks to Jesse Caplan for his explanation of issues with Task.Delay in time-critical code and the SynchronousWaiter sample.
Check the demo solution for all code running together.
Edit 18-09-2015 - simplified SwitchDevice.Toggle method considerably after comment from @robvanu - thanks!