
 MVP Profile
 Try my app HoloATC!
  HoloLens 2
 Magic Leap 2
 Android phones
 Snap Spectacles
 Buy me a drink ;)
 BlueSky
 Mastodon
 Discord: LocalJoost#3562
A Lens Studio component to let the user locate points on the floor in Spectacles
If you’ve tried my prize-winning app HoloATC for Snap Spectacles, you may have seen this component used for placing the map center on the ground. It basically tracks your head, suggesting you look at the floor. If you do so, a flat square appears on the floor, rotated towards you, with text telling you to pinch to select a location. Then the map of the chosen airport appears, with the chosen location as center, and the app continues to show air traffic.
There is a component in the Snap Package Manager that does more or less that, but of course, mine is better 😁. Just kidding - but I needed something that separated the actual acquiring of the location from what is actually done with that location. The sample code, indeed, just spawns an object (a 40 x 40 x 40 cm purple cube), so from a functional perspective, the sample is the same as the Snap samples. However, it lends itself to more architectural approaches, and larger or more complex apps.

Using my Locator is a four-step process with an optional fifth.
1: Provide a Spatial Map
When placing things on the floor, Spectacles needs to know about a floor. So the first thing you add to your scene is something to create a world mesh, preferably an occluding one, as that is more realistic. I simply nicked the one I made for CubeBouncer.

And yeah, I still use “HologramCollection” as my root, and I still call virtual objects holograms. When you’ve been (mostly) in the HoloLens space for nearly a decade, things tend to stick 😉.
2: Drag the Locator prefab into your scene

Well, that was easy, right?
3: Drag the world mesh provider into the World Mesh field
On top of the Locator prefab, there’s the LocationController script. Drag the Occluded Collider World Mesh from the scene into the World Mesh field in the Locator prefab.
4: Write some code to actually interact with the component
I know, low-code, codeless, and things you can drag-and-drop together are all the rage, but I am a code jockey and I want to use it in a properly architectured application. So there always needs to be some kind of ‘controller’ that actually steers the component. In HoloATC, it only passes the new value back to a State service. In this sample, this controller simply spawns an object.
import { Pose } from "LocalJoost/Utils/Pose";
import { ViewDirectionLocator } from "LocalJoost/ViewDirectionLocator/Scripts/ViewDirectionLocator";

@component
export class LocatorController extends BaseScriptComponent {

   @input viewDirectionLocator: ViewDirectionLocator;
   @input private readySound: AudioComponent
   @input private locationObjectPrefab: ObjectPrefab;

   onAwake() {
      const delayedEvent = this.createEvent("DelayedCallbackEvent");
      delayedEvent.bind(() => this.initialize());
      delayedEvent.reset(1);
   }

   private initialize(): void {
      this.viewDirectionLocator.onLocationDetermined.add(this.onLocationDetermined.bind(this));
      this.viewDirectionLocator.start();
   }

   private onLocationDetermined(pose: Pose) {
      this.readySound.play(1);
      var newLocationObject = this.locationObjectPrefab.instantiate(this.getSceneObject());
      newLocationObject.getTransform().setWorldPosition(pose.position);
      newLocationObject.getTransform().setWorldRotation(pose.rotation);
      print("Object created");
   }
}
Some things of note:
ViewDirectionLocatoris a script that controls the Locator. More about that later. Just to get it going, it’s enough to know that- It has a public method
start()that will start the location process - It has a public method
stop()that will stop the location process (all components are made invisible) - It has an event
onLocationDeterminedthat will return aPoseobject; this holds both aposition(vec3) and arotation(quat). In Unity, we have such an object as well, and although it has more capabilities there, I found it convenient to at least have an object that allowed me to pass a rotation and a position in one go.
- It has a public method
This LocatorController script sits in the HologramCollection game object, together with some audio:
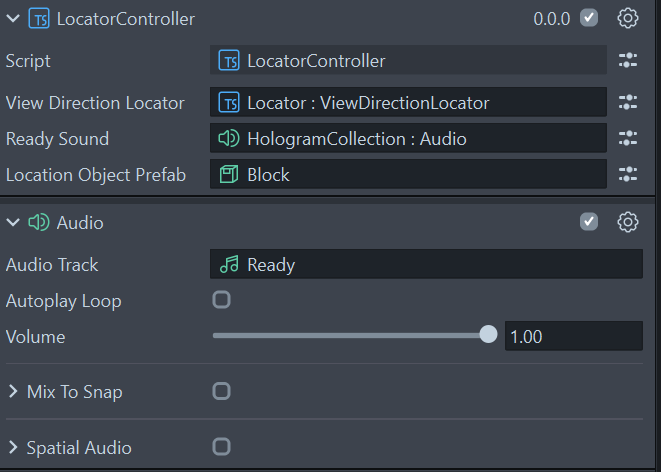
And then it’s simply a matter of filling in the inputs: drag the ViewDirectionLocator from the Locator prefab into the View Direction Locator field, drag an Audio component into the Ready Sound field, and a Prefab you want to have spawned into the Location Object Prefab. Like I said, this is not the way I use it, but it’s the easiest way to show how this component actually works.
5: Change settings in the prefab (optional)
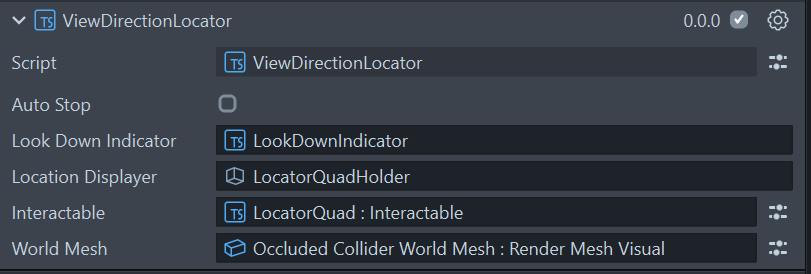
We already saw that the ViewDirectionLocator in the Locator prefab has five inputs. Apart from the World Mesh input, which you must set, there is also one you can set: “Auto Stop”. If you set that to true, the Locator stops itself after you’ve selected one location. This is the way I used it in my app - in this sample, it just goes on placing blocks until either your entire room is purple, or the battery of your Spectacles runs out.
So how does this work?
The above is enough to get it working and use the component to get a floor location from the user. For the more curious, I’ll unpack a bit more in detail about how this works. Speaking of unpacking, here’s the Locator prefab in detail:
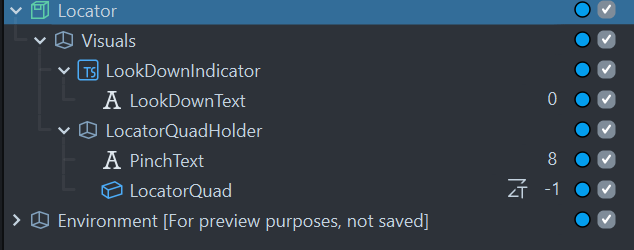
To understand how this works, note that the LookDownIndicator component has both a HeadLock and a BillBoard.
This ensures the text “Please look down at the floor” stays in view and rotated toward the user while they are not looking at the floor yet.
The PinchText component has a BillBoard, but no HeadLock, so it stays in place but is always rotated toward the user.

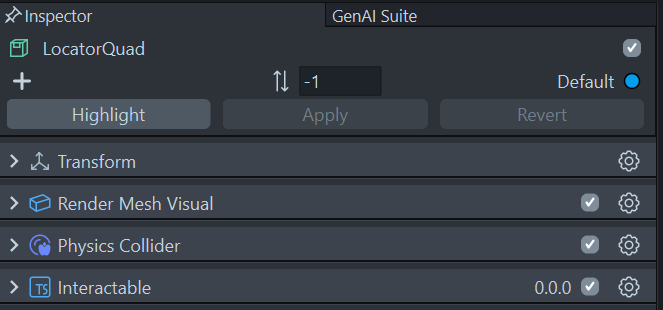
And finally, the LocatorQuad has an Interactable that plays a small role as well.
But the most important part is the ViewDirectionLocator script that sits on top of the prefab.
ViewDirectionLocator: Variables and declarations
First, the inputs already shown in the picture above:
@component
export class ViewDirectionLocator extends BaseScriptComponent {
    @input lookDownIndicator: SceneObject;
    @input locationDisplayer: SceneObject;
    @input autoStop: boolean = true;
    @input interactable: Interactable
Next, the event any listening components can subscribe to:
private onLocationDeterminedEvent = new Event<Pose>();
public readonly onLocationDetermined = this.onLocationDeterminedEvent.publicApi();
I already described events in Lens Studio TypeScript in a previous blog.
Then, some things we need from the system:
private cameraTransform = WorldCameraFinderProvider.getInstance().getTransform();
private locationDisplayerTransform: Transform
private probe = Physics.createGlobalProbe();
private handProvider: HandInputData = HandInputData.getInstance();
private leftHand = this.handProvider.getHand("left" as HandType);
private rightHand = this.handProvider.getHand("right" as HandType);
Basically the camera and hands. This is because we need both the camera position to point to a location and the hands to select one. After that, some internal housekeeping:
private locationDisplayerTransform: Transform
private hitFailureCount = 0;
private reportCount = 0;
private lastPose: Pose = null;
private isActive: boolean
private isInitializedOnce: boolean;
And finally, some constants you can fiddle with if you so desire:
private readonly MIN_VERTICAL_DISTANCE = 75;
private readonly EPSILON = 0.01;
private readonly MAX_RAY_LENGTH = 10000;
- MIN_VERTICAL_DISTANCE: the minimal vertical distance between the camera and what we assume to be the floor. 75 cm should be enough even if you sit on a low chair.
- EPSILON: minimal difference between two floats before we consider them equal. Usage will become clear in code.
- MAX_RAY_LENGTH: maximum distance from the user where locations can be selected (10 m).
Initialization, starting, and stopping
Our trusted onAwake method simply sets up some basic things, most notably setting up a listener trapping the Update event:
onAwake(): void {
    this.stop();
    this.locationDisplayerTransform = this.locationDisplayer.getTransform();
    this.createEvent("UpdateEvent").bind(this.onUpdate.bind(this));
}
The start method, that needs to be called from your controlling code, kicks off the location process:
public start() : void   {
    this.hitFailureCount = 0;
    this.reportCount = 0;
    this.setDisplayStatus(false);
    this.isActive = true;
    this.interactable.enabled = global.deviceInfoSystem.isEditor();
    if(this.interactable.enabled && !this.isInitializedOnce)
    {
        this.interactable.onInteractorTriggerStart.add(() => this.reportLocation(true));
    }
    this.isInitializedOnce = true;
}
The fields hitFailureCount and reportCount are used to prevent the process from being too trigger happy, which will become clearer later. The method setDisplayStatus is called to set the display status to ‘no hit’, so users will be suggested to look down (if they are not already doing so). Note the interactable field - this is only enabled in Lens Studio, not in the deployed app. This is so you can test easily within the Lens Studio Interactive Preview using a mouse click, which is very useful since the pinching hand gesture simulation has been removed a couple of Lens Studio versions ago.
The Update loop
The onUpdate method is where it basically all happens, and is the most cryptic piece of code:
private onUpdate() {
    if (!this.isActive) {
        return;
    }
    const camPos = this.cameraTransform.getWorldPosition();
    const camForward = this.cameraTransform.forward;
    this.probe.rayCastAll(camPos,
            camPos.sub(camForward.mult(VectorUtils.scalar3(this.MAX_RAY_LENGTH))), (hits: RayCastHit[]) => {
            var hit = this.getFirstValidHit(hits);
            if( hit !== null) {
                this.onHitTestResult(hit, camForward, camPos);
            }
        });
    if (this.leftHand.isPinching() || this.rightHand.isPinching()) {
        this.reportLocation();
    }
}
Two main things are happening here:
- A ray cast is done from the camera position in the direction of the camera’s looking direction (i.e. forward).
- If it yields at least one valid hit,
onHitTestResultis called, with the hit info, as well as the camera’s forward and position at the moment of the hit.
- If it yields at least one valid hit,
- If one of the hands is pinching,
reportLocationis called.
What is a ‘valid’ hit?
Simply, any hit that is on the spatial mesh, i.e. the worldMesh scene object:
private getFirstValidHit(hits: RayCastHit[]): RayCastHit {
    for (let i = 0; i < hits.length; i++) {
        const hit = hits[i];
        if (hit.collider.getSceneObject() === this.worldMesh.getSceneObject()) {
            return hit;
        }
    }
    return null;
}
This method simply gets the first hit that is on the spatial mesh. All other hits are ignored.
Checking if the hit can be processed
private onHitTestResult(hit: RayCastHit, camforward: vec3, cameraPosition: vec3) {
     if (hit === null) {
         this.processHitResult(false);
     } else {
         if (1 - Math.abs(hit.normal.normalize().dot(vec3.up())) < this.EPSILON &&
             cameraPosition.y - hit.position.y > this.MIN_VERTICAL_DISTANCE) {
             this.processHitResult(true);
             const toRotation = quat.lookAt(
                new vec3(camforward.x, 0, camforward.z).normalize(), vec3.up());
             this.locationDisplayerTransform.setWorldPosition(hit.position.add(new vec3(0, 5, 0)));
             this.locationDisplayerTransform.setWorldRotation(toRotation);
         } else {
             this.processHitResult(false);
         }
     }
 }
The flow is as follows:
- If the hit is null, discard.
- If the hit’s normal has a very shallow angle with the world up (we want a horizontal surface!) and the hit is at least 75 cm below the camera:
- We report the hit as fit for processing.
- We calculate a rotation that makes the location displayer (i.e. the pulsating quad) look at the camera.
- The
locationDisplayeris shown 5 cm above the hit, at the calculated rotation. Because if you place it exactly at the same height as the hit, chances are the bottom of your object disappears partially below the spatial mesh occlusion. As I found out when I built this.
Processing the hit
This is a bit of a funky method. The idea is that it determines when either the ‘look down’ or the ‘pinch’ text is displayed, depending on isHit. After 10 failed hits, we assume the user is not looking at the floor, and we show the ‘look down’ text. This is to prevent the texts from flickering from one state to the other.
private processHitResult(isHit: boolean, force: boolean = false) {
    if (!this.isActive) {
        return;
    }
    if (isHit) {
        this.hitFailureCount = 0;
    }
    else {
        this.hitFailureCount++;
        if (this.hitFailureCount < 10 && !force) {
            return;
        }
    }
    this.setDisplayStatus(isHit);
    this.lastPose = isHit ? Pose.fromTransform(this.locationDisplayerTransform) : null;
}
If there is a successful hit, the pose from the locationDisplayer, set by onHitTestResult, is read into the lastPose field.
Reporting the location
As you might remember, in onUpdate we have this little piece of code:
if (this.leftHand.isPinching() || this.rightHand.isPinching()) {
    this.reportLocation();
}
The reportLocation method checks if we have a pose in lastPose, and if this method has been called at least 10 times. If so, the onLocationDeterminedEvent is invoked, and the LocatorController does with it whatever it wants (in our case, place a purple block):
private reportLocation(force : boolean = false) {
    if (this.lastPose !== null) {
        if(this.reportCount++ < 10 && !force) {
            return;
        }
        if(this.autoStop) {
            this.stop();
        }
        this.reportCount = 0;
        this.hitFailureCount = 0;
        this.onLocationDeterminedEvent.invoke(this.lastPose);
        this.lastPose = null
    }
}
Why the 10-times check again? The check on pinching happens in the onUpdate method, which is called every frame. If we would not have this check, every pinch would not place one, but a rapid succession of blocks - because the Spectacles update loop is very fast compared to a human movement.
In essence: in every frame, we collect a potential location and a potential pinch. Think of these as more or less separate processes. The method onHitTestResult is continuously collecting potential poses; the isPinching check tries to intercept the last location. If a pinch meets a valid pose, it is reported to the outside world.
Concluding words
To be honest, the general flow of this component comes 1:1 from Unity, although in the process of building it, it morphed quite a bit to fit the way TypeScript works in Lens Studio. It is not meant to be used in a low-code or even codeless environment, as I already stated - because I am a code jockey, I tend to glue things together in code. I do hope it’s useful for my fellow code jockeys ;)