
 MVP Profile
 Try my app HoloATC!
  HoloLens 2
 Magic Leap 2
 Android phones
 Snap Spectacles
 MetaLense 2
 Buy me a drink ;)
 BlueSky
 Mastodon
 Discord: LocalJoost#3562
Getting the Unity Localization Package to work with HoloLens
Since parties outside of the Netherlands seem to have become very interested in the current product I am working at for Velicus, I was looking into multi language support (‘localization’) for HoloLens applications. Unity has a package that is nearly finished - aptly called “Localization” - which seems to be exactly what we want: you can make string and assets tables, so things like texts, buts also graphics, audio and basically any asset you want can be changed based upon a locale.
It comes with a very good quick start tutorial, is easy to set up, and you get a very nice locale drop down in play mode. This enables you to quickly switch locales, and you can verify the UI is looking good in all languages pretty easily that way.
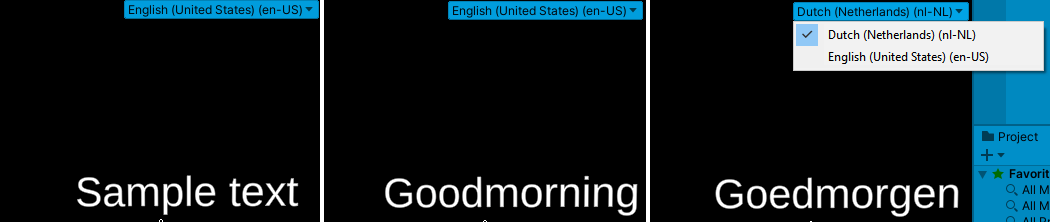
From left to right - default text, English and Dutch. Awesome, right?
That is, until you try to run it on HoloLens. Then the result is:

Simply the default text. Meh.
Missing steps overview
Fortunately you can actually get it to work - it turns out the quick start seems to be missing a few steps. At least, where HoloLens is concerned. There is a rather illogical sequence of steps you need to follow. Assuming you have followed the unity quick start, you will need to do the following:
- Mark the Localization Settings as Addressable
- Select the labels of your locales in the default group
- Build the addressable groups
- Click “Add All” in the Localization Settings
- Build the addressable groups again
Missing steps in more detail
Preface
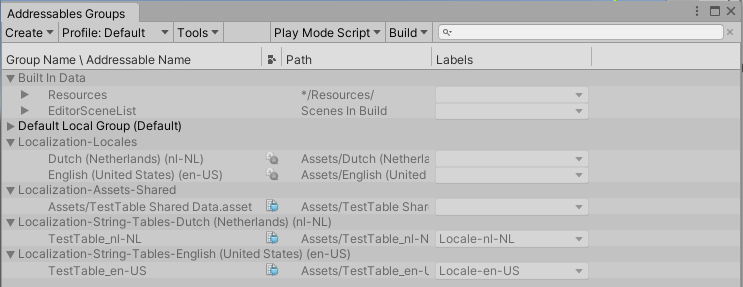
You can best see what is going on if you first open the Addressable Groups window like this:
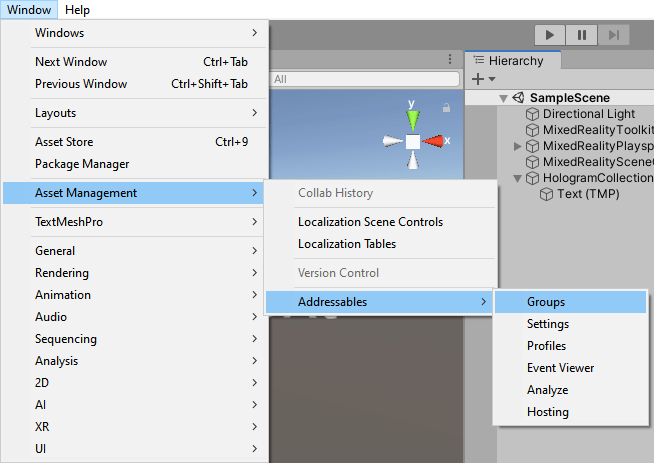
Which will show you this window:
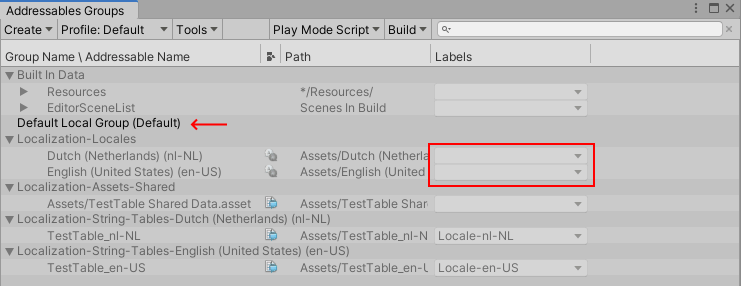
I have marked a few areas of interest, which are now empty - and they should not be. Notice, especially, the “Default Local Group (Local) is empty.
1. Mark the Localization Settings as Addressable
Find the Localization Settings (LocalizationSettings.asset)
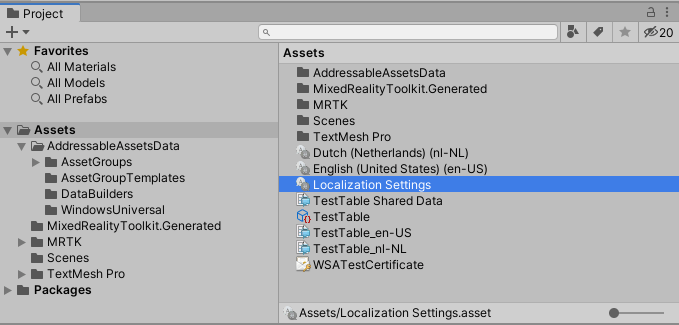
and select it. In the inspector, you will get this UI:
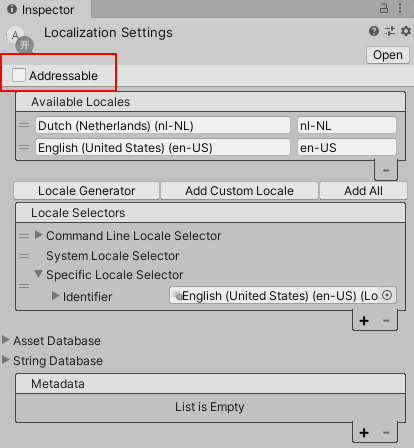
Check the check mark I have indicated with a red box
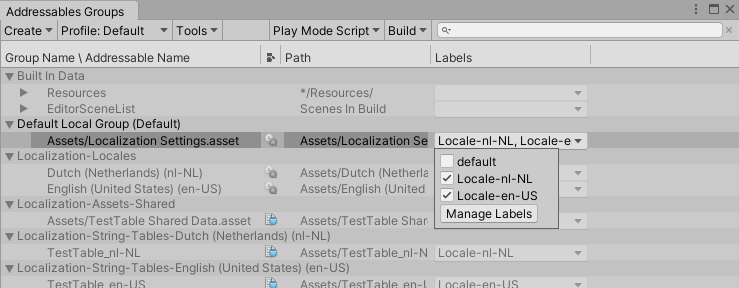
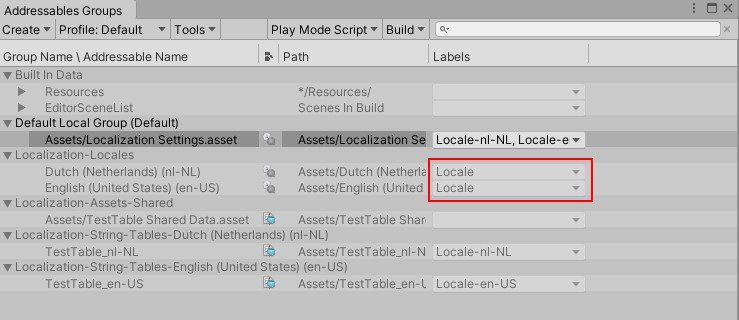
2. Select the labels of your locales in the default group
Now if you go back to the Addressable Groups window, you will notice you can actually expand the Default Local Group
If you do so, you will get a drop down, which enables you to select locales. I have selected the locales I have created - I have no idea why there’s a ‘default’, what it does or what it’s for, but apparently we don’t need it. So I select locales like this:
3. Build the addressable groups
Unity describes how to do this in their quick start, but to make things easier, I added a screenshot showing how to do this:

Do not skip this step or the next step won’t work
4. Click “Add All” in the Localization Settings
Go back to Localization Settings you opened in step 1
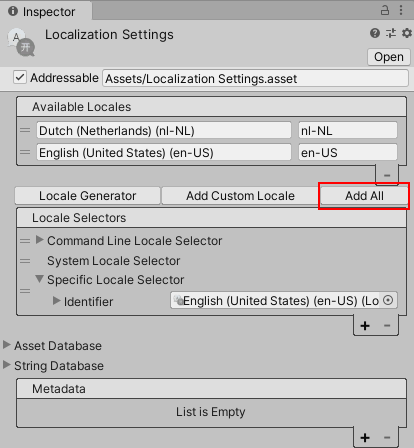
Click the “Add All” button. This may take a second. In the Addressable Groups window you will see the Localization-Locales getting filled with “Locale”
5. Build the addressable groups again
Repeat step 3
6. Victory!
Now build the app from Unity and deploy from Visual Studio like you normally would, and if you did everything right, a HoloLens set to English/US settings it wish you good morning ;):

Files and file changes
These steps have influenced only three files, which you can see if you check the demo project. Between the first commit (that does not work) and the second, only these files are changed:

A word of warning
This all works very well, but has a significant drawback when multiple people are adding texts. The addressables_content_state.bin is a binary file and this creates a bottleneck - as well as a big source of merge conflicts. Especially as any addressable group build leads to a change, even if nothing changes in de addressable groups - it looks like the build time is stored inside (and thus updated). We are considering not storing this file in GIT but making the addressable groups build part of the build procedure, as it’s a generated file anyway.
Concluding words & credits
This is still a preview, and it definitely has some quirks, but it’s very usable. In the demo project you can see the complete project including the changes I have made over the cause of this blog in the main branch. In the quickstart branch you get the not-working version, which you get if you follow Unity’s quick start - without ‘my’ additional steps.
At least part of the credits in finding these missing steps go to my colleague Timmy Kokke aka Sorskoot, who, in his own words, ‘hunted various forums post and then clicked some buttons and check boxes bit randomly and then it worked’. The interesting challenge then was to find out which steps actually contributed to the solution and turn into a minimal reproducible set of steps - which I just did. And while I was at it, blogged it was well, a usual.