
 MVP Profile
 Try my app HoloATC!
  HoloLens 2
 Magic Leap 2
 Android phones
 Snap Spectacles
 Buy me a drink ;)
 BlueSky
 Mastodon
 Discord: LocalJoost#3562
Lens Studio Cube Bouncer for the confused Unity developer: controlling the app from the hand menu
In the previous post we created a hand menu to control the app. Pardon, ‘lens’. Now we are actually going to make the hand menu do something. To be precise:
- Re-create the cube grid from scratch, in front of your camera
- Drop all the cubes to the floor
- Move all the cubes back to their start position (in about 1 second)
So not only will you see the hand menu work, but I will also show you how to turn on gravity and how to move stuff via a lerp construct (which you probably will know from old skool Unity).
Hand menu controller
This will only be used to pass on button clicks - eventually - to the CubeManager. If you have developed in Unity and the MRTK, this is fairly simple. You just define a controller behavior with three public methods, and in the editor, you connect them to a public method. You make sure the controller behavior has access to the CubeManager, and call the appropriate CubeManager method from the controller behavior. In Lens Studio, this works… slightly different. For starters, you will have to make that connection via code, but there’s other weird things.
Anyway, right now we can only call one method in CubeManager (createGrid), let’s get that wired up first, the rest will come later. We of course start again with some imports:
import { CubeManager } from "./CubeManager"
import { Interactable } from "../../SpectaclesInteractionKit/Components/Interaction/Interactable/Interactable"
Interactable is the component on the button we need to be able to latch onto events
@component
export class HandMenuController extends BaseScriptComponent {

    @input createNewGridButton: SceneObject;
    @input dropAllButton: SceneObject;
    @input revertAllButton: SceneObject;
    @input cubeManager:  CubeManager;
We need a reference to each button, and the CubeManager of course since that is actually controlling the cube creation process (and more soon). I’ll continue at the bottom first now, to show the way you actually connect a method to a button click:
private addTrigger(button: SceneObject, callback: () => void) {
    var interactable = button.getComponent(Interactable.getTypeName()) as Interactable;
    interactable.onTriggerEnd.add(callback);
}
This gets an Interactable from the button scene object, and adds the callback method (specified as a parameter-less void) to the onTriggerEnd event method. Easy enough, right? Anyway, to be able to start adding buttons - we can’t do that on onAwake, as the buttons aren’t ready apparently (also again something I learned by trial, error, and cursing), so I used the weird wait construction again that I also showed when getting a reference to the camera in a previous blog post:
onAwake() {
    const delayedEvent = this.createEvent("DelayedCallbackEvent");
    delayedEvent.bind(() => {
        this.initializeButtons();
    });
    delayedEvent.reset(1);
}
Translation: wait one second before calling initializeButtons. A method that should look like this, don’t you think?
private initializeButtons() {
    this.addTrigger(this.createNewGridButton, this.cubeManager.createNewGrid);
}
Wrong. Because if you use it like this, a reference to “this” will always be HandMenuController and continue to be so even inside methods of CubeManager. This can drive a developer used to a decently designed programming language to complete insanity, because there’s no warning or hint this might be the case. Why this is? Because TypeScript is a child of JavaScript and Hopper knows what kind of mushrooms the creators of this piece of JavaScript might have been smoking while they were designing it (or, more likely, carving it in the bar with a knife). But the thing is this: when something is called from an event, the ‘sticky this’ occurs. In C# this is not even possible as you are inside an object. Why is this might be even useful? I don’t smoke mushrooms, and I really can’t tell. Fortunately, there is a weird construction that you can use to make a call like this behave like it would be in any sensible programming language at this particular point:
private initializeButtons() {
    this.addTrigger(this.createNewGridButton,
                    this.cubeManager.createNewGrid.bind(this.cubeManager));
}

Let’s make it work!
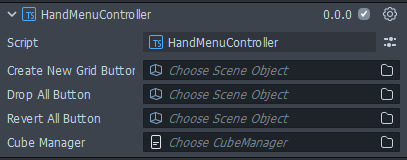
Go to your HandMenu prefab, double-click it, and in the Inspector, click “+ Add Component”. Select “HandMenuController”. Then, drag the “CreateGridButton” onto the “Create Grid Button” field:
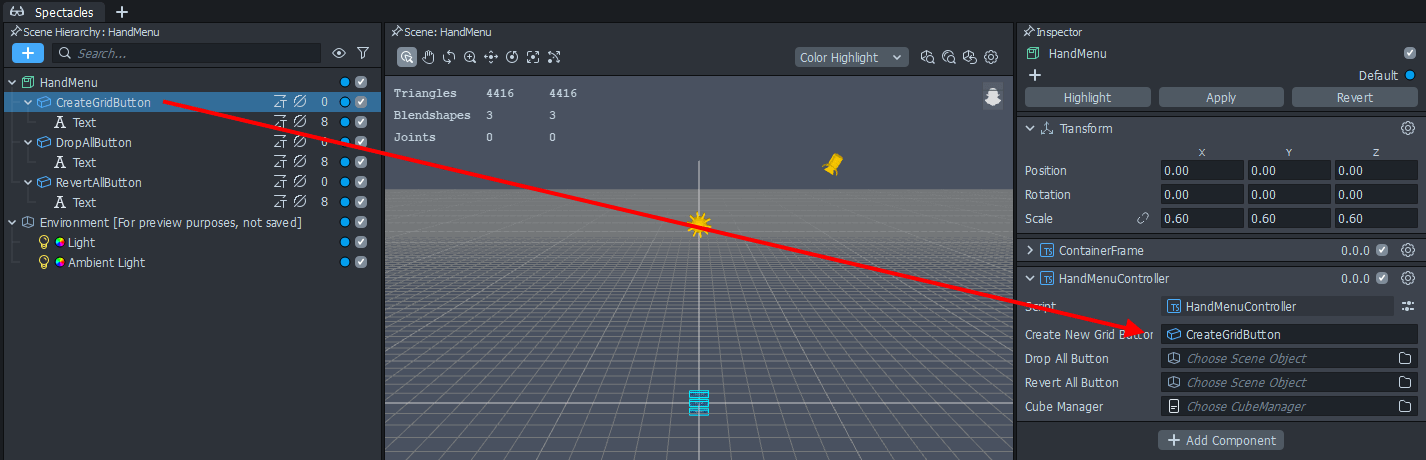
Repeat for DropAllButton and RevertAllButton. When you are done, don’t forget to hit Apply!
Now open the Scene again. And we will see something annoying. If you select the HandMenu there, in the Inspector, the hand menu is not updated.
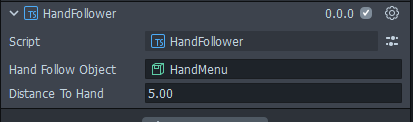
This is probably a bug. So what you can do best now is delete the HandMenu prefab from the scene, then add it again to the Scene by dragging it from the Asset browser. Now the three button fields are displayed in the scene as well. But you will so need to go back to the HandFollower script that’s in HologramCollection and assign the Hand Follow Object again.
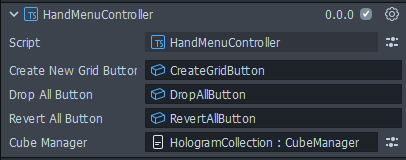
Anyway, select the HandMenu Prefab in the scene and go to the HandMenuController component in the Inspector, click the “Choose CubeManager” field and select the CubeManager in HologramCollection:

It should show this when you are done:
And if you have followed my instructions to the letter, the “Create Grid” button will now create a new grid before your Spectacles every time you hit it.
Dropping the cubes
This is a simple process. First of all, we open CubeController.ts and add the following code:
public drop(): void    {
    this.enableGravity(true);
}
And in case you had forgotten: enableGravity is explained here.
In CubeManager.ts we add:
public dropAll() : void {
    for (const cube of this.cubes) {
        cube.drop();
    }
}
And finally, in HandMenuController.cs we add a second line to initializeButtons:
this.addTrigger(this.dropAllButton,
  this.cubeManager.dropAll.bind(this.cubeManager));
}
Move all cubes back to their original position
What we want to achieve is this:
In about one second the cubes move back to their original position. Dead easy to make in Unity, once you have stuff like LeanTween. But we don’t have that here. So I literally had to delve back well over 8 years into my blog to see how I did it back then in 2016. With a co-routine, and lerping. Goodness gracious. Anyway, my first versions failed horribly as they locked up the main thread, the cubes moved erratically, or did not end up in the right place. What I ended up with was the following. Let’s start with the top of the method revert in CubeController:
public async revert() : Promise<void> {
    const time = 1;
    this.enableGravity(false);
    var startPosition = this.getTransform().getWorldPosition();
    var startRotation = this.getTransform().getWorldRotation();
    this.bodyComponent.enabled = false;
    var i = 0;
    var rate = 1.0 / time;
    while (i <= 1)
    {
        i += getDeltaTime() * rate;
        this.getTransform().setWorldPosition(
           vec3.lerp(startPosition, this.originalPosition, i));
        this.getTransform().setWorldRotation(
          quat.slerp(startRotation, this.originalRotation, i));
Well, the first part does not look so bad, and in fact, rather like the Unity version. Apart from that weird Promise<\void\> which I don’t understand completely, but apparently is necessary. We turn off the gravity and disable the PhysicsBody (and thus the collider), keep the start position and rotation so we know what to lerp from, and we lerp to the original position and rotation of the cube, so far so good.
The next line is a bit unexpected:
await this.yieldControl();
This is kind of like Task.Yield in Unity. At least it seems to do more or less the same: it prevents locking up the main thread and thus the display refresh. Only you have to define that yourself:
private yieldControl(): Promise<void> {
    return new Promise(resolve => {
        this.createEvent("UpdateEvent").bind(() => {
            resolve();
        });
    });
}
I can only say: don’t ask me, it works. Then the last part of the revert method is also interesting:
this.getTransform().setWorldPosition(this.originalPosition);
this.getTransform().setWorldRotation(this.originalRotation);
this.bodyComponent.velocity = new vec3(0, 0, 0);
this.bodyComponent.angularVelocity = new vec3(0, 0, 0);
this.bodyComponent.enabled = true;
Whatever I tried, I never could get the lerp end in exactly the same position or rotation as it came from, maybe it’s something with calculation precision - beats me. In the end, I just added two lines directly after the lerp loop making sure they are back in the same position. Then another fun thing: where in Unity messing with “IsKinematic” resets all things in a RigidBody to default values, this does not happen in a PhysicsBody, and if you enable it again, it still retains the last velocity and angular velocity. Result: the cube started spinning and moving just like before the lerp as soon as I enabled the PhysicsBody again. However, if you set those values to zero yourself, your game object, pardon, scene object stays put after you enable the PhysicsBody again.
For the finishing touch: go to CubeManager again and add this method:
public revertAll() : void {
    for (const cube of this.cubes) {
        cube.revert();
    }
}
and add this line to HandMenuController.initializedButtons
this.addTrigger(this.revertAllButton, this.cubeManager.revertAll.bind(this.cubeManager));
and you are done. The hand menu is fully functional
Concluding words
While the first two hand menu functions were pretty straightforward, the revert method caused me quite some headaches. I can tell you, before arriving at this (finally) working code, I was one hell of a confused Unity developer. But hey, it works now, even if I don’t always quite understand still why some things are necessary. But then again, that is not something that’s unusual in Unity either.
The app so far can be found at GitHub, branch “blog4”