Lens Studio Cube Bouncer for the confused Unity developer: set up, create box, create a grid of boxes
All right, time to build something with Lens Studio. I am going to show you how to build Cube Bouncer for Spectacles: smash cubes with your hand, let them bounce off each other, the walls and floor, let them drop on the floor and come back to the original position. This may sound like a very trivial application - which is true from a functional standpoint - but there’s a lot in it:
- A re-implementation of my Hand Smash Service in Lens Studio
- An implementation of an MRTK style Hand Menu in Lens Studio
- How to set up a spatial map, including a collider to bounce off from, and occlusion
- How a behavior looks in Lens Studio
- How to get the camera position
- Vector math
- Deal with collisions
- What’s the rigid body equivalent and how you can use it to mess with gravity
- How to play sounds, deal with spatial sound and deal with Spectacles limitations around that
Over a couple of blog posts, I am going to walk through it. I am not sure at this point how much - we’ll see how it develops. This first hands-on blog is meant to give the confused Unity developer some handholds to get familiar with the unfamiliar-yet-very-similar-but-subtly-different Lens Studio environment. You will notice the strides getting bigger the further we go. But a wise person once said: you gotta learn to crawl before you can walk, learn to walk before you can run, learn to run before you can fly. We confused Unity developers have one advantage: we already know we can fly. Only, instead of this giant 747 we are used to flying, we now have to get to grips with this peculiar unfamiliar aircraft.

Set up a project
But let’s start at the beginning. Set up a project. Like I said in my previous post, simply start with a starter project.
And then I tend to remove this from the Scene Hierarchy:
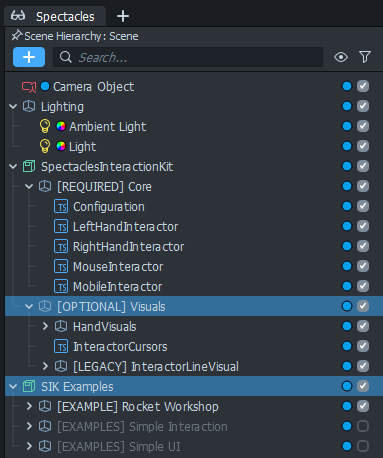
And this from the Asset Browser:
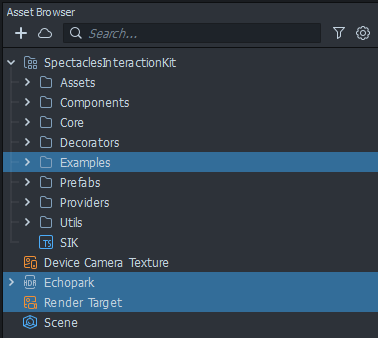
Because I like to keep stuff clean. Finally, I create a root folder for my own stuff, and some folders I know I am going to need. A habit I got from working with Unity - keep your stuff apart from third party or system stuff, so you can easily reuse it and keep oversight.

Now go to File/Project Settings and name your Lens.
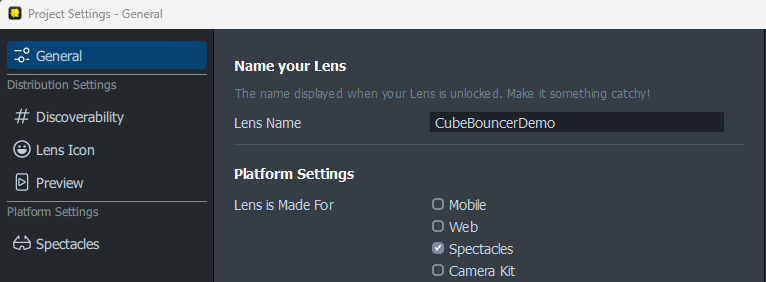
Then hit “File/Save” and choose a name for your project. This may be a different name than your Lens, but that is not quite logical. Note that Lens Studio makes a folder with your Lens name, and within that folder comes an .esproj file, and folders with all of your stuff. Please hit CTRL+S sometimes, because apart from similar concepts, intended purpose and general look & feel Lens Studio shares another feature with Unity - it sometimes crashes.
Create a box prefab
Texture and material
A texture is simply an image, just as in Unity. So I asked Copilot in Edge for “an image of a friendly cartoonish ghost on a yellow background”

Create the material by right-clicking the Materials folder you just created, then Create Asset/Materials/Empty Material. Call your material “Box Material”. It also creates an Empty shader - delete that
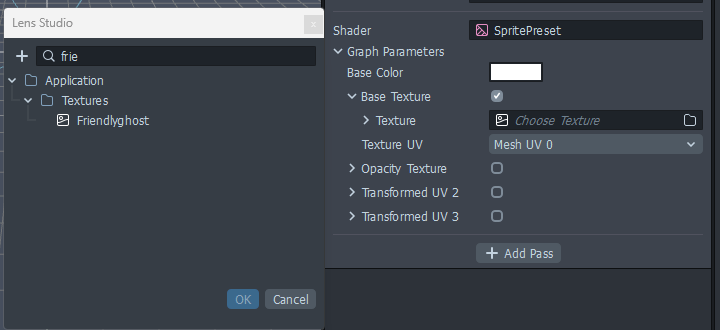
Select the material in the Asset Browser, then over in the Inspector, click the pink “Choose shader”, enter “Sprite” in the search box and select the “SpritePreset” shader. Hit OK.
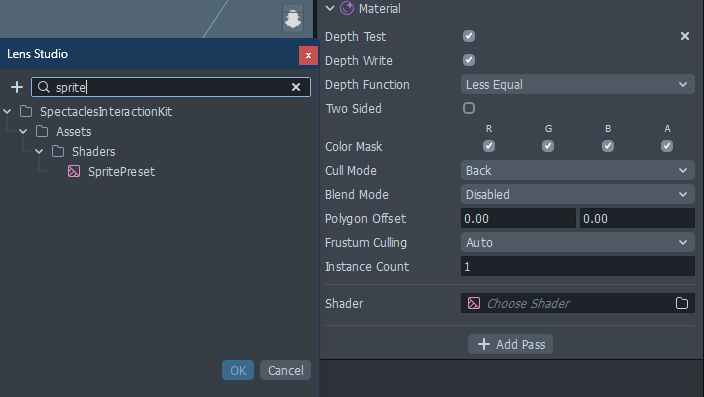
Then expand “Base Texture”, select the check box behind it and click “Choose texture”. The search box comes up, enter “frie” and your texture shows up already - select it, hit OK and your material is done.
Note: you can also drag directly from your asset browser to select shaders, textures etc. instead of using the search box if you prefer that, but I have often found that selecting a folder with assets to select from removes your existing selection, which you then have to reselect again - this is easier.
The box itself: mesh and rigid body (pardon, ‘physics body’)
Right-click on an empty spot in the Scene Hierarchy, and select “Create Scene Object”
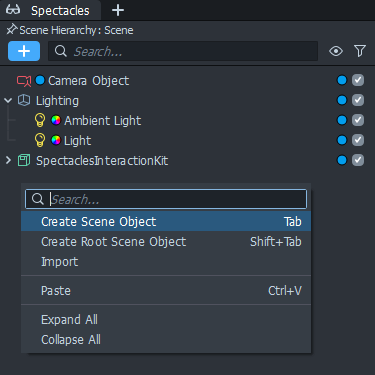
Call it “Box”. Change its size to 10 x 10 x 10 and mind you, that’s 10 x 10 x 10 centimeters as Lens Studio uses centimeters as a unit, instead of meters like Unity.

Click “Add component” and select “Render Mesh Visual”
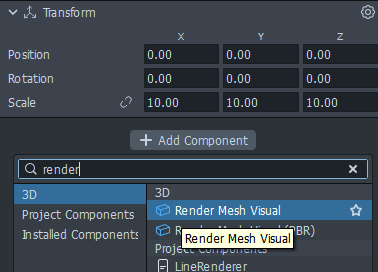
then click “Choose Mesh” and select “BoxMesh”.
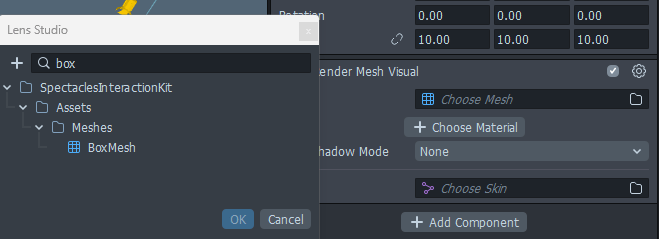
Note: you can also define mesh shapes yourself, but the Spectacles Interaction Kit already has one, so why bother.
Click “+ Choose Material” and select “BoxMaterial”
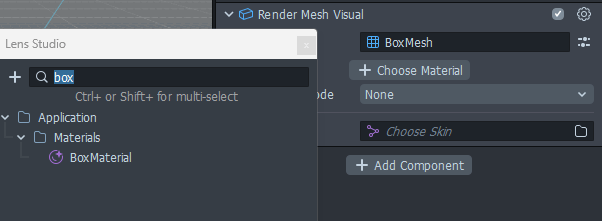
Now hit “Add Component” again, and add a “Physics Body”, aka a rigid body
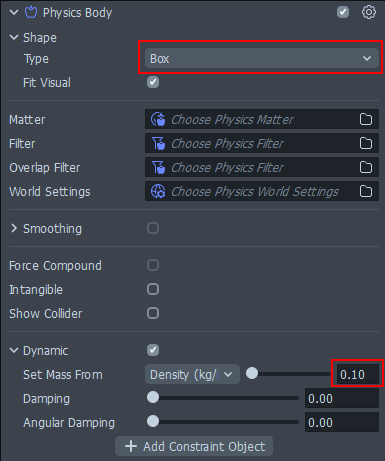
Set the Type to “Box” (default is Sphere, which does not make sense here) and mass to 0.1 kg. Note: we don’t have to set a collider, if you add a Physics Body a collider is implicitly created, it seems.
And if you now zoom in on the Scene view, you can already see some result of your handiwork:
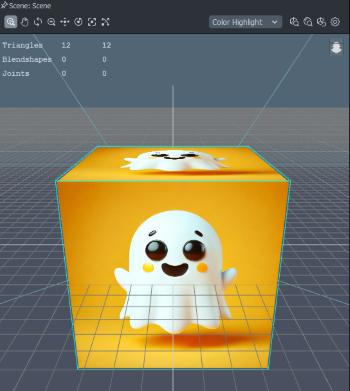
And now we are going to create a prefab exactly the way you are used to doing in Unity: drag the Box Scene Object into the Prefabs folder we made in the Asset Browser and voila, a prefab. The Blue brick-icon changes into a green prefab icon in your scene. Now remove the Box object itself from the Scene.
And now… it’s time to code.
First off: all my samples are in TypeScript. You are welcome to try JavaScript, but the whole Spectacles Interaction Kit is in TypeScript, I personally can do with some guardrails coming from type-safe C#, and there’s ample opportunity to shoot myself in the foot anyway, so I cling to some semblance of type-safety - and my sanity, if you don’t mind.
Creating scripts
Right-click on the Scripts folder, click Create Assets/General/TypeScript file. Name the file CubeController. Repeat, and call the second one CubeManager. That was easy, right?
Controlling the cube with CubeController
If you open the newly-created CubeController you see only this:
@component
export class NewScript extends BaseScriptComponent {
    onAwake() {

    }
}
This, my friends, is a Component, basically a MonoBehaviour equivalent. Nothing more, nothing less. And onAwake does exactly what you think it does. Let’s first name the class properly after its filename, then continue with adding some code:
@component
export class CubeController extends BaseScriptComponent {

    @input private bodyComponent: BodyComponent

    private originalPosition: vec3;
    private originalRotation: quat;
    private isInitialized: boolean = false;

    onAwake() {
        this.bodyComponent.enabled = false;
    }

    public initialize (id: number, initialPosition: vec3,
                       initialRotation: quat) : void {
        if (this.isInitialized) {
            return;
        }
        this.isInitialized = true;
        this.originalPosition = initialPosition;
        this.originalRotation = initialRotation;
        this.getTransform().setWorldPosition(initialPosition);
        this.getTransform().setWorldRotation(initialRotation);
        this.enableGravity(false);
        this.bodyComponent.enabled = true;
        this.getSceneObject().name= "Cube " + id;
    }

    private enableGravity(boolean: boolean) {
        var worldSettings = Physics.WorldSettingsAsset.create();
        worldSettings.gravity = new vec3(0, boolean ? -980 : 0, 0);
        this.bodyComponent.worldSettings = worldSettings;
    }
}
Oh boy, isn’t TypeScript fun. Instead of putting your type before an identifier you put it behind it, we use camelCase and to add insult to injury: dangling accolades. It hurts my eyes and a bit of my feelings, but when in Rome, act as Romans. Those darn script kiddies. Oh wait, now I am one myself.
So here do we see a lot of stuff that is different, yet very familiar
- Putting
@inputbefore a field is the same as putting[SerializeField]in the Unity Editor vec3= Vector3quat= Quaternion- you get the transform via a method instead of a property
- you set rotation and position via methods instead of via a property
- and you type “
this” until your fingers hurt.
So, if this were a Unity behaviour, I would say: it first turns off the rigid body, and when someone calls initialize, it saves its original position and rotation, it actually sets the game object to initial position and rotation, then turns off gravity before enabling the rigid body again, and names the object.
The gravity thing is a bit weird. A few of the settings of a Physics Body are put into a WorldSetting. In theory, you can give then all objects the same setting and have a single place to change everything. However, I noticed, if you keep a reference for a single WorldSetting for all your objects, and turn on gravity while it first was off - a lot of cubes drop to the ground, but not all of them. So in the end, I decided to give every cube its own WorldSetting
Add CubeController to prefab
In the Asset Browser, double click the Box prefab in Prefabs. In the Inspector, scroll down, click “Add Component”, then type “CubeController” and click OK

Now you see, it needs a reference to its own Physics Body. Weirdly enough, the search box does not work now if you double-click, now only dragging works:
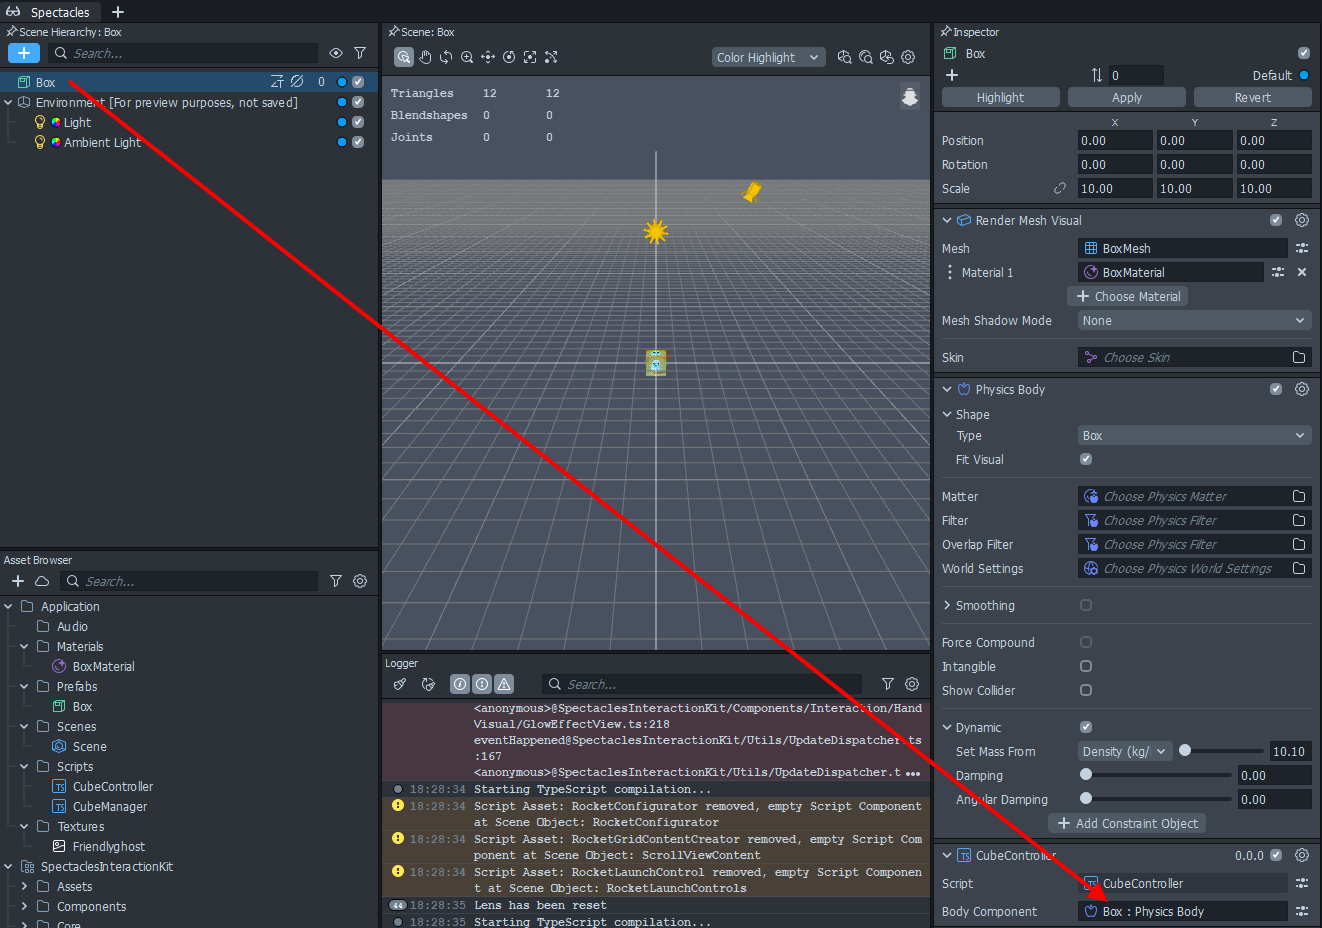
All the way from the top left to bottom right. And then, please, don’t forget to hit “Apply” on top of the Prefab otherwise your changes won’t be saved

Always remember to do this, otherwise you will be sorry. And confused.
Add script CubeManager to Scene
Select the scene again in your Asset Browser, Create a new Scene Object, call it “HologramCollection” (some habits are hard to break) and add the CubeManager script to it.
Deconstructing CubeManager
This is almost a 1:1 translation of the Unity version I created for the QuestCubeBouncer.
The script CubeManager.ts is the component/behaviour that actually creates the cubes (and will do a lot more in follow up posts). I am going to pick this script apart as it contains a few important concepts I want to hammer home to the confused Unity/C# developer.
import WorldCameraFinderProvider from "../../SpectaclesInteractionKit/Providers/CameraProvider/WorldCameraFinderProvider"
import { CubeController } from "./CubeController";
import { VectorUtils } from "./VectorUtils";
So this looks like C#’s using and it kind of is. But unlike a .csproj your Lens Studio does not take care of hiding the location where stuff is actually stored. So you actually reference a file containing the referenced code. This has important repercussions: if you decide to move the referencing file to its parent or a child folder, all the references break. And no, you can’t use absolute path, at least I could not find out how. This is pretty dumb IMHO, but that’s the way TypeScript works, and you can’t blame that on the Snap folks.
Also notice the WorldCameraFinderProvider does not need accolades, but my custom classes do. This because the WorldCameraFinderProvider is defined as
export default class WorldCameraFinderProvider
The default keyword is the difference: my own classes are defined without the default keyword, as you can see down here:
@component
export class CubeManager extends BaseScriptComponent {

    @input private cubePrefab: ObjectPrefab;

    private camera = WorldCameraFinderProvider.getInstance();
    private readonly SIZE = 20;
    private readonly MAXX = 25
    private readonly MAXY = 25
    private readonly MAXZ = 70
    private readonly START_DISTANCE = 80
    private cubes: CubeController[] = [];
Anyway, the first part looks familiar now I guess. We define an input field ([SerializedField] equivalent, remember?), then get a reference to the camera. This is like Camera.main. For the rest, some constants and a list to store the cubes in. Then comes this funky bit of code:
onAwake() {
    const delayedEvent = this.createEvent("DelayedCallbackEvent");
    delayedEvent.bind(() => {
        this.createNewGrid()
    });
    delayedEvent.reset(1);
}
I noticed the cubes appearing at weird places when I started the app, and in the end determined there is apparently some time between the moment onAwake is called and the camera is initialized, so this weird piece of code waits a second before it fires createGrid, which starts by destroying any existing cubes:
public createNewGrid() :void{
    for (const cube of this.cubes) {
        cube.getSceneObject().destroy();
    }
    this.cubes = [];
Then we get this piece of code that first gets some initial data from the camera, then shows us our first piece of vector calculus.
const forward = this.camera.getTransform().forward;
const right = this.camera.getTransform().right;
const up = this.camera.getTransform().up;
const rotation = this.camera.getTransform().getWorldRotation();

const startPostion = this.camera.getTransform().
                        getWorldPosition().sub(
                        forward.mult(
                        VectorUtils.scalar3(this.START_DISTANCE)));
Yeah. You can’t multiply, add or subtract vectors with operators - they have methods for that, respectively mult, add and sub. To make things more difficult, you can only add, subtract and multiply with complete vectors, so vector.mult(0.5) is a no-go, you need new vector(0.5,0.5,0.5). That quickly got old, so I created a little VectorUtils helper class so I could at least make a scalar vector. Anyway, all what this code does, is to calculate a position of 80cm from the camera.
This next loop then calculates the position of each cube in a camera-aligned grid:
var id = 0;
for (var z = 0; z <= this.MAXZ; z += this.SIZE) {
    for (var x = -this.MAXX; x <= this.MAXX; x += this.SIZE) {
        for (var y = -this.MAXY; y <= this.MAXY; y += this.SIZE) {
            this.createCube(id++,
                startPostion.add(forward.mult(
                    VectorUtils.scalar3(-z))).add(
                    right.mult(VectorUtils.scalar3(x))).
                    add(up.mult(VectorUtils.scalar3(y))),
                rotation);
        }
    }
}
You see that a bit more complex vector calculus quickly becomes a mass of chained methods and parentheses. In Unity/C# this is simply:
startPose.position + startPose.forward * z + startPose.right * x +
  startPose.up * y
But it is what it is.
Finally, the code that actually creates and initializes a cube:
private createCube(id: number, position: vec3, rotation: quat) {
    const clone = this.cubePrefab.instantiate(this.getSceneObject());
    var cubeController = clone.getComponent(CubeController.getTypeName())
        as CubeController;
    cubeController.initialize(id++, position, rotation);
    this.cubes.push(cubeController);
}
It looks remarkably familiar - instantiate is a method of the prefab, instead of the component, so you basically ask it to instantiate itself, with its future parent as parameter. getSceneObject() is a 1:1 equivalent of MonoBehaviour.gameObject, and getComponent() more or less the same as getComponent<T>(), only you have to give the component type as string and then cast it to the desired type. Weird, I’ll grant, but when in Rome… I said it before.
The last detail - for now.
The only thing left now is to assign the prefab to the CubeManager script:
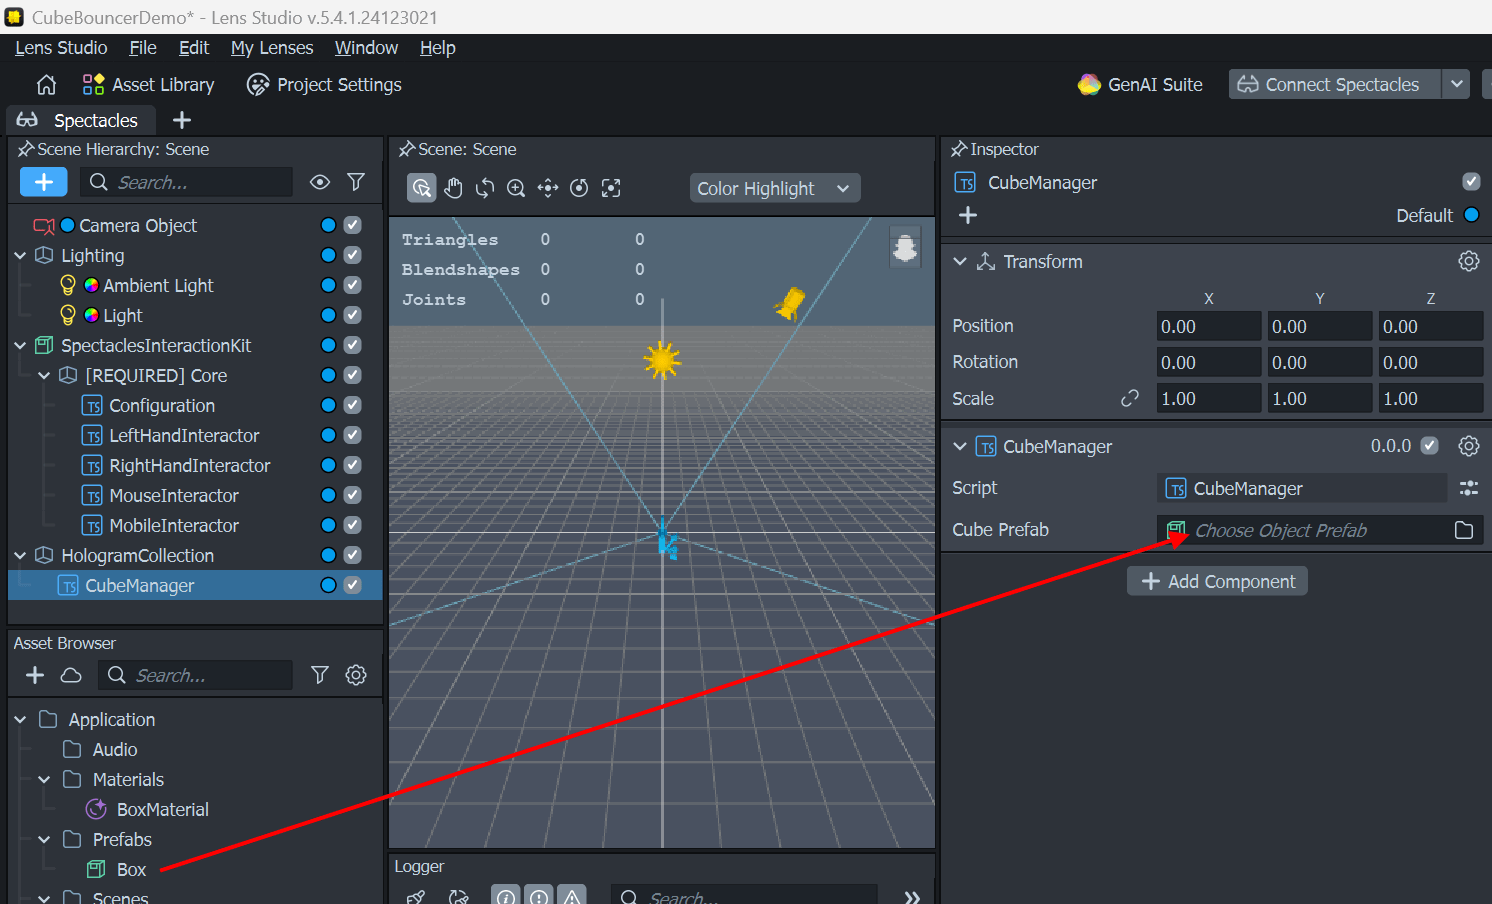
And boom: the poor girl suddenly nearly disappears behind a grid of cubes:

Conclusion
It really feels a bit like back in 2016 when I struggled to get to grips with Unity and HoloLens, but at least now I had some grasp of concepts like vectors, quaternions, game objects, transforms… it’s doable, but initial progress is slow. However, with some determination, it’s doable. I hope you are already starting to feel a bit less confused.
As usual, there is a demo project on GitHub. Branch “blog1” contains the app so far.

 MVP Profile
 Try my app HoloATC!
  HoloLens 2
 Magic Leap 2
 Meta Quest
 Android phones
 Snap Spectacles
 Buy me a drink ;)
 BlueSky
 Mastodon
 Discord: LocalJoost#3562