Using hand simulation with MRTK3 in the Unity Editor
Recently, someone asked me if I knew how the MRTK3 input simulation works, as it seems to have significantly changed since MRTK2. As far as I could find, it’s not documented anywhere. But the fun thing is, since the whole MRTK3 is built upon Unity’s XR Interaction Toolkit, you can actually see pretty easily for yourself what the exact mouse gestureS and/or combined key strokes are.
If you have installed the MRTK3 in a Unity project, go to your project, navigate to Packages/MRTK Input/Simulation and find MRTKInputSimulatorControls

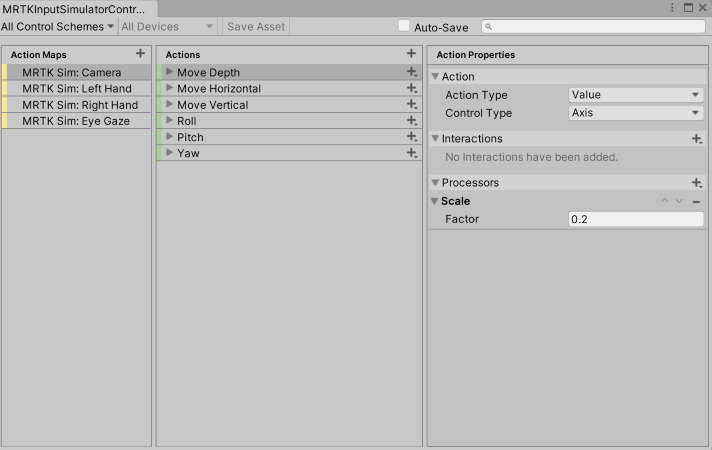
If you double-click that, the following window pops up:

Move X/Y/Z
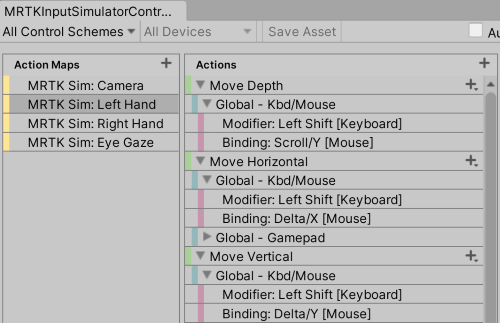
Most of it is similar to MRTK2. For basic movement of the left hand in X/Y direction, for instance, you use left shift, combined with actually moving the mouse. If you want to move in the Z direction you use left shift combined with rotating your mouse wheel:

Roll, pitch, yaw
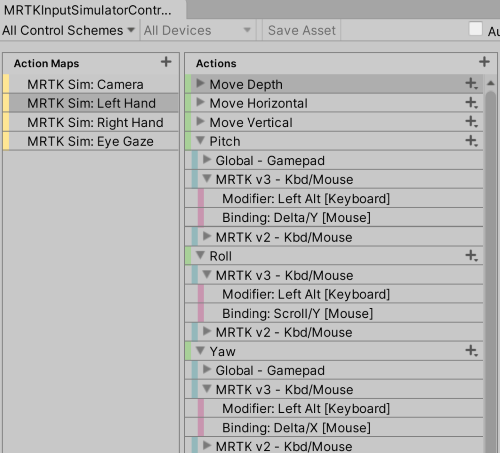
Similarly, for roll, pitch and yaw you use left alt combined with moving the mouse or using the scroll wheel.

Gestures
Thus movement and rotation in three dimensions are covered, the rest is category “misceallaneous gestures”

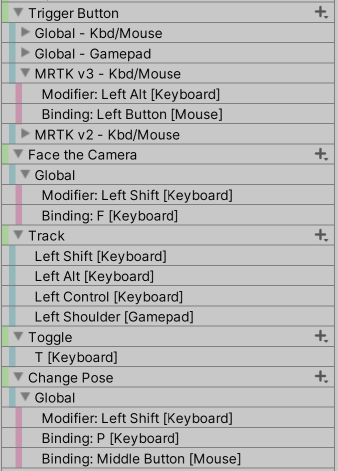
- Left alt and right mouse button will press left hand thumb and index finger together - the good old HoloLens ‘air tap’
- Left shift and F will rotate the hand palm towards the camera - this is a great feature for quickly getting to a hand menu
- Simply pressing left alt or left shift will show the left hand.
- Pressing T will show the left hand and keep it active, pressing T will make it disappear again. This is identical to MRTK2.
- Finally, pressing left shift and pressing your scroll wheel (or the P key) will toggle the hand from pointing gesture to and ‘open hand’ gesture. Funny detail: if you then proceed to press the right mouse button you don’t get an air tap, but a thumbs up ;)
You might have noticed I skipped on the “Grip Button”. This apparently has no function in this scheme, and in any case, pressing left alt + G just activate the Unity
“GameObject” pulldown menu
For the right hand:
- use space bar in stead of left shift
- use left ctrl in stead of left alt
- use Y in stead of T
In a table
Left hand
| Action/Gesture | Button and/or mouse action |
|---|---|
| Move X/Y | Left shift, move mouse |
| Move Z | Left shift, roll scroll wheel |
| Yaw & Pitch | Left alt, move mouse |
| Roll | Left alt, roll scroll wheel |
| Air tap | Left alt, left mouse button |
| Rotate to camera | Left shift, then F (toggles) |
| Show | Left shift |
| Show and keep showing | T (toggles) |
| Open hand | Left shift, press scroll wheel or P (toggles) |
| Thumbs up | Left alt , left mouse button (in open hand mode) |
Right hand
| Action/Gesture | Button and/or mouse action |
|---|---|
| Move X/Y | Space bar, move mouse |
| Move Z | Space bar, roll scroll wheel |
| Yaw & Pitch | Left ctrl, move mouse |
| Roll | Left ctrl, roll scroll wheel |
| Air tap | Left ctrl, left mouse button |
| Rotate to camera | Space bar, then F (toggles) |
| Show | Space bar or ctrl |
| Show and keep showing | Y (toggles) |
| Open hand | Space bar, press scroll wheel or P (toggles) |
| Thumbs up | Left ctrl, left mouse button (in open hand mode) |
Since no code is involved this time, I am going to skip on the usual companion GitHub repo

 MVP Profile
 Try my app HoloATC!
  HoloLens 2
 Magic Leap 2
 Meta Quest
 Android phones
 Snap Spectacles
 Buy me a drink ;)
 BlueSky
 Mastodon
 Discord: LocalJoost#3562