Bing Maps control with MVVMLight on Windows Phone 7
This article appeared originally in the March 2011 issue of .Net Magazine – in Dutch. By popular request I wrote this English translation. Regular readers of this blog may recognize parts of it ;-)
A POWERFUL CONTROL WITH A ROBUST ARCHITECTURE
Not everyone is aware of it yet, but MVVM is becoming the de facto standard for all XAML driven environments – WPF, Silverlight, Microsoft Surface and Windows Phone 7. This article shows how this pattern can be applied and how it can make complex tasks like tombstoning easier. A quite unusual approach is used – driving the Bing Maps control
MVVM – theory
MVVM stands for Model-View-Viewmodel. Model (business classes) and View (XAML) are connected by a ViewModel – which was dubbed ‘basically a value convertor on steroids’ by Josh Smith. The ViewModel is a class that provides properties from the Model in such a way that the contents can be displayed using data binding.
Since data binding can work two-way, a change in the ViewModel is automatically displayed in the View, and a change in the View (on user input) is automatically populated to the model. The View can also bind to commands: these are methods in the ViewModel called as a result of an event in the View (for example, a button is pressed), and that in some way manipulate the underlying Model. In theory the companion ‘code behind’ files to the XAML are completely empty. This approach has two distinct advantages:
- The ViewModel can be unit-tested, something that’s next to impossible when the logic is put in the code behind in the traditional way.
- The View itself – the XAML – is totally devoid of code. Therefore a designer, who is not interested in code, can happily style the and adapt the View without breaking functionality.
MVVM – in practice, on Windows Phone 7
Windows Phone 7 – based on Silverlight 3 – poses some challenges. Property binding is a breeze, but command binding is not – for the simple reason that the classes supporting command binding are missing. Another challenge is the fact that Windows Phone 7 applications can be interrupted at any moment – because the user hits the ‘Start’ button, for instance. When this occurs, the application state must be preserved – ‘tombstoned’.
CodePlex host various frameworks that enable MVVM support in Silverlight and Windows Phone 7. Two of the most well-known are (in no particular order) MVVMLight by Laurent Bugnion and Caliburn Micro by Rob Eisenberg. Both have their distinct advantages and disadvantages, both have their ardent advocates. In this article MVVMLight is used.
In the next sample all classes are put together in one project – in practice certain classes will get their own assemblies. But the purpose of this article is to show the idea behind using MVVM.
Base application
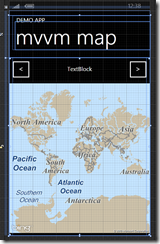 The way Bing Maps and MVVMLight can act together will be demonstrated using a simple “MapBindingDemo” app. This consists of a Bing Maps control, two buttons to select map types, and a TextBlock to display the name of the selected map. Map manipulation by using pinch zoom, pan and double tap are all included for free, courtesy of the Bing Maps control. The easiest way to get started is to create an empty “Windows Phone Application” in Visual Studio 2010. Then open this application in Blend, enter “Map” in the Assets box and drag the map on the design pane. Add controls until the result looks like displayed on the the right.
In XAML, the result should look like this:
<Grid x:Name="ContentPanel" Grid.Row="1" Margin="12,0,12,0"/>
<Grid Grid.Row="1">
  <Grid.ColumnDefinitions>
    <ColumnDefinition Width="0.167*"/>
    <ColumnDefinition Width="0.667*"/>
    <ColumnDefinition Width="0.167*"/>
  </Grid.ColumnDefinitions>
  <Grid.RowDefinitions>
    <RowDefinition Height="0.13*"/>
    <RowDefinition Height="0.87*"/>
  </Grid.RowDefinitions>
  <Microsoft_Phone_Controls_Maps:Map Grid.Row="1" Grid.ColumnSpan="3"/>
  <Button Content="<"/>
  <Button Content=">" Grid.Column="2"/>
  <TextBlock Grid.Column="1" TextWrapping="Wrap" Text="TextBlock"
    Margin="0,23,0,0" HorizontalAlignment="Center"/>
</Grid>
Those who are stubborn enough to venture here without using Blend: the project should have a reference to Windows.Controls.Phone.Maps and the namespace declarations of the PhoneApplicationPage should include the following declarations:
xmlns:Microsoft_Phone_Controls_Maps=
   "clr-namespace:Microsoft.Phone.Controls.Maps;assembly=Microsoft.Phone.Controls.Maps"
Another thing to take into consideration is the fact that Bing Maps Control usages requires credentials. These can be created using this website.The credentials should be included in the Map Control’s CredentialsProvider property. The Uri the site asks for does not matter – that’s only important when the Bing Maps control is used in a web site context, which is obviously not the case in a Windows Phone 7 app.
Bing Maps Control and TileSource
The Bing Maps Control is pretty flexible and powerful, and can show both vector and raster maps. This example concentrates on the latter. It’s important to know the control has three major settings as far as raster maps are concerned: “Road”, “Aerial” and the least known – “Mercator”. When Mercator is set, the control won’t download any map data by itself – the developer should supply the logic in a class implementing Microsoft.Phone.Controls.Maps.TileSource. Only the GetUri method needs to be overridden. The Bing Maps controls supplies 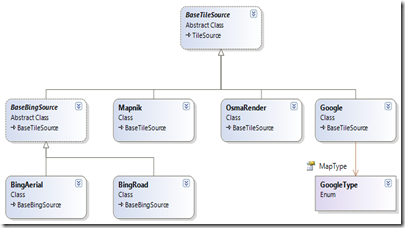 three parameters to this method: x, y and zoomlevel. At level 1, the world is a square of 2x2=4 tiles of 256x256 pixels each. On level 2, there are 16 tiles, on level 3 there are 64, etc. The method GetUri should convert these three numbers into an Uri leading to a suitable image. For geo nuts like me a piece of cake, for the rest of the world possible a load of gobbledygook. This is by no means a problem when trying to understand MVVM - the TileSource code is all included in this article. The application sports a folder "Maps" which will include this code.
In this article, the code for the various TileSources is showed in a single code file to give an easier overview. In real-world development, only code generators put multiple classes in one file, eh?
using System;
using Microsoft.Phone.Controls.Maps;

namespace MapBindingDemo.Maps
{
  public abstract class BaseTileSource : TileSource,
    IEquatable<BaseTileSource>
  {
    public string Name { get; set; }


    public bool Equals(BaseTileSource other)
    {
      return other != null && other.Name.Equals(Name);
    }

    public override bool Equals(object obj)
    {
      return Equals(obj as BaseTileSource);
    }
  }

//------------------------

  public abstract class BaseBingSource : BaseTileSource
  {
    private static string TileXYToQuadKey(int tileX, int tileY, int levelOfDetail)
    {
      var quadKey = new StringBuilder();
      for (var i = levelOfDetail; i > 0; i--)
      {
        char digit = '0';
        int mask = 1 << (i - 1);
        if ((tileX & mask) != 0) digit++;
        if ((tileY & mask) != 0)
        {
          digit++;
          digit++;
        }
        quadKey.Append(digit);
      }
      return quadKey.ToString();
    }

    public override Uri GetUri(int x, int y, int zoomLevel)
    {
      if (zoomLevel > 0)
      {
        string quadKey = TileXYToQuadKey(x, y, zoomLevel);
        string veLink = string.Format(UriFormat,
           new object[] { quadKey[quadKey.Length - 1], quadKey });
        return new Uri(veLink);
      }
      return null;
    }
  }

//------------------------

  public class BingRoad : BaseBingSource
  {
    public BingRoad()
    {
      UriFormat = "http://r{0}.ortho.tiles.virtualearth.net/tiles/r{1}.png?g=203";
    }
  }

//------------------------

  public class BingAerial : BaseBingSource
  {
    public BingAerial()
    {
      UriFormat = "http://h{0}.ortho.tiles.virtualearth.net/tiles/h{1}.jpeg?g=203";
    }
  }

//------------------------

  public class OsmaRender : BaseTileSource
  {
    public OsmaRender()
    {
      UriFormat = "http://{0}.tah.openstreetmap.org/Tiles/tile/{1}/{2}/{3}.png";
    }

    private readonly static string[] TilePathPrefixes =
      new[] { "a", "b", "c", "d", "e", "f" };

    public override Uri GetUri(int x, int y, int zoomLevel)
    {
      if (zoomLevel > 0)
      {
        var url = string.Format(UriFormat,
          TilePathPrefixes[(y%3) + (3*(x%2))], zoomLevel, x, y);
        return new Uri(url);
      }
      return null;
    }
  }

//------------------------

  public class Mapnik : BaseTileSource
  {
    public Mapnik()
    {
      UriFormat = "http://{0}.tile.openstreetmap.org/{1}/{2}/{3}.png";
    }

    private readonly static string[] TilePathPrefixes = new[] { "a", "b", "c" };

    public override Uri GetUri(int x, int y, int zoomLevel)
    {
      if (zoomLevel > 0)
      {
        var url = string.Format(UriFormat, TilePathPrefixes[y%3], zoomLevel, x, y);
        return new Uri(url);
      }
      return null;
    }
  }

//------------------------

  public enum GoogleType
  {
    Street     ='m',
    Hybrid     ='y',
    Satellite    ='s',
    Physical     ='t',
    PhysicalHybrid ='p',
    StreetOverlay  ='h',
    WaterOverlay   ='r'
  }

//------------------------

  public class Google : BaseTileSource
  {
    public Google()
    {
      MapType = GoogleType.PhysicalHybrid;
      UriFormat = @"http://mt{0}.google.com/vt/lyrs={1}&z={2}&x={3}&y={4}";
    }

    public GoogleType MapType { get; set; }

    public override Uri GetUri(int x, int y, int zoomLevel)
    {
      return new Uri(
        string.Format(UriFormat, (x % 2) + (2 * (y % 2)),
        (char)MapType, zoomLevel, x, y) );
    }
  }
}
The starting point is a base class “BaseTileSource” which only adds a Name property and an Equals method that compares by name – a quite naïve implementation, but sufficient for this purpose. A subclass “BaseBingSource” contains most of the heavy lifting for the Bing Maps calculations, so two pretty simple subclasses “BingAerial” and “BingRoad” are all that’s needed to implement Bing Aerial and Bing Road. So far the net result is a quite complicated way to get exactly the same result as the standard Bing Maps Control, but the fun starts when two well-known open source OpenStreetMap mapservers are added – OsmaRender and Mapnik. And of course my personal favorite ‘nag the competition’ option: Google Maps.
As stated before, the Bing Maps Control should operate in Mercator mode. The way to do this is described below:
<Microsoft_Phone_Controls_Maps:Map
    CredentialsProvider="your_credentials_here">
    <Microsoft_Phone_Controls_Maps:Map.Mode>
        <MSPCMCore:MercatorMode/>
    </Microsoft_Phone_Controls_Maps:Map.Mode>
</Microsoft_Phone_Controls_Maps:Map>
The namespace “MSPCMCore” is declared in the PhoneApplicationPage tag like this:
"clr-namespace:Microsoft.Phone.Controls.Maps.Core;assembly=Microsoft.Phone.Controls.Maps"
Setup MVVMLight
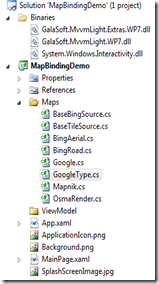 The framework itself contains of two assemblies: GalaSoft.MvvmLight.WP7.dll andGalaSoft.MvvmLight.Extras.WP7.dll. These can be downloaded from CodePlex. Apart from those, the assembly System.Windows.Interactivity.dll is necessary as well – this can be found in the Expression Blend SDK and is locaties either in
<drive>:\Program Files\Microsoft SDKs\Expression\Blend\Windows Phone\v7.0\Libraries
or in
<drive>:\Program Files (x86)\Microsoft SDKs\Expression\Blend\Windows Phone\v7.0\Libraries
when you have a 64 bit OS, which is becoming ever more commonplace these days. It’s good practice to put these assemblies in a solution folder to make sure they remain associated with the solution – it makes working with multiple developers on a single Windows Phone 7 project utilizing a source control mechanism a lot easier. In this sample a folder “Binaries” is used to that effect. The project needs to have a reference to the three assemblies mentioned above, and the solution now should look like displayed to the right.
Map app ViewModel
An MVVMLight ViewModel is a child class of the most originally named “ViewModelBase” class. A number of properties are defined within this application’s ViewModel: ZoomLevel, MapCenter, AvailableMaps and CurrentMap. In addition, it has a number of commands: one for moving a map definition ahead, and one for moving back. The ViewModel looks like this:
using System.Collections.Generic;
using System.Device.Location;
using System.Windows.Input;
using GalaSoft.MvvmLight;
using GalaSoft.MvvmLight.Command;
using MapBindingDemo.Maps;
using MapBindingDemo.Serialization;

namespace MapBindingDemo.ViewModel
{
  public class MvvmMap : ViewModelBase
  {
    public MvvmMap()
    {
      _availableMapSources = new List<BaseTileSource>
      {
        new BingAerial{ Name = "Bing Aerial"},
        new BingRoad {Name = "Bing Road"},
        new Mapnik {Name = "OSM Mapnik"},
        new OsmaRender {Name = "OsmaRender"},
        new Google {Name = "Google Hybrid", MapType = GoogleType.Hybrid},
        new Google {Name = "Google Street", MapType = GoogleType.Street},
      };
    }

    private GeoCoordinate _mapCenter;
    public GeoCoordinate MapCenter
    {
      get { return _mapCenter; }
      set
      {
        if (_mapCenter == value) return;
        _mapCenter = value;
        RaisePropertyChanged("MapCenter");
      }
    }

    private double _zoomLevel;
    public double ZoomLevel
    {
      get
      {
        return _zoomLevel;
      }
      set
      {
        if (value == _zoomLevel) return;
        if (value >= 1)
        {
          _zoomLevel = value;
        }
        RaisePropertyChanged("ZoomLevel");
      }
    }

    private BaseTileSource _currentMap;
    public  BaseTileSource CurrentMap
    {
      get
      {
        if (_currentMap == null &&
          _availableMapSources != null &&
          _availableMapSources.Count > 0)
        {
          _currentMap = _availableMapSources[0];
        }
        return _currentMap;
      }
      set
      {
        if (value.Equals(CurrentMap)) return;
        {
          _currentMap = value;
        }
        RaisePropertyChanged("CurrentMap");
      }
    }

    private List<BaseTileSource> _availableMapSources;
    [DoNotSerialize]
    public List<BaseTileSource> AvailableMapSources
    {
      get
      {
        return _availableMapSources;
      }
      set
      {
        _availableMapSources = value;
        RaisePropertyChanged("AvailableMapSources");
      }
    }

    public ICommand NextMap
    {
      get
      {
        return new RelayCommand(() =>
        {
          var newIdx = AvailableMapSources.IndexOf(CurrentMap) + 1 ;
          CurrentMap =
            AvailableMapSources[newIdx > AvailableMapSources.Count - 1? 0 : newIdx];
        });
      }
    }

    public ICommand PreviousMap
    {
      get
      {
        return new RelayCommand(() =>
        {
          var newIdx = AvailableMapSources.IndexOf(CurrentMap) -1;
          CurrentMap =
            AvailableMapSources[newIdx < 0 ?
             AvailableMapSources.Count - 1 : newIdx];
        });
      }
    }

    private static MvvmMap _instance;
    public static MvvmMap Instance
    {
      get { return _instance; }
      set { _instance = value; }
    }

    public static void CreateNew()
    {
      _instance = new MvvmMap();
    }
  }
}
Hooking up ViewModel and user interface using Blend
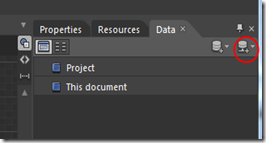 Using databinding, ZoomLevel and MapCenter can be hooked up without any special measures to a Bing Maps control, while the TextBlock “TextBlock” should display the map name. The easiest way to accomplish this is using Expression Blend. A free version for Windows Phone is included with the Windows Phone 7 tools. When Blend has finished loading your projects, notice the three tabs to the upper right: "Properties", "Resources" and "Data". Click the encircled symbol and a menu appears, which contains the option “Create Object Data Source. When this is selected, a popup appears with all the objects in the solution. Click MapBindingDemo, then MapBindingDemo.ViewModel, and finally MvvmMap. To the right, the properties of MvvmMap are displayed. Drag the “Instance” property to the Grid “LayoutRoot” in the “Objects and Timeline” panel at the left side. Blend shows the text “Data bind LayoutRoot.DataContext to Instance”. Release the mouse button and – done. Data binding.
At the right bottom, a panel “Data context” has appeared. Drag property “Name” from “CurrentMap” on top of the TextBlock. The contents of the TextBlock immediately changes to “Bing Aerial”. And that’s correct, since the ViewModel code shows that when no map is selected, the first map in “AvailableMaps” should be selected, which is indeed Bing Aerial.
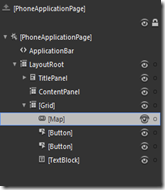 Go back to the “Objects and Timeline” panel, and select the object “Map”. To get there, you will first need to expand “Layoutroot” and “Grid”. Data bind the “MapCenter” property of the ViewModel to the “Center” property of the map by dragging MapCenter on top of the Bing Maps controls – a popup appears, in which you can select the “Center” property.
For some strange reason I could not get Blend to databind “ZoomLevel” this way – it only wants to bind to “Content”. To work around this: select 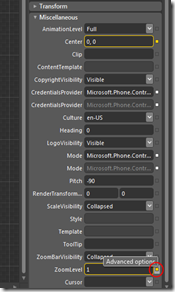 tab “Properties”. Then expand “Miscellaneous”. All the way down you will see the “ZoomLevel” property. Right next to it is a little square: click this, and this will yield and menu which contains the option “Data Binding”. Select this, and then select property “ZoomLevel” of the model in the popup that follows.
Now switch to the XAML view, and notice that in the Bing Maps Control Center and Zoomlevel properties are bound: Center="{Binding MapCenter}" ZoomLevel="{Binding ZoomLevel}". To make the binding function properly, change this to Center="{Binding MapCenter, Mode=TwoWay}" ZoomLevel="{Binding ZoomLevel, Mode=TwoWay}”. This can be done from Blend as well, but this way is quicker.
Databinding command utilizes the MVVMLight EventToCommand behavior. Type “Event” in the “Search” box top left and the EventToCommand behavior appears. Drag this on both the “<” and the “>” button. Then drag “PreviousCommand” from the ViewModel on top of the EventToCommand below the “<” button (inthe Objects and Timeline panel). “NextCommand” is databound in the same way to the “>” button. Hit F5 in Blend, the emulator appears and when “>” and “<” the text in the TextBlock should change. But the map does not play along – even more, there is absolutely no map visible. That’s because there’s no TileSource associated with it.
Attached Dependency Properties – plumbing holes in data binding
Binding a TileSource to a Bing Maps control is not possible, because there’s no fitting property. Fortunately XAML includes attached dependency properties – these can be regarded as the property equivalent of extension methods. Back to Visual Studio, where an attached dependency property will be created in the folder “ViewModel”
using System.Windows;
using MapBindingDemo.Maps;
using Microsoft.Phone.Controls.Maps;

namespace MapBindingDemo.ViewModel
{
  public static class BindingHelpers
  {
    //Used for binding a single TileSource object to a Bing Maps control
    #region TileSourceProperty

    public static readonly DependencyProperty TileSourceProperty =
      DependencyProperty.RegisterAttached("TileSource", typeof(TileSource),
      typeof(BindingHelpers), new PropertyMetadata(SetTileSourceCallback));

    // Called when TileSource is retrieved
    public static TileSource GetTileSource(DependencyObject obj)
    {
      return obj.GetValue(TileSourceProperty) as TileSource;
    }

    // Called when TileSource is set
    public static void SetTileSource(DependencyObject obj, TileSource value)
    {
      obj.SetValue(TileSourceProperty, value);
    }

    //Called when TileSource is set
    private static void SetTileSourceCallback(object sender,
      DependencyPropertyChangedEventArgs args)
    {
      var map = sender as Map;
      var newSource = args.NewValue as TileSource;
      if (newSource == null || map == null) return;

      // Remove existing layer(s)
      for (var i = map.Children.Count - 1; i >= 0; i--)
      {
        var tileLayer = map.Children[i] as MapTileLayer;
        if (tileLayer != null)
        {
          map.Children.RemoveAt(i);
        }
      }

      var newLayer = new MapTileLayer();
      newLayer.TileSources.Add(newSource);
      map.Children.Add(newLayer);
    }
    #endregion
  }
}
This quite adequately shows why an attached dependency property is necessary: a Bing Maps controls has Children that can contain (among others) MapTileLayer objects – and only that contains a TileSource. So when the displayed map is changed, first all current MapTileLayer objects need to be deleted, before a new MapTileLayer containing the new Tilesource is created, that can be added to the Children of the map. With this in place, the whole ViewModel can be databound to the Bing Maps Control. Unfortunately not with Blend, so this will have to go manually, in XAML. Add the namespace in which the BindingHelper class is situated to the namespace declarations at the top of the PhoneApplicationPage:
xmlns:MapBindingDemo_ViewModel="clr-namespace:MapBindingDemo.ViewModel"
Now the actual binding to the map needs to take place. On the same spot where ZoomLevel and MapCenter were bound the attached dependency property is bound:
<Microsoft_Phone_Controls_Maps:Map x:Name="Map" Grid.Row="1" Grid.ColumnSpan="3"
  CredentialsProvider="your_credentials_here"
  Center="{Binding MapCenter, Mode=TwoWay}"
  ZoomLevel="{Binding ZoomLevel, Mode=TwoWay}"
  MapBindingDemo_ViewModel:BindingHelpers.TileSource ="{Binding CurrentMap}">
Now the application is fully functional, even in design mode it shows the default map (Bing Aerial). The buttons left and right of the map name change the map that’s displayed – with not a single line of code in the code behind. Granted, the user experience and look and feel could benefit from some more attention, but nevertheless – mission accomplished. Well, almost. Zoom in a little, select a map that not the default, hit the start button and then hit back. Alas – the default map again, with full world view. The application’s last state is not preserved, or to put things differently – it does not support tombstoning.
Tombstoning an MVVMLight application
Mike Talbot has written a brilliant post in which he describes a helper object called “SilverlightSerializer”. This object can serialize virtually every Silverlight and Windows Phone 7 object as a binary. The fun part is that it even serializes non-serializable objects – like MVVMLight’s ViewModelBase. The blog post is called “Silverlight Binary Serialization” and includes the source code.
SilverlightSerializer is added to a folder “Serialization” in the project. In the same folder (and namespace) a file “ApplicationExtensions.cs” is added that implements two extension methods on the Application class: one for writing the entire ViewModel to Isolated Storage, and one for reading it back from IS.
using System;
using System.IO;
using System.IO.IsolatedStorage;
using System.Windows;
using GalaSoft.MvvmLight;

namespace MapBindingDemo.Serialization
{
  /// <summary>
  /// Some extensions method that allow serializing and deserializing
  /// a model to isolated storage
  /// </summary>
  public static class ApplicationExtensions
  {
    private static string GetDataFileName( Type t)
    {
      return string.Concat(t.Name, ".dat");
    }

    public static T RetrieveFromIsolatedStorage<T>(this Application app)
      where T : class
    {
      using (var appStorage = IsolatedStorageFile.GetUserStoreForApplication())
      {
        var dataFileName = GetDataFileName(typeof(T));
        if (appStorage.FileExists(dataFileName))
        {
          using (var iss = appStorage.OpenFile(dataFileName, FileMode.Open))
          {
            try
            {
              return SilverlightSerializer.Deserialize(iss) as T;
            }
            catch (Exception e)
            {
              System.Diagnostics.Debug.WriteLine(e);
            }
          }
        }
      }
      return null;
    }

    public static void SaveToIsolatedStorage(this Application app,
      ViewModelBase model)
    {
      var dataFileName = GetDataFileName((model.GetType()));
      using (var appStorage = IsolatedStorageFile.GetUserStoreForApplication())
      {
        if (appStorage.FileExists(dataFileName))
        {
          appStorage.DeleteFile(dataFileName);
        }
        using (var iss = appStorage.CreateFile(dataFileName))
        {
           SilverlightSerializer.Serialize(model,iss);
        }
      }
    }
  }
}
These methods are used from App.Xaml’s code behind. This may look like a deviation from the MVVM paradigm, but it’s not as bad as it looks. This file has some default code anyway (the Application_* methods), for this is the place that sports the methods that are called when the application (re)starts or stops. This last step just adds a little code. First, add two usings:
using MapBindingDemo.Serialization;
using MapBindingDemo.ViewModel;
Then, adapt the existing code till it looks like this:
// Code to execute when the application is launching (eg, from Start)
// This code will not execute when the application is reactivated
private void Application_Launching(object sender, LaunchingEventArgs e)
{
  LoadModelFromIsolatedStorage();
}

// Code to execute when the application is activated (brought to foreground)
// This code will not execute when the application is first launched
private void Application_Activated(object sender, ActivatedEventArgs e)
{
  LoadModelFromIsolatedStorage();
}

///
/// Loads the model from isolated storage
///
private void LoadModelFromIsolatedStorage()
{
  MvvmMap.Instance = this.RetrieveFromIsolatedStorage();
  if (MvvmMap.Instance == null) MvvmMap.CreateNew();
}

// Code to execute when the application is deactivated (sent to background)
// This code will not execute when the application is closing
private void Application_Deactivated(object sender, DeactivatedEventArgs e)
{
  this.SaveToIsolatedStorage(MvvmMap.Instance);
}

// Code to execute when the application is closing (eg, user hit Back)
// This code will not execute when the application is deactivated
private void Application_Closing(object sender, ClosingEventArgs e)
{
   this.SaveToIsolatedStorage(MvvmMap.Instance);
}
Notice both deactivation and closing call the same code: the data is always written to Isolated Storage. Similarly, launching and deactivation always call RetrieveFromIsolatedStorage. It’s perfectly possible to store the ViewModel in the PhoneApplicationService but then the stored model won’t be available when the application is started again from the start menu (in stead of using the “back” button). This is “works as designed” behavior as far as Windows Phone 7 is concerned but if it’s used in as described above, both the back button and a restart give the same result – the last application state is preserved.
A drawback of saving the entire ViewModel as a binary is that deserializing fails when major changes are implemented in the ViewModel. This is why it always is surrounded by try/catch statements. Attentive readers also may have noticed that property “AvailableMapSources” is serialized in vain, since it’s always initialized from the constructor. SilverlightSerializer’s default behavior is to serialize everything, but if something needs to be skipped it can be marked with the [DoNotSerialize] attribute defined by SilverlightSerializer itself.
Concluding remarks
For all but the most trivial Windows Phone 7 applications MVVM simply is the way to go, if only because SilverlightSerializer makes a quite complex thing like tombstoning a breeze. For complex application with multiple models things get a lit more challenging, but it’s clear MVVMLight and SilverlightSerializer are a winning team.
Thanks to Jarno Peshier and Dennis Vroegop for their suggestions on the original article.
Code can be downloaded here.

 MVP Profile
 Try my app HoloATC!
  HoloLens 2
 Magic Leap 2
 Meta Quest
 Android phones
 Snap Spectacles
 Buy me a drink ;)
 BlueSky
 Mastodon
 Discord: LocalJoost#3562