Introducing the new Windows Phone 8 Map control
The time is finally there: the Windows Phone SDK 8.0 is out, and now we can finally talk about all the great news things for developers that this new SDK brings, and I’ll start that right now. And I don’t think it will surprise anyone who knows me that the first thing I did was looking at the much-rumored new maps control.
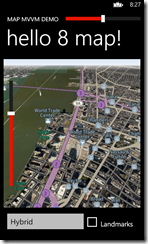
 I was not disappointed. In general, just two words: super slick. The very embodiment of fast and fluid. What Windows Phone 8 brings to the mapping table made by geo hart skip and is nothing short of dramatic. Think the Nokia drive map on your Windows Phone 7. On steroids. As a control. For you to use in your apps. With downloadable maps for use offline. I have seen it run on actual hardware and for me as a GIS buff, used to the fact that maps stuff usually take a lot of processing power and doesn’t necessary always go super fast, this was a serious nerdgasm. So I created a little app to show off the very basics of this map control. It allows you to select the various map modes, as well to to select map heading and pitch. Heading is the direction the top of the map is pointing – in Bing Maps this was always “North”, and Pitch is how you are looking on the map. If that’s 0, you are looking straight from above.
Now the important the thing about Windows Phone 8 is that the team really went out of their way to make sure code is backwards compatible. That means that not only the new maps control is in the framework, but also Ye Olde Bing Maps control. This can lead to some confusing situations. The important thing to remember when working with the new map control is
- The (old) Bing Maps control stuff is in namespace Microsoft.Phone.Controls.Maps
- The new map control stuff in in namespace Microsoft.Phone.Maps.Controls.
So “Controls” and “Maps” are swapped. I always keep in mind “maps first” as a mnemonic to remember which namespace to use. Especially when you are using ReSharper or a tool like it that most helpfully offers you to add namespaces and references (again) can really get you caught on the wrong foot, so pay attention.
I started out creating a “New Windows Phone App”, selected OS 8.0 (of course), fired up the Library Package Manager and downloaded my wp7nl library. This gives MVVMLight and some other stuff I need for my sample. At the moment of this writing this is still Windows Phone 7 code but this will run fine (of course this all will be updated shortly). The only thing you need to take care of is that you delete the references to Windows Phone Controls.dll and Windows Phone Controls.Maps.dll the package makes.
First step is to make a simple view model describing the cartographic modes the new map control supports:
using GalaSoft.MvvmLight;
using Microsoft.Phone.Maps.Controls;

namespace MvvmMapDemo1.ViewModels
{
  public class MapMode : ViewModelBase
  {
    private string name;
    public string Name
    {
      get { return name; }
      set
      {
        if (name != value)
        {
          name = value;
          RaisePropertyChanged(() => Name);
        }
      }
    }

    private MapCartographicMode cartographicMode;
    public MapCartographicMode CartographicMode
    {
      get { return cartographicMode; }
      set
      {
        if (cartographicMode != value)
        {
          cartographicMode = value;
          RaisePropertyChanged(() => CartographicMode);
        }
      }
    }
  }
}
The main view is basically some properties and a little bit of logic. First part handles the setup and the properties for displaying and selecting the cartographic map modes:
using System;
using System.Collections.ObjectModel;
using System.Device.Location;
using GalaSoft.MvvmLight;
using Microsoft.Phone.Maps.Controls;

namespace MvvmMapDemo1.ViewModels
{
  public class MapViewModel : ViewModelBase
  {
    public MapViewModel()
    {
      modes = new ObservableCollection<MapMode>
      {
        new MapMode
          {CartographicMode = MapCartographicMode.Road, Name = "Road"},
        new MapMode
          {CartographicMode = MapCartographicMode.Aerial, Name = "Aerial"},
        new MapMode
         {CartographicMode = MapCartographicMode.Hybrid, Name = "Hybrid"},
        new MapMode
         {CartographicMode = MapCartographicMode.Terrain, Name = "Terrain"}
      };
      selectedMode = modes[0];
    }

    private MapMode selectedMode;
    public MapMode SelectedMode
    {
      get { return selectedMode; }
      set
      {
        if (selectedMode != value)
        {
          selectedMode = value;
          RaisePropertyChanged(() => SelectedMode);
        }
      }
    }

    private ObservableCollection<MapMode> modes;
    public ObservableCollection<MapMode> Modes
    {
      get { return modes; }
      set
      {
        if (modes != value)
        {
          modes = value;
          RaisePropertyChanged(() => Modes);
        }
      }
    }
  }
}
The only important part about this is that there must be an initially selected mode, as the control does not take it very well if the mode is forcibly set to null by the data binding.
At little bit more interesting are the next two properties of the view model, which control heading and pitch:
private double pitch;
public double Pitch
{
  get { return pitch; }
  set
  {
    if (Math.Abs(pitch - value) > 0.05)
    {
      pitch = value;
      RaisePropertyChanged(() => Pitch);
    }
  }
}

private double heading;
public double Heading
{
  get { return heading; }
  set
  {
    if (value > 180) value -= 360;
    if (value < -180) value += 360;
    if (Math.Abs(heading - value) > 0.05)
    {
      heading = value;
      RaisePropertyChanged(() => Heading);
    }
  }
}
The map seems to try to keep its heading between 0 and 360 degrees, but I like to have the slider in the middle for North position – that way you can use it to rotate the map left and right. So I want heading to be between –180 and +180, which should be functionally equivalent to between 0 and 360 - and apparently I get away with it. Since both values are doubles I don’t do the standard equals but use a threshold value to fire a PropertyChanged. Courtesy of ReSharper suggesting this.
Then there’s a MapCenter property, that doesn’t do very much in this solution apart from setting the initial map center. I have discovered that the center map does not like being set to null either – this beasty is a bit more picky than the Bing Maps control it seems so I take care to set an initial value:
private GeoCoordinate mapCenter = new GeoCoordinate(40.712923, -74.013292); ////// Stores the map center /// public GeoCoordinate MapCenter { get { return mapCenter; } set { if (mapCenter != value) { mapCenter = value; RaisePropertyChanged(() => MapCenter); } } } private double zoomLevel = 15; public double ZoomLevel { get { return zoomLevel; } set { if (zoomLevel != value) { zoomLevel = value; RaisePropertyChanged(() => ZoomLevel); } } }
Together with the initial ZoomLevel set to 15, this will give you a nice view of Manhattan Island, New York City, USA. There's also a boolean property "Landmarks" that will enable or disable landmarks - you can look that up in the sources if you like.
Then I opened up Blend, plonked in a map, two sliders, a checkbox on the screen, did some fiddling with grids and stuff, and deleted a lot of auto-generated comments. That made me end up with quite a bit of XAML. I won’t show it all verbatim, but the most important thing is the map itself:
<maps:Map x:Name="map"
          CartographicMode="{Binding SelectedMode.CartographicMode,Mode=TwoWay}"
          LandmarksEnabled="{Binding Landmarks,Mode=TwoWay}"
          Pitch="{Binding Pitch, Mode=TwoWay}"
          Heading="{Binding Heading, Mode=TwoWay}"
          Center="{Binding MapCenter, Mode=TwoWay}"
          ZoomLevel="{Binding ZoomLevel, Mode=TwoWay}"
          Grid.ColumnSpan="2"/>
Does not look like exactly rocket science, right? It is not, as long as you make sure the maps namespace is declared as:
xmlns:maps="clr-namespace:Microsoft.Phone.Maps.Controls;assembly=Microsoft.Phone.Maps"
The horizontal slider, controlling the heading, is defined as follows:
<Slider Minimum ="-180" Maximum="180" Value="{Binding Heading, Mode=TwoWay}"/>The vertical slider, controlling the pitch, looks like this: <Slider Minimum="0" Maximum="75" Value="{Binding Pitch, Mode=TwoWay}" />
Sue me, I took the easy way out and declared the valid ranges in XAML in stead of in my (view) model. But the point of the latter is this: apparently you can only supply ranges between 0 and 75 for pitch. And the pitch is only effective from about level 7 and higher. If you zoom out further, the map just become orthogonal (i.e. viewed straight from above, as if the pitch is 0). This is actually animated if you zoom out using pinch zoom, a very nice visual effect.
Finally, the list picker controlling which kind of map you see, and the checkbox indicating if the map should show landmarks or not
<toolkit:ListPicker ItemsSource="{Binding Modes}"
                    SelectedItem="{Binding SelectedMode, Mode=TwoWay}"
                    DisplayMemberPath="Name"/>
<CheckBox Content="Landmarks" IsChecked="{Binding Landmarks, Mode=TwoWay}"/>
… only I haven’t been able to find any landmarks, not in my hometown Amersfoort, not Berlin nor New York so I suppose this is something that’s not implemented yet ;-)
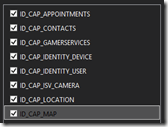
 If you fire up this application you will get an immediate error message indicating that you have asked for the map but that you have not selected the right capability for this in the manifest. So double click on “Properties/WMAppManifest.xml” and select ID_CAP_MAP (yeah, the manifest’s got a nice editor too now), and fire up your app.
And that’s all there is to your first spin with the new Windows Phone map control. It supports data binding – to an extent, and it’s easy to control and embed. Play with the sliders and scroll over the map – it’s amazingly fast and I can assure you it is even more so on actual hardware. Stay tuned: more is coming on this subject!
Note: I have not touched upon creating and adding map keys to the map in this solution. This procedure is described here.
As usual: download the sample solution here.

 MVP Profile
 Try my app HoloATC!
  HoloLens 2
 Magic Leap 2
 Meta Quest
 Android phones
 Snap Spectacles
 Buy me a drink ;)
 BlueSky
 Mastodon
 Discord: LocalJoost#3562