
 MVP Profile
 Try my app HoloATC!
  HoloLens 2
 Magic Leap 2
 Android phones
 Snap Spectacles
 MetaLense 2
 Buy me a drink ;)
 BlueSky
 Mastodon
 Discord: LocalJoost#3562
Building HoloLens/MRTK3 applications on an Azure virtual Machine using GitHub Actions
Unity is a great tool, but all too often I have been confronted with different developer machines delivering different build results. If you pull an update into your working branch, Unity imports the new resources, but it also has older stuff cached, and although most of the time this goes well, sometimes it does not. The only way to ensure everything works, is a clean build, i.e. delete everything, pull a clean branch from GitHub, open in Unity, build the app - and in the case of HoloLens, build the generated C++ application as well. In fact, sometimes twice, because you will usually need a sideloaded version to test locally, but possibly also one to upload to the Store. This takes a lot of time. The solution to this - and other things - is to have an automated build taking care of this, while you do other things.
So I set out to make a build server, using as simple as possible tools without too much sophistication. The idea is that it automatically pulls stuff from GitHub, builds it into an app while automatically increasing version numbers, and uploads the resulting artifacts to an Azure blob. I am sure there are better or smarter ways to do this, but this works for me.
Setting up a build machine
For various reasons, one of them me being a control freak, I used a custom build server. For that, I have created a Virtual Machine in Azure. I took Windows 11 Pro x64. Then, I take the following steps to configure it:
Developer mode
Put the virtual machine in developer mode
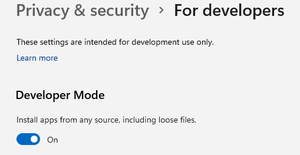
I am inclined to say “well duh” but it’s something I always forget.
Visual Studio
Install Visual Studio 2022 community edition with the following work loads:
- Desktop development with C++
- Game Development with Unity
- Universal Windows Platform development
For UWP, make sure the following additional components are installed:
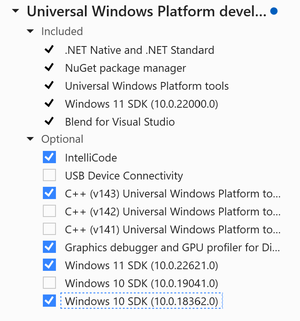
Unity
The previous step already got you the Unity Hub. Sign in to that hub with an account eligible to build apps, then proceed to install the version(s) of Unity you have used to develop the app.
GitHub self-hosted runners
The process is fairly well explained in this section on self hosted runners in GitHub itself:
Make sure you follow the procedure to the finest detail. Also important, as you can see below:
- Make sure at least one of the “additional labels” matches the label in your build file (more later)
- Accept the suggestion to run the runner as a service.
Install Git
Although not strictly necessary, you might want to install Git for Windows on this machine. I even go a bit further - I install TortoiseGit and part of that process is installing Git for Windows. This simple shell extension lets you easily see if there’s something funky with your repo on the build server, simply using the File Explorer. Incidentally, for development it is my premier choice on the client as well.
If you don’t install Git, the GitHub runner will download the whole archive and unzip it.
Long path
Windows drags a long history behind it, and one of them is the 260 character maximum file path length. This will potentially make us run into problems, partly because the runners extract the project into an already deep folder structure (C:\actions-runner\_work\projectname\projectname), partly because the packages in the MRTK3 have a long name, and partly because Unity itself unpacks that in a very verbose way. Long story short: you will probably need to make the long path registry setting
Log folder
Make a folder C:\Logs
Reboot the server
This makes sure all path and other settings are now known to the runner service.
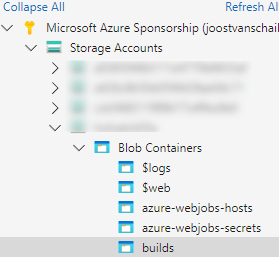
Preparing Azure
Make sure you have a Blob storage account ready. Make a Blob container you want to store your deliverables in. I called mine “builds”. I used the Azure Storage Explorer for that
Preparing the project
Assuming an already working project that builds locally, we will need to add the builder script to it. Copy this folder into your Assets folder. This is a slightly adopted copy from this awesome project apparently created by Weber Takken. I slightly adapted it to accept HoloLens specific parameters, but at this point I am not even sure these are really necessary. I used these instead of the stuff that comes with MRTK because it supports Addressables, which I need for localization of assets.
Then, do the following steps:
- Build the app locally once in Unity, make sure the C++ app is created in the “App” folder in your project
- If you want to build your app for the Store, open the resulting C++ solution and associate it with the Store first.
- Make sure the right SDK versions are selected. I usually use 10.0.18362.0 as target platform minimum version.
- Finally add the “Package.appxmanifest” to GitHub
Building the app with GitHub actions
Next up is quite some YAML interspersed with a lot of PowerShell. I am deeply sorry. Please contact your local therapist if you experience anxiety attacks after reading the following.
In the .github\workflows folder sits a file buildfile.yaml. I am going to describe this in detail because the code is hard to read and sometimes does not seem to make sense at all.
Top definitions
name: DemoBuild

on:
  workflow_dispatch:
  push:
      branches:
        - main

env:
  UNITY_STARTUPTIME: 120
  UNITY_MAX_STEPTIMEOUT: 110
  UNITY_PROJECT_VERSION: 2021.3.16f1
  UNITY_LOGFILE: demobuild.txt
  PACKAGE_NAME: DemoBuildProject
  UNITY_ROOT_FOLDER: .
  UPLOAD_CONTAINER_NAME: builds
  BUILD_VERSION: 1.0.0.0
  BUILD_NAME: Master
The build is called DemoBuild. The “workflow_dispatch” make the “Run workflow” button appear in the GitHub - that allows you trigger the build manually. It will also run automatically when you push code to the main branch.
Then we define a number of settings we need in other places in the build file:
| Variable | Usage |
|---|---|
| UNITY_STARTUPTIME | The time to allow for Unity startup |
| UNITY_MAX_STEPTIMEOUT | The time to allow for a step timeout |
| UNITY_PROJECT_VERSION | Unity version used to make the project |
| UNITY_LOGFILE | Logfile to dump Unity output in (and to follow progres) |
| PACKAGE_NAME | Your app’s package name |
| UNITY_ROOT_FOLDER | Prefix folder for if your Unity project is not in the root of your folder structure in GitHub |
| UPLOAD_CONTAINER_NAME | Azure Blob container into where the resulting builds will be uploaded (we called that “builds”, remember?) |
| BUILD_VERSION | Needed by the UnityBuilderAction but has no effect on the C++ app as far as I can see |
| BUILD_NAME | Needed by the UnityBuilderAction but has no effect on the C++ app as far as I can see |
UNITY_STARTUPTIME and UNITY_MAX_STEPTIMEOUT will become clearer in the explanation of the process - I hope.
Defining the job
jobs:

  build-project:
    runs-on: UnityBuildDemo
    env:
      ACTIONS_ALLOW_UNSECURE_COMMANDS: 'true'

    name: Build job
    steps:
Here you see the link between the Runner (UnityBuildDemo) and the actual job. The job is called “Build Job” and it allows Unsecure commands. I am not quite sure anymore why, but I seem to recall it had something to do with some of the more funky PowerShell things I do later on.
Checking out the repo
- name: Checkout repo
      uses: actions/checkout@v3
      # with:
      #   submodules: recursive
      #   token: ${{ secrets.SUBMODULE_ACCESS_TOKEN }}
Well, that was easy. Note that part of this is disabled. This is because the demo does not use private submodule repos. If you need those, you will need an access token for that, and you can generate those using this page.
Building C++ app with Unity
This is a horrible piece of code, that I am going to split in pieces otherwise it’s completely incomprehensible. The code is mostly so horrible because apparently, Unity runs in such a way that the shell in which the GitHub action runs thinks it’s already done. Most of the code checks in a loop if stuff is added to the log file. After quite some time of nothing being added, it is going to assume Unity is done. I kind of nicked this from the original MRTK build code.
Setting the stage
- name: Build C++ solution with Unity
  run : |
    $startupTime=[double]$Env:UNITY_STARTUPTIME;
    $timeout=[double]$Env:UNITY_MAX_STEPTIMEOUT
    $editor="C:/Program Files/Unity/Hub/Editor/"+ $Env:UNITY_PROJECT_VERSION + "/Editor/Unity.exe";
    $unityBuildLogFile="c:/logs/" + $Env:UNITY_LOGFILE;
    if (Test-Path $unityBuildLogFile)
    {
      Remove-Item $unityBuildLogFile;
    }
    New-Item -Path $unityBuildLogFile -ItemType File
We define the Unity editor to use and a log file where Unity’s output is dumped. If the logfile exists, delete it, and make a new - empty - one. Notice the $Env:UNITY_LOGFILE - this is how you use stuff from the “env” block
Actual building with Unity
$argumentList="-projectPath $Env:UNITY_ROOT_FOLDER -batchmode -nographics -master -arm64 -buildOutput App -customBuildPath App -buildTarget WSAPlayer -buildVersion $Env:BUILD_VERSION -customBuildName $Env:BUILD_NAME -logfile $unityBuildLogFile -executeMethod UnityBuilderAction.Builder.BuildProject -wsaArchitecture ARM64 -wsaUWPBuildType D3D -wsaMinUWPSDK 10.0.18362.0 -wsaSubtarget HoloLens"

$proc = Start-Process -FilePath $editor -ArgumentList $argumentList -PassThru;
First, we define a giant argument list. Feel free to completely pick it apart. This is what Unity and UnityBuilderAction.Builder needs to build a C++ solution. It basically starts the editor in batch, then executes the BuildProject method of the UnityBuilderAction.BuildProject class that we copied into the project.
Waiting for completion
And the rest:
Start-Sleep -Seconds $startupTime
$noProgressCounter = 0;
do
{
  $oldlength = $(Get-Item $unityBuildLogFile).length;
  Receive-Job $ljob;
  Start-Sleep -Seconds 10;
  $length=$(Get-Item $unityBuildLogFile).length;
  if($length -eq $oldlength)
  {
    $noProgressCounter++;
    echo ">>>>>> no progress counter = $noProgressCounter";
  }
  else
  {
    $noProgressCounter = 0;
  }
} until($noProgressCounter -eq ($timeout/10));
Receive-Job $ljob;
Stop-Job $ljob;
Remove-Job $ljob;
Stop-Process $proc;
.. is basically a very complicated way to first allow Unity some time to start up, then wait in steps of 10 seconds to see if still stuff is added to the logfile, and if during 110 seconds nothing happens, we are going to assume Unity is ready. If your build server is faster or slower, you might want to tune the value of UNITY_STARTUPTIME and UNITY_MAX_STEPTIMEOUT.
Update version number
- name: Update version number
  run : |
    $manifestfile = $Env:UNITY_ROOT_FOLDER + "/App/" + $Env:PACKAGE_NAME + "/Package.appxmanifest"
    echo $manifestfile;
    [xml]$manifest = get-content $manifestfile;
    $versionparts = $manifest.Package.Identity.Version.Split('.');
    $appBuildVersion = [int]$Env:GITHUB_RUN_NUMBER - [int]$Env:VERSION_OFFSET
    $versionparts[2] = [int]$versionparts[2] + [int]$appBuildVersion;
    $versionstring = $versionstring = $versionparts -join '.';
    $manifest.Package.Identity.Version = $versionstring;
    $manifest.save($manifestfile);
    $uploadpath = ([string]$Env:GITHUB_RUN_NUMBER).PadLeft(10,'0') + "_" + $versionstring;
    echo "UPLOADPATH=$uploadpath" | Out-File -FilePath $Env:GITHUB_ENV -Encoding utf8 -Append;
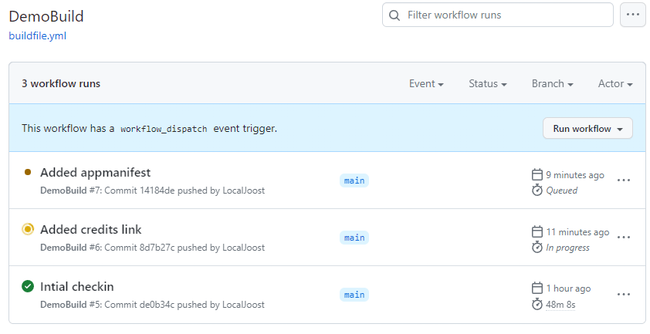
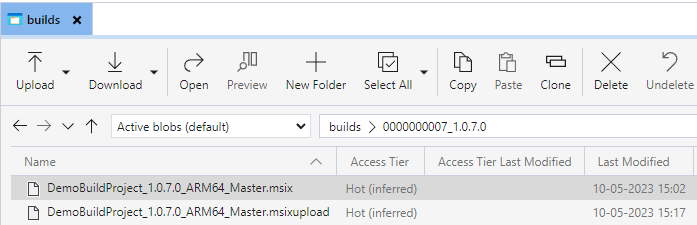
This actually opens the manifest file, and updates the version number. That is, the build number. So if the version number in the manifest file is 1.2.3.0, it changes the “3”. It uses the GitHub Run number to set the value. The version number in the manifest file of the demo project is 1.0.0.0, so if you recall this image:
You will see the topmost build will get version number 1.0.7.0. However, if you update for instance the major and/or minor version to for instance 2.1.0.0, you might want to make the first build of that version 0 again. This is where VERSION_OFFSET comes in. This is an external variable that you can set using repository variables
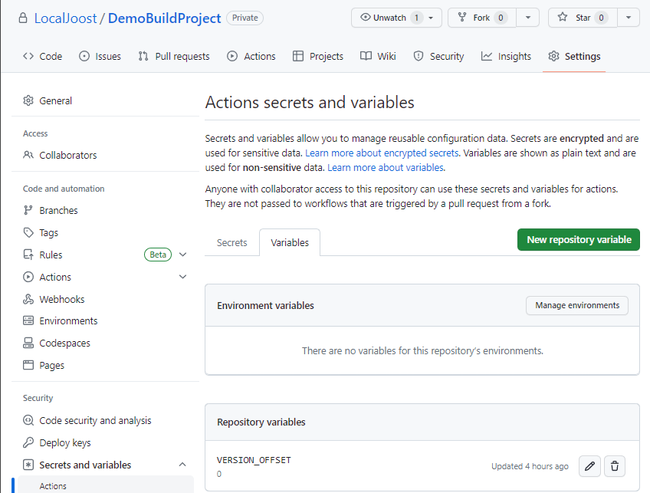
Now the offset is 0, but if I had set it to 4, the app versions would have been version number 1.0.3.0, 1.0.2.0 and 1.0.1.0.
The last two lines have nothing to do with setting the version number. They create and save a variable UPLOADPATH to GitHub environment. This is not so much a path, but something that will become a ‘folder’ in the Azure blob storage. It will, for instance, be like “0000000006_1.0.6.0” - that is, a 10 digit build number, followed by an underscore and the version number. We will need that in a later step.
Add MSBuild to PATH
- name: Add MSBuild to the PATH
  uses: microsoft/setup-msbuild@v1.1
Thank goodness, there’s a simple action for that. This prevents you from having to look where MSBuild hangs out on this build server.
Build the test/sideloaded MSIX
For sideloaded apps you need to use a temporary self signed certificate. The package needs to be signed with the package’s thumbprint. Fortunately, Unity makes a certificate for you, and Visual Studio is nice enough pick it up and use it when you build sideloaded apps.
MSBuild doesn’t know all that, so you have to tell it that yourself. Hence the following bit of code:
- name: Run MSBuild to make MSIX
  run : |
    $solution = $Env:UNITY_ROOT_FOLDER + "/App/" +  $Env:PACKAGE_NAME + ".sln";
    $certData = Get-PfxCertificate -FilePath Assets/WSATestCertificate.pfx
    $thumbprint = $certData.Thumbprint
    msbuild $solution -t:restore,Il2CppOutputProject,$Env:PACKAGE_NAME /p:configuration=Master /p:Platform=Arm64 /p:UapAppxPackageBuildMode=SideloadOnly /p:PackageCertificateThumbprint=$thumbprint /p:AppxPackageSigningEnabled=true
We first define the solution name, then get the certificate thumbprint. And then we call msbuild, making sure the thumbprint is supplied and AppxPackageSigningEnabled is set to true. Also, we force any package restore on the two expected projects. Now MSBuild knows what to do, and you get a deployable package.
Kill possible lingering mspdbsrv
The joys of building stuff with scripts in stead of letting Visual Studio handle things. Sometimes mspdbsrv.exe stays alive and locks up files. So we have to kill that process, in case it exists:
- name: Kill mspdbsrv.exe
  run : taskkill /f /t /im mspdbsrv.exe
  continue-on-error: true
I think this might be one of the “unsafe commands” I use.
Find the resulting MSIX
Since I am a bit lazy, I just let a bit of PowerShell find the full path of the resulting MSIX:
- name: Find MSIX
  run : |
      $artifactfolder = $Env:UNITY_ROOT_FOLDER +  "/App/AppPackages";
      $artifact = Get-Childitem -Path $artifactfolder *.msix -Recurse -ErrorAction SilentlyContinue;
      $filename=$artifact.fullname;
      echo "MSIX=$filename" | Out-File -FilePath $Env:GITHUB_ENV -Encoding utf8 -Append;
Note: once again this name is saved to the GitHub environment. No idea why it must be done in this weird way, but that’s the way it is apparently.
Uploading to Azure Blob Storage
I cannot even imagine how bleak life would be without all-knowing überMVP Lance McCarthy. He seems to know a bit of everything, is the most helpful fellow MVP I know. On top of that, he also created this awesome action to easily upload whatever to Azure Blob storage. It’s free to use and is regularly maintained.
- uses: LanceMcCarthy/Action-AzureBlobUpload@v2.1.0
  name: Upload MSIX to Azure
  with:
    connection_string: ${{ secrets.UPLOADBLOB }}}
    container_name: ${{ env.UPLOAD_CONTAINER_NAME }}}
    source_folder: ${{ env.MSIX }}}
    destination_folder: ${{ env.UPLOADPATH }}}
UPLOAD_CONTAINER_NAME comes from the env block at the start (“builds”), MSIX and UPLOADPATH have been defined in previous steps, and the UPLOADBLOB comes from secrets. You can define those at the same settings page as the external environment variables
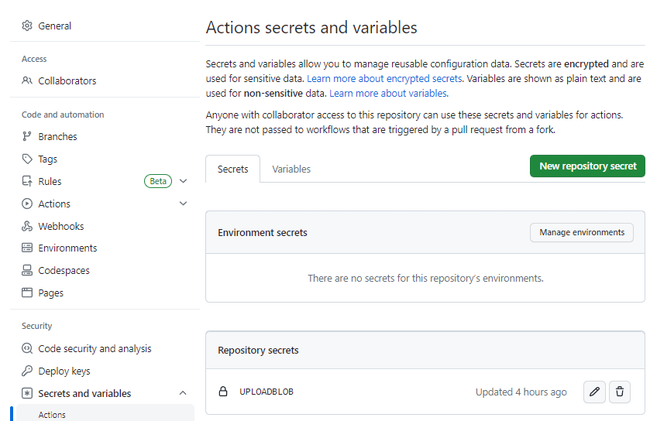
but at a different tab. These are like write-only variables - that is, write-only for you and everyone else. Just a GitHub action can read those. Be sure not to echo these values in logfiles ;)
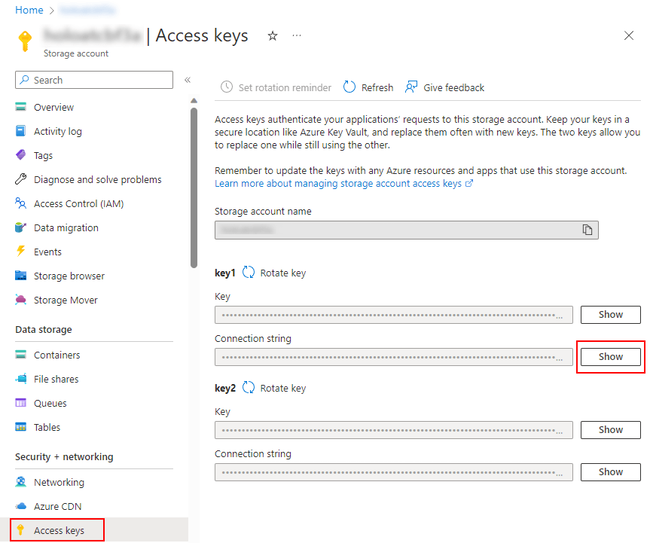
You can find the key you will need to store in UPLOADBLOB in your Azure portal. Go to the Blob storage account you want to use, and find the connection string - that’s what you need. It should start with “DefaultEndpointsProtocol=https;AccountName”
Clean the artifacts folder
The last thing we want is the previous build messing up our precious Store build, so we first clean out everything that was built by MSBuild. This includes the packages, and whatever is in bin and obj.
- name: Clean build artifacts folder
  run: |
    Remove-Item -path ($Env:UNITY_ROOT_FOLDER + "/App/AppPackages") -recurse -force;
    Remove-Item -path ($Env:UNITY_ROOT_FOLDER + "/App/build/bin") -recurse -force;
    Remove-Item -path ($Env:UNITY_ROOT_FOLDER + "/App/build/obj") -recurse -force;
Build the store version
This is almost identical to the previous build step
- name: Run MSBuild to make MSIXUPLOAD
  run : |
     $solution = $Env:UNITY_ROOT_FOLDER + "/App/" +  $Env:PACKAGE_NAME + ".sln";
     msbuild $solution -t:restore,Il2CppOutputProject,$Env:PACKAGE_NAME /p:configuration=Master /p:Platform=Arm64 /p:UapAppxPackageBuildMode=storeupload /p:AppxPackageSigningEnabled=false /p:GenerateAppInstallerFile=false
Only the last parameters differ - we don’t want an app installer file because we build for the store, and we don’t sign the package because hallelujah, the Store is going to take care of that.
And the rest…
Is more of the same. Kill mspdbsrv again, find the msixupload file, and upload it to Azure using once again Lance’s action.
The result
If I open my “builds” blob on the target blob storage account, I know see the following:
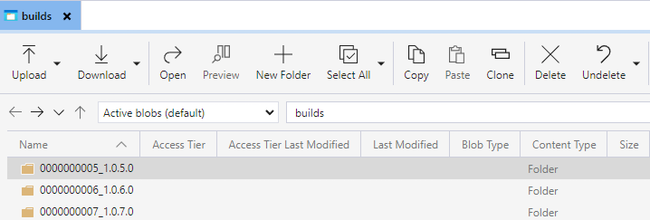
And if I open the last folder I see
Conclusion
While creating this I wondered whether the Universal Declaration of Human Rights should be extended with a paragraph defining this mishmash of YAML and PowerShell as unusual cruelty, but in the end - it works. Writing it is quite difficult, debugging nearly impossible, runs can take a long time, make one mistake in indentation and the whole thing breaks, and the difference in syntax between YAML itself and in embedded PowerShell - particularly when it comes to using variables - is highly confusing. Things I learned the hard way:
- Writing YAML is hard, especially with lots of PowerShell in it.
- Environment variables in PowerShell are accessible as $Env:ENV_VAR, but in YAML code it’s ${{ env.ENV_VAR }}}
- For getting your parameters for both Unity and MSbuild correct, first create simple batch files with those parameters and run those on the server
- Craft the build file step by step. If one step works, comment it out and build the next step. If you are for instance trying to fix the MSbuild step, it saves an enormous amount of time if you disable the steps that check out the repo and the building of the C++ application.
- Use Visual Studio Code to write YAML, and install an appropriate extension, for instance the YAML support extension by Red Hat.
- Virtual machines are expensive. Make sure you shut them down automatically at the end of a day and spin them up only on demand. In my previous post, I showed you how to do that.
I do hope the demo project saves you a lot of time when you try your hand at building Mixed Reality apps using GitHub actions. There is still a lot to do for - build automatically for other platforms, automatically running and verifying unit tests… I see more YAML and PowerShell in my future. But at least this should get you off the ground - with considerable less pain than me. I hope.