
 MVP Profile
 Try my app HoloATC!
  HoloLens 2
 Magic Leap 2
 Android phones
 Snap Spectacles
 MetaLense 2
 Buy me a drink ;)
 BlueSky
 Mastodon
 Discord: LocalJoost#3562
Unit testing UI interaction with MRTK3
Unit testing is a method software developers use to ensure code reliability. It involves writing extra code to input known data into other code - the business logic - expecting a known output. For example, testing an Add function with “Add(1,2)” and expecting the result to be 3. If the test passes, the function is ‘covered’ by tests. Ideally, testing all components and their assemblies should ensure the whole program works.
However, users interact mostly with the user interface, not the business logic. If the UI is flawed, even with correct business logic, it’s like having a car with all components tested except the connection between the steering wheel and the wheels. At some point, a user is going to messily encounter this oversight while taking an offramp doing 75.
So how do we deal with this?
In most cases, this is solved by a comprehensive manual testing plan. However, the MRTK3 contains a lot of UI interaction tests, and a host of classes that make simulated user input possible. And the greatest thing is: with some futzing around, you can actually use those classes yourself to make your own simulated UI test:

The requirements
For this demo, I have put together a simple set of requirements:
- If the user presses a button, it should be toggled. If the same button is pressed again, it should be untoggled.
- Only one of the four buttons can be toggled at one time. If a button is pressed when another button is already toggled, that other button should be untoggled.
- If the close button is pressed, the menu should be closed, that is, destroyed.
The menu itself you could see (very briefly) in the intro ‘movie’ at the top of this article.
Setting up the project for UI Unit testing
I am assuming a project set up for MRTK3 and having some functionality in it.
First, right-click on “Assets” in your project, then hit Create / Testing / Test Assembly Folder and give it a name. I called mine InteractionTests. Now, as I have written before, if you define assemblies yourself, Unity is not going to do you the pleasure of auto-referencing assemblies anymore, so you all have to do that yourself. Which ones, depends on what you need. I have found out that for my particular tests, we need to add the following assemblies as references:
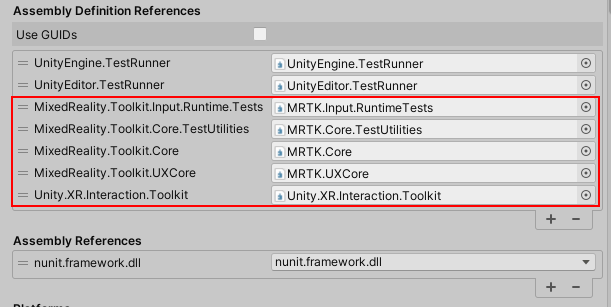
The first two are added by default. Assemblies MRTK.Input.RuntimeTests and MRTK.Core.TestUtilities contain the actual utility classes we need to write code to simulate input, and the other three contain classes that we need to check results - like if a button is toggled or not.
The next step is very weird. You see, if you now write code in your test class and use the TestHand class from the MixedReality.Toolkit.Input.Tests namespace, Unity cannot find it. While it very clearly is there:
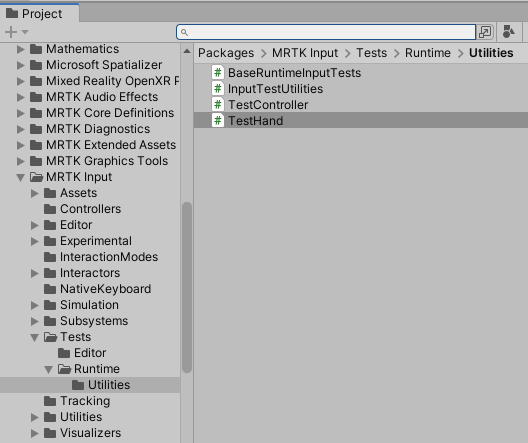
It wasn’t until I stumbled on the 17th comment on this post from 2019 in the Unity forums that I found out what I needed to do: go to the Packages folder, manually edit the manifest.json file, and add the following at the end:
"testables" :
[
    "org.mixedrealitytoolkit.input",
    "org.mixedrealitytoolkit.core"
]
You can’t make this up.
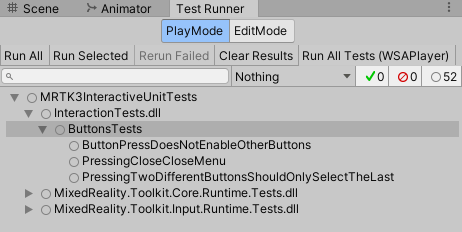
As always, if you know what you are looking for, the testables entry is actually mentioned in Unity’s infamously confusing documentation, but not with this critical piece of knowledge. Anyway, the result is A) you can now finally use the MixedReality.Toolkit.Input.Tests utility classes, and B) all the unit tests in both assemblies now show up in your Test Runner, next to the ones you are going to add (in this picture, they already are).
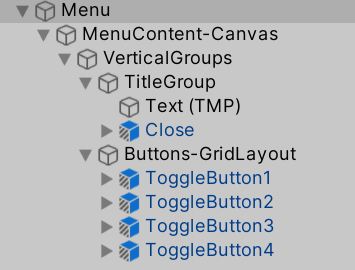
Menu structure
The menu looks like this, and we need this information to be able to see how the menu responds to input actions.
Test class setup
For UX tests, we can utilize the BaseRuntimeHandInputTests class. This is a subclass of the MRKT BaseRuntimeInputTests, that takes care of a lot of things, like setting up a test scene with an MRTK XR Rig, and destroying it after the test.
public class ButtonsTests : BaseRuntimeHandInputTests
{
    private const string MenuGuid = "e9ddf3517c4b9c7488c12bdec6a9917f";
    private GameObject testGameObject;
    private List<pressablebutton> allButtons;
At the top, you see the menu prefab guid, which you can find in the Menu.prefab.meta file:
fileFormatVersion: 2
guid: e9ddf3517c4b9c7488c12bdec6a9917f
PrefabImporter:
  externalObjects: {}
  userData:
  assetBundleName:
  assetBundleVariant:
As well as some other things we will need in the tests. Below that, the Init method creates the prefab and gathers some information about the prefab: its initial position and the buttons.
[SetUp]
public void Init()
{
    testGameObject = InstantiatePrefab(MenuGuid);
    allButtons = FindByName(testGameObject, "Buttons-GridLayout").
                    GetComponentsInChildren<pressablebutton>().ToList();
}
The Teardown just destroys the object. Note it does not need a [TearDown] attribute; the base class takes care of that.
public override IEnumerator TearDown()
{
    yield return base.TearDown();
    Object.Destroy(testGameObject);
}
Testing toggle button states
The test that tests requirement 2 - only one button can be toggled - is the most complex. Or actually, it does the most.
Setting up the test data
[UnityTest]
public IEnumerator PressingTwoDifferentButtonsShouldOnlySelectTheLast()
{
    var pressedButtons = new List<pressablebutton>();
    var initialHandPosition = GetInitialHandPosition();
    TestHand hand = null;
    yield return GetHand(initialHandPosition, h => { hand = h; });
We need a list with buttons that are already pressed to make sure we don’t press the same button twice. Then we calculate get a first hand postion, which does not matter really, but we need an initial position. And then we test the initial condition: no buttons pressed.
Testing a press
First, we test if there are no toggled buttons. Then we move from hand to hand, poke the button, and every time there should only be one button toggled at any time.
Assert.AreEqual(0, GetToggledButtonCount());

foreach(var button in allButtons)
{
    var handPosition =
        GetInitialHandPositionBefore(button.gameObject, HandInFrontOfGameObject);
    yield return MoveHandTo(hand, handPosition);
    yield return PokeHand(hand, HandInFrontOfGameObject);
    Assert.AreEqual(1, GetToggledButtonCount());
    AddButtonToPressedList(pressedButtons);
}
The helper methods that do it all
A lot of the helper methods that I created to make things easier, are defined in base class BaseRuntimeHandInputTests (that extends the MRTK3 class BaseRuntimeInputTests, as I metioned before).
public abstract class BaseRuntimeHandInputTests : BaseRuntimeInputTests
{
    protected const int HandMoveSteps = 1;
    protected const int UpdateFrames = 1;
    protected const float HandInFrontOfGameObject = 0.15f;
    protected const float InitialHandInFrontOfUserDistance = 0.2f;
HandMoveSteps is used in the methods that actually move the hand; the lower the number, the fewer steps are taken in moving the hand - so the hand moves faster. UpdateFrames is the wait time after a hand move or creation. Here also goes: a lower number is a faster unit test. These numbers might be adapted to debug the test visually.
Determining the initial hand position
protected Vector3 GetInitialHandPosition(
    float initialDistance = InitialHandInFrontOfUserDistance)
{
    return InputTestUtilities.InFrontOfUser(Vector3.forward * initialDistance);
}

protected Vector3 GetInitialHandPositionBefore(
    GameObject testGameObject,
    float initialDistance = HandInFrontOfGameObject)
{
    return testGameObject.transform.position - Vector3.forward * initialDistance;
}
There are basically two methods doing this: GetInitialHandPosition gets a position before the user, GetInitialHandPositionBefore get a position in front of a game object, so you can move the hand simply forward and press a button, for instance.
Initializing the hand
A bit of an oddball method - it creates the hand at the initial position. Since an IEnumerator can’t return a value and also can’t use ref out variables (I tried), I used a lambda to return the actual hand:
protected IEnumerator GetHand(Vector3 initialHandPosition, Action<testhand> action)
{
    var hand = new TestHand(Handedness.Right);
    yield return hand.Show(initialHandPosition);
    yield return RuntimeTestUtilities.WaitForUpdates(UpdateFrames);
    action(hand);
}
Note the RuntimeTestUtilities.WaitForUpdates call. This needs to be done after every hand creation or move; otherwise, the test code will throw a “Cached unprocessed value unexpectedly became outdated for unknown reason, new value ‘0’ old value ‘3’” error.
Moving the hand
With everything in place, now it’s very simple to move the hand.
protected IEnumerator PokeHand(TestHand hand, float distance)
{
    yield return MoveHand(hand, Vector3.forward * distance);
    yield return MoveHand(hand, -Vector3.forward * distance);
}

protected IEnumerator MoveHand(TestHand hand, Vector3 distance)
{
    yield return hand.Move(distance, HandMoveSteps);
    yield return RuntimeTestUtilities.WaitForUpdates(UpdateFrames);
}

protected IEnumerator MoveHandTo(TestHand hand, Vector3 location)
{
    yield return hand.MoveTo(location, HandMoveSteps);
    yield return RuntimeTestUtilities.WaitForUpdates(UpdateFrames);
}
PokeHand moves the hand forward and backward, MoveHand moves the hand forward over a specific vector (so relative from the current position), and MoveHandTo moves the hand to a specific absolute location. These methods only add a RuntimeTestUtilities.WaitForUpdates but it’s a bit annoying to have to add that yourself after every call.
Some bits & pieces
Making sure all buttons are pressed
The test method itself actually checks every time if only one button is toggled, but this would still work for pressing only two buttons (back and forth). To make sure every button press is a different press, I wrote this little routine:
private void AddButtonToPressedList(List<pressablebutton> pressedButtons)
{
    var button = buttons.FirstOrDefault(b => b.IsToggled);
    if (!pressedButtons.Contains(button))
    {
        pressedButtons.Add(button);
    }
    else
    {
        Assert.Fail("Button already pressed");
    }
}
Creating a new prefab from a guid
This I basically stole from existing code in the MRTK3 itself, with a little adaptation. This is how you load a prefab from a guid, then instantiate it.
private GameObject InstantiatePrefab(string guid)
{
    var prefabPath = AssetDatabase.GUIDToAssetPath(guid);
    var prefab = AssetDatabase.LoadAssetAtPath(prefabPath, typeof(Object));
    return Object.Instantiate(prefab) as GameObject;
}
Finding a child object by name
This is a rather standard routine that recursively looks for an a game object by name, below a starting object.
protected GameObject FindByName(GameObject parent, string name)
{
    if (parent.name == name)
    {
        return parent;
    }
    foreach (Transform child in parent.transform)
    {
        var result = FindByName(child.gameObject, name);
        if (result != null)
        {
            return result;
        }
    }
    return null;
}
Concluding words.
Yes, I know this is a trivial case. Yes, I know PressableButton has methods that can simulate clicks, so you don’t need to go this roundabout way. Yes, I know the only-one-button-toggled logic should be driven by business logic that could be checked. Yes, I also know this is technically integration testing, not unit testing. That is not the point of this blog post: the point is to show how to set up and execute these kinds of automated UI tests using stuff that is already in the MRTK3. You can do all kinds of nifty things with hands, and this is very useful for finding events that are wired up in the editor but were broken later. The code in this blog post can be a useful starting point.