Cross-platform Yolo object detection with Sentis on Magic Leap 2 and HoloLens 2
Some time ago, I wrote about Yolo object recognition using HoloLens 2 and the Unity Barracuda inference engine. However, Unity seems to have stopped developing this engine and is now pushing the Sentis inference engine. On the same vein: Microsoft have announced they have stopped producing HoloLens 2, with no successor being announced. I have been banging the cross-platform drum for quite a while now, and I think this proves me right.
I already published a version of my YoloHolo app for Magic Leap 2. However, this is still based on Barracuda and the initial GA release of the MRTK3. So, it’s time to revisit this. And I present you a cross-platform version of YoloHolo that runs both on Magic Leap 2 and HoloLens 2, without any code changes.

Recap: how it works in general
In a nutshell, the app does the following:
- It acquires an image using the device’s webcam to see what you are looking at.
- This image is fed to a Yolo model. This results in a number of boxes on the image.
- The app then pretends the picture is ‘hanging before the camera’ at a 1m distance while it’s 1m wide.
- It shoots rays through the center of the box, and where it hits the spatial map, it assumes this is where the object is in space.
For more detailed information, please refer to the first article in this series Yolo V7.
Getting an image
On HoloLens 2, this is very easy. On Magic Leap 2, it is not. However, this is where the Service Framework comes to help us. As I showed in a previous post, the service itself has only two public methods and one public property.
public interface IImageAcquiringService : IService
{
    void Initialize(Vector2Int requestedImageSize);
    Vector2Int ActualCameraSize { get; }
    Task<Texture2D> GetImage();
}
For HoloLens 2, I made a small adaptation as the previous implementation contained a small error.
public class ImageAcquiringService : BaseServiceWithConstructor, IImageAcquiringService
{
    private readonly ImageAcquiringServiceProfile profile;
    private WebCamTexture webCamTexture;
    private RenderTexture renderTexture;

    public ImageAcquiringService(string name, uint priority,
      ImageAcquiringServiceProfile profile)
        : base(name, priority)
    {
        this.profile = profile;
    }

    public void Initialize(Vector2Int requestedImageSize)
    {
        renderTexture = new RenderTexture(requestedImageSize.x, requestedImageSize.y,
                                          24);
        webCamTexture = new WebCamTexture(profile.RequestedCameraSize.x,
            profile.RequestedCameraSize.y, profile.CameraFPS);
        webCamTexture.Play();
        ActualCameraSize = new Vector2Int(webCamTexture.width, webCamTexture.height);
    }

    public Vector2Int ActualCameraSize { get; private set; }

    public async Task<Texture2D> GetImage()
    {
        if (renderTexture == null)
        {
            return null;
        }
        Graphics.Blit(webCamTexture, renderTexture);
        await Task.Delay(32);

        var texture = renderTexture.ToTexture2D();
        return texture;
    }
}
It basically employs a WebCamTexture to acquire an image. I have dropped the Start method and put everything for initialization in the Initialize method. For Magic Leap 2, the situation is a bit more complex. But the service is unchanged from the previous implementation. I do hope Magic Leap will make acquiring webcam images a bit easier in following SDK releases.
Processing Yolo in- and output data with Sentis
This still is a Service Framework Service, not because we need a platform-dependent implementation, but simply because as an architect, I think setting up discrete reusable portions of code as a service is a smart thing to do, because it makes reusability easier, decouples code, and also makes unit and integration testing a lot easier. Its interface still has only one method:
public interface IYoloProcessor : IService
{
    Task<List<YoloItem>> RecognizeObjects(Texture2D texture);
}
However, it gets some information from its profile, as I described earlier. The only change in that is that a model is now no longer of type NNModel but of ModelAsset.
public class YoloProcessor : BaseServiceWithConstructor, IYoloProcessor
{
    private readonly YoloProcessorProfile profile;
    private Worker worker;

    public YoloProcessor(string name, uint priority, YoloProcessorProfile profile)
        : base(name, priority)
    {
        this.profile = profile;
    }

    public override void Initialize()
    {
        var model = ModelLoader.Load(profile.Model);
        worker = new Worker(model, BackendType.GPUCompute);
    }
Most notably, it gets the model. The Sentis inference engine is set with the last two lines. First, you load the model using the ModelLoader, after that you create a Worker.
Recognizing the object still happens in the RecognizeObjects method.
public async Task<List<YoloItem>> RecognizeObjects(Texture2D texture)
{
    // Create a tensor from the input texture
    try
    {
        var inputTensor = TextureConverter.ToTensor(texture);

        await Task.Delay(32);
        // Run the model on the input tensor
        var outputTensor = await ForwardAsync(worker, inputTensor);
        var result = outputTensor.ReadbackAndClone();

        inputTensor.Dispose();
        outputTensor.Dispose();

        var yoloItems = result.GetYoloData(profile.ClassTranslator,
            profile.MinimumProbability, profile.OverlapThreshold, profile.Version);

        result.Dispose();
        return yoloItems;
    }
    catch (System.Exception e)
    {
        Debug.LogError($"Error recognizing objects: {e.Message} {e.StackTrace}");
        return new List<YoloItem>();
    }
}
However, instead of making a new Tensor and feeding a Texture to its constructor, you now use a static conversion method TextureConverter.ToTensor(texture). Also, although ForwardAsync still returns a Tensor, it cannot be accessed directly as it runs on the GPU. So you have to copy it from there using outputTensor.ReadbackAndClone() and go from there.
ForwardAsync now also has the same small changes:
private async Task<Tensor<float>> ForwardAsync(Worker modelWorker, Tensor inputs)
{
    var executor = worker.ScheduleIterable(inputs);
    var it = 0;
    bool hasMoreWork;
    do
    {
        hasMoreWork = executor.MoveNext();
        if (++it % 20 == 0)
        {
            await Task.Delay(32);
        }
    } while (hasMoreWork);

    var result = modelWorker.PeekOutput() as Tensor<float>;

    return result;
}
worker.StartManualSchedule(inputs) has been changed to worker.ScheduleIterable(inputs) and results in an IEnumerator executor. Also, worker.FlushSchedule() no longer exists (as it apparently was not necessary) and the weirdest thing comes at the end: instead of modelWorker.PeekOutput() you have to call modelWorker.PeekOutput() as Tensor<float> otherwise you get just a Tensor object without any indexes - I could not find out how to process that without casting as I do now.
Interpreting a Yolo V7 item with Sentis
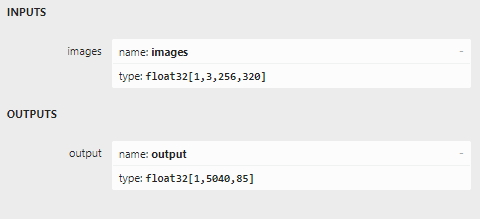
One of the advantages of Sentis is that we are no longer dealing with things like channel and width, which were very confusing to me and I could only get the right values for what by debugging a lot and setting breakpoints. Sentis just returns a multi-dimensional array. A Tensor now just has a “shape” array that contains metadata, and indexers equal to the number of shapes. If this sounds a bit abstract, remember what Netron said about the V7 model:

The output is a three-dimensional array. “shape” will have three values: 1, 5040, and 85. The first is the batch size - always one, one image at a time, there are 5040 boxes of 85 numbers - which means the first 4 are the box, the 5th is confidence something is recognized, and the last 80 are just probabilities for every object this model can recognize. This is simply the way this model is created. This means we need to iterate over the 2nd item (index 1) of the ‘shape’ of the three-dimensional array. Which is exactly what happens, in this little excerpt from TensorExtensions.ProcessV7Item in my code
private static List<YoloItem> ProcessV7Item(this Tensor<float> tensor,
    IYoloClassTranslator translator, float minProbability,
    float overlapThreshold, YoloVersion version)
{
    float maxConfidence = 0;
    var boxesMeetingConfidenceLevel = new List<YoloItem>();
    for (var i = 0; i < tensor.shape[1]; i++)
    {
        var yoloItem = YoloItem.Create(tensor, i, translator, version);
        maxConfidence = yoloItem.Confidence > maxConfidence ? yoloItem.Confidence :
          maxConfidence;
        if (yoloItem.Confidence > minProbability)
        {
            boxesMeetingConfidenceLevel.Add(yoloItem);
        }
    }
The data of each item is then easily processed like this:
internal YoloV7Item(Tensor<float> tensorData, int boxIndex,
  IYoloClassTranslator translator)
{
    Center = new Vector2(tensorData[0, boxIndex, 0], tensorData[0, boxIndex, 1]);
    Size = new Vector2(tensorData[0, boxIndex, 2], tensorData[0, boxIndex, 3]);
    TopLeft = Center - Size / 2;
    BottomRight = Center + Size / 2;
    Confidence = tensorData[0, boxIndex, 4];

    var classProbabilities = new List<float>();
    for (var i = 5; i < tensorData.shape[2]; i++)
    {
        classProbabilities.Add(tensorData[0, boxIndex, i]);
    }
    var maxIndex = classProbabilities.Any() ?
      classProbabilities.IndexOf(classProbabilities.Max()) : 0;
    MostLikelyObject = translator.GetName(maxIndex);
}
Because the shape has three values, the tensor will have three indexers. The first indexer is the batch size (always 0 as the model can only process one image at a time), the boxindex is the indexer of this particular item, and the third indexer is the value we want. The first two are the center coordinate, the second two are the X/Y size, the fifth the confidence something is recognized and are probabilities for each of the objects this model knows. To iterate over these, we just have to iterate to the value of shape[2], starting at 5.
Interpreting a Yolo V8 item with Sentis
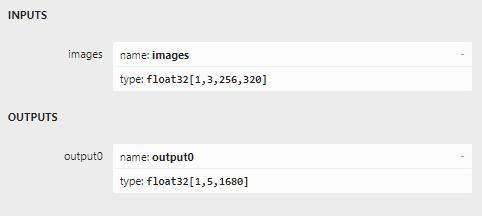
This is nearly the same. However, there are two things different about this model. First of all, it has only one class, so the center coordinate plus the size plus the confidence should be five, or possibly six numbers only. Netron has the following to say:

So apparently no class data was added for the one class. But apparently, now the number of boxes is in shape[1], and the values for each box in shape[2]. So TensorExtensions.ProcessV8Item iterates over shape[2] instead of shape[1]
private static List<YoloItem> ProcessV8Item(this Tensor<float> tensor,
    IYoloClassTranslator translator, float minProbability,
    float overlapThreshold, YoloVersion version)
{
    float maxConfidence = 0;
    var boxesMeetingConfidenceLevel = new List<YoloItem>();
    for (var i = 0; i < tensor.shape[2]; i++)
    {
        var yoloItem = YoloItem.Create(tensor, i, translator, version);
        maxConfidence = yoloItem.Confidence > maxConfidence ? yoloItem.Confidence :
           maxConfidence;
        if (yoloItem.Confidence > minProbability)
        {
            boxesMeetingConfidenceLevel.Add(yoloItem);
        }
    }
And YoloV8Item is nearly the same as YoloV7Item except that “boxIndex” goes into the third indexer instead of the second, and it iterates over shape[1] to get additional class values. Which are not present anyway, but I kept the code intact in case you want to use it with a V8 model that does support multiple classes of objects
public class YoloV8Item : YoloItem
{
    internal YoloV8Item(Tensor<float> tensorData, int boxIndex,
      IYoloClassTranslator translator)
    {
        Center = new Vector2(tensorData[0, 0, boxIndex], tensorData[0, 1, boxIndex]);
        Size = new Vector2(tensorData[0, 2, boxIndex], tensorData[0, 3, boxIndex]);
        TopLeft = Center - Size / 2;
        BottomRight = Center + Size / 2;
        Confidence = tensorData[0, 4, boxIndex];

        var classProbabilities = new List<float>();
        for (var i = 5; i < tensorData.shape[1]; i++)
        {
            classProbabilities.Add(tensorData[0, i, boxIndex]);
        }
        var maxIndex = classProbabilities.Any() ?
          classProbabilities.IndexOf(classProbabilities.Max()) : 0;
        MostLikelyObject = translator.GetName(maxIndex);
    }
}
Conclusion
As far as inference engine use is concerned, you might have noticed that the code changes going from Barracuda to Sentis are relatively small, and actually Sentis code is easier and more intuitively mappable to Netron output than Barracuda code. There are some notable differences in performance and execution though. Where with my first implementation I had the idea HoloLens 2 came out just on top, now it’s definitely the other way around. This may be just the engine being more optimized for Android now. I can imagine Unity not putting much effort into HoloLens 2 support now. There are two weird idiosyncrasies though:
- If you start the app, you will see a number of debug messages floating in space. One of them is text saying the camera has been acquired, at what size. After that the model is loaded, and the recognition starts. HoloLens then loads the model, and starts showing either “no objects found” or a list of found objects. Magic Leap 2 then shows nothing at all for a full 16 seconds - apart from the red dot top left indicating the camera is active. Everything else is turned off. So far, I have not been able to detect what is causing it, or where it’s hanging on. However, then it comes back alive, and runs faster and more accurately recognizes objects.
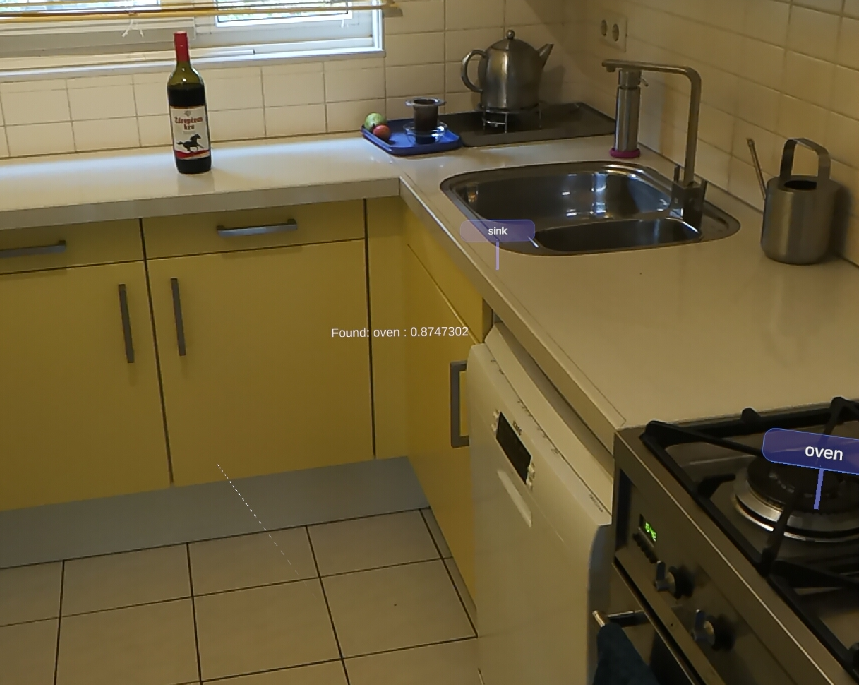
- It’s impossible to film or properly photograph the recognizing process on a Magic Leap 2. If you try to film, it stops recognizing. If you take a picture (like I did) the app will get that picture and that picture only, so after I took the picture it saw ovens and sinks everywhere
Presumably the camera reference in my app is b0rked or lost after the OS grabs the camera for taking pictures or movies.
Demo project as always on GitHub, branch crosplat-sentis

 MVP Profile
 Try my app HoloATC!
  HoloLens 2
 Magic Leap 2
 Meta Quest
 Android phones
 Snap Spectacles
 Buy me a drink ;)
 BlueSky
 Mastodon
 Discord: LocalJoost#3562