
 MVP Profile
 Try my app HoloATC!
  HoloLens 2
 Magic Leap 2
 Android phones
 Snap Spectacles
 MetaLense 2
 Buy me a drink ;)
 BlueSky
 Mastodon
 Discord: LocalJoost#3562
HoloLens AI - using Yolo ONNX models to localize objects in 3D space
Since everyone seems to be an AI expert all of a sudden, I decided to jump on the bandwagon too and see what I could do with ‘AI’. Large Language Models (LLMs) like ChatGPT are all the rage these days, but for me, one of the most compelling cases for AI is still computer vision. About four years ago, when AI was still called Machine Learning, I already did a project with Azure Custom Vision and toy airplanes but that was slow and cumbersome, and it was running on a HoloLens 1, too.
After Jasper Brekelmans pointed me to the PINTO model zoo I lifted out this YoloV7 model to see what I could do with it. Of course, using ChatGPT as my teacher, because that’s the thing these days. After considerable experimentation, I had an MRTK3-based app which I called YoloHolo. I have been toying with the idea of calling it HoloCopilot, but on reflection, I did not want to take chances with Microsoft’s vast legal department not seeing the humor in that. So I stuck with YoloHolo. And this it what is does: recognizing objects before it and taking a stab at locating them in 3D space.

A bit about Yolo models
Yolo stands for You Only Look Once. You can read the whole explanation of how it works but what it amounts to is, I think, that you break down a picture into a structure that contains a three dimensional array of RGB values, the model tries to see if any of the known objects fit into a set of predefined boxes, and out comes a three dimensional array of bounding boxes and classifications. Those arrays are called “Tensors” and they have a few tricks up their sleeve. If you install Netron and double-click on the model you can actually see how the model works. Also, if you scroll all the way down and click out the “output” box, it shows the metadata of this model and what objects it supports:
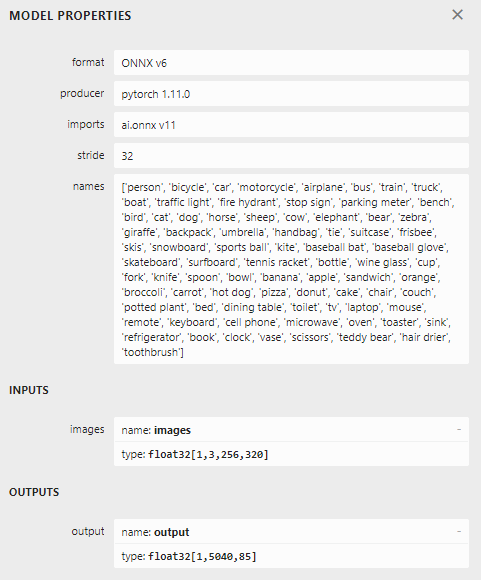
This shows that this particular models supports 320x256 RGB colors images (hence the 3). The first number is ‘batch size’ but the code always feeds it one image at the time. As for the output, that’s a two dimensional array. 5040 is the number of predefined boxes. For every box, there are 85 numbers: box center coordinates (x and y), box size (height and width), confidence level something actually is in the box at all, and then a confidence level for all 80 object types this model supports.
I quickly learned that using this kind of models is not that hard - but actually understanding what the output means and in what order it comes out is a whole different ballgame.
Getting the pieces of the puzzle
Basically, I needed to do five things
- Get a running feed from the HoloLens camera
- Find an inference library that would run on HoloLens
- Feed the picture to the model
- Get the recognitions out of the model
- Find the locations in space
Get a running feed from the HoloLens camera
So I asked ChatGPT, but it completely failed to help me. Maybe I asked the wrong question, but it tried to get me to use UWP MediaCapture and that led me down a rabbit hole of all kinds of weird camera and image formats… and in the end I just old-fashioned GoogleBinged and stumbled on WebCamTexture. You can literally do something like this:
var webCamTexture = new WebCamTexture(requestCameraSize.x, requestCameraSize.y, cameraFPS);
webCamTexture.Play();
and you will have a texture that gets populated with a camera image ‘cameraFPS’ times a second. It’s that easy. And it’s a Unity solution to boot, so no messing around with UWP specific code. On top of that, it does apparently not take exclusive access to the camera so you can actually record or cast your experience while the apps grabs images off the video feed. As you could see above.
Now the thing is, the actual camera size you get may not be the camera size you want. We need an image size of 320x256. The HoloLens 2 video camera can, as I found out, apparently deliver two formats:
- 896 x 504
- 2272 x 1278
It will select a size that best fits your requested size, and to make sure it gets the smallest one, I explicitly ask for 896x504, as you can see in the YoloObjectLabeler behavior at the start of the app
[SerializeField]
private Vector2Int requestedCameraSize = new(896, 504);
At the start of the StartRecognizingAsync method you can see how the resizing works:
private async Task StartRecognizingAsync()
{
    await Task.Delay(1000);

    actualCameraSize = new Vector2Int(webCamTexture.width, webCamTexture.height);
    var renderTexture = new RenderTexture(yoloImageSize.x, yoloImageSize.y, 24);

    while (true)
    {
        var cameraTransform = Camera.main.CopyCameraTransForm();
        Graphics.Blit(webCamTexture, renderTexture);
It simply uses a RenderTexture of the desired size for the Yolo model and Blit the web cam texture on that. That’s all. And yes, it will be a bit stretched out of proportions, but we will take care of that later.
Inference library that runs on HoloLens
To be able to use an ONNX model, you will need to use an inference library. I asked once again ChatGPT for ideas. It provided a neat list of four options. I could not get the first suggestion, ML.Net, to run in Unity. Using NuGet for Unity I got all kinds of dll version conflict issues.
The second suggestion was Unity Barracuda. And that works. Awesomely. It is dead simple to use, and it has a Tensor object class that can directly create itself from a Texture2D. Automagically in the right format! And also Unity a Unity solution, so no UWP code here either. How about them apples!
Feed the picture to the model
Okay, now we are going to dive deep. The main loop of ObjectLabeler runs like this:
while (true)
{
    var cameraTransform = Camera.main.CopyCameraTransForm();
    Graphics.Blit(webCamTexture, renderTexture);
    await Task.Delay(32);

    var texture = renderTexture.ToTexture2D();
    await Task.Delay(32);

    var foundObjects = await yoloProcessor.RecognizeObjects(texture);

    ShowRecognitions(foundObjects, cameraTransform);
    Destroy(texture);
    Destroy(cameraTransform.gameObject);
}
The ToTexture extension method, that I nicked from Stack Overflow, simply converts a RenderTexure to a Texture2D
Then the picture is simply fed into the yoloProcessor and out come recognized objects. Now you might have seen YoloProcessor is a Reality Collective ServiceFramework Service. If you have never heard of the ServiceFramework before, have a look at this article I wrote before. In the next few paragraphs, we are going to pick the YoloProcessor service apart.
Get the recognitions out of the model
Service profile
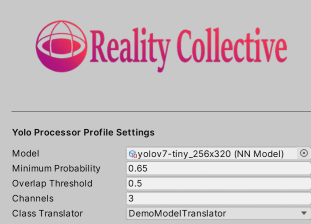
As with most services, it starts with a profile that allows for a number of settings:
public class YoloProcessorProfile : BaseServiceProfile<IServiceModule>
{
    [SerializeField]
    private NNModel model;
    public NNModel Model => model;

    [SerializeField]
    private float minimumProbability = 0.65f;
    public float MinimumProbability => minimumProbability;

    [SerializeField]
    private float overlapThreshold = 0.5f;
    public float OverlapThreshold => overlapThreshold;

    [SerializeField]
    private int channels = 3;

    public int Channels => channels;

    [SerializeField]
    [Implements(typeof(IYoloClassTranslator), TypeGrouping.ByNamespaceFlat)]
    private SystemType classTranslator;

    private static IYoloClassTranslator translator;

    public IYoloClassTranslator ClassTranslator =>
        translator ??=
          (IYoloClassTranslator)Activator.CreateInstance(classTranslator);
}
You can use it to set which model is used, what the minimum confidence level is for recognized objects, what the threshold is for overlapping boxes to be filtered out (more about that later), the channels to be used (3, because 3 colors) and a translator. The last one uses editor configurable dependency injection to allow you to attach a simple class that translates the recognized object’s index into its name. This may look a bit overengineerd (and probably is), but does make the architecture very flexible:
[Serializable]
public class DemoModelTranslator : IYoloClassTranslator
{
    public string GetName(int classIndex)
    {
        return detectableObjects[classIndex];
    }

    private static List<string> detectableObjects = new()
    {
        "person",
        "bicycle",
        "car",
        "motorcycle",
        "airplane",

        //etc
This list comes 1:1 from the Netron output. In the Unity editor, the service configuration sits in YoloProcessorProfile.asset and looks like this:
The YoloProcessor service
This basically does all the recognizing work. It is, as stated before, a service. The Initialize method loads the model, and the by calling RecognizeObjects with the texture you got from the webcam you get your recognitions back. It’s simpele as that.
public YoloProcessor(string name, uint priority, YoloProcessorProfile profile)
     : base(name, priority)
 {
     this.profile = profile;
 }

 public override void Initialize()
 {
     var model = ModelLoader.Load(profile.Model);
     worker = WorkerFactory.CreateWorker(WorkerFactory.Type.ComputePrecompiled,
                                         model);
 }

 public async Task<List<YoloItem>> RecognizeObjects(Texture2D texture)
 {
     var inputTensor = new Tensor(texture, channels: profile.Channels);
     await Task.Delay(32);
     var outputTensor = await ForwardAsync(worker, inputTensor);
     inputTensor.Dispose();

     var yoloItems = outputTensor.GetYoloData(profile.ClassTranslator,
         profile.MinimumProbability, profile.OverlapThreshold);

     outputTensor.Dispose();
     return yoloItems;
 }
Now a Barracuda Worker has an Excecute method, but that evaluates the whole model in one go, and this might cause your application to skip a few frames. So instead of that it uses this:
public async Task<Tensor> ForwardAsync(IWorker modelWorker, Tensor inputs)
{
    var executor = worker.StartManualSchedule(inputs);
    var it = 0;
    bool hasMoreWork;
    do
    {
        hasMoreWork = executor.MoveNext();
        if (++it % 20 == 0)
        {
            worker.FlushSchedule();
            await Task.Delay(32);
        }
    } while (hasMoreWork);

    return modelWorker.PeekOutput();
}
I nicked it from this Unity forum post. Also acquired by old fashioned GoogleBinging. I adapted it a little to wait for approximately two frames. It basically gives your device breathing room to actually be able to continue displaying a smooth image. You will see this await Task.Delay(32) on more places.
Picking apart the output tensor, part 1
This uses the GetYoloData extension method. This is not part of Barracude, and sits in TensorExtensions.cs:
        public static List<YoloItem> GetYoloData(this Tensor tensor,
            IYoloClassTranslator translator,
            float minProbability, float overlapThreshold)
        {
            var boxesMeetingConfidenceLevel = new List<YoloItem>();
            for (var i = 0; i < tensor.channels; i++)
            {
                var yoloItem = new YoloItem(tensor, i, translator);
                if (yoloItem.Confidence > minProbability)
                {
                    boxesMeetingConfidenceLevel.Add(yoloItem);
                }
            }

            var result = new List<YoloItem>();
            var recognizedTypes = boxesMeetingConfidenceLevel.
                Select(b => b.MostLikelyObject).Distinct();
            foreach (var objType in recognizedTypes)
            {
                var boxesOfThisType = boxesMeetingConfidenceLevel.
                    Where(b => b.MostLikelyObject == objType).ToList();
                result.AddRange(RemoveOverlappingBoxes(boxesOfThisType,
                                                       overlapThreshold));
            }

            return result;
        }
It basically does three things:
- Convert every tensor ‘channel’ item to a
YoloItem - Weed out the items with a lower-than-desired confidence level
- Weed out duplicate recognitions per object type
As I stated before, Yolo works with a lot of overlapping predefined boxes. Apparently, you sometimes get duplicates of partially overlapping items - or at least I did get duplicates when I tried a test picture with some parrots. So I used some code to remove every box that overlaps more than 50% with any other containing the same recogizned object. How it does that? it uses RemoveOverlappingBoxes. You are welcome to have a look at it in the source code. This is something I asked ChatGPT to write, and it did so. It works. This is the kind of drudgery code that I think it’s very good at. Apparently a fairly common standard algorithm, so it had lots of examples to draw from.
Picking apart the output tensor, part 2
Harking back to this little piece of code:
for (var i = 0; i < tensor.channels; i++)
{
    var yoloItem = new YoloItem(tensor, i, translator);
Maybe you remember the output of the model was an array of 1,5040,85. Well, the first number was the batch size (always 0 in our case), the second number is, apparently, called the “channel”. I think of it as the index of the box. A tensor can have all kinds of ‘shapes’ and Barracuda offers multiple ways to access the data:
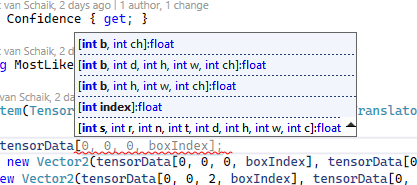
I don’t quite understand all of that, but I am pretty sure “b” stand for “batch”, and since we have only one image, it should be 0. I assume h, w, and ch stands for height, width and channel, and by some experimenting I found out that channel is the index of the box, and w the box metadata - so, we have 5040 channels of each 85 numbers. Apparently, we don’t need the height, so I keep that to 0 as well.
And this is what the YoloItem constructor uses to pick one piece of recognition data from the whole big 3-dimensional output array:
public YoloItem(Tensor tensorData, int boxIndex, IYoloClassTranslator translator)
{
    Center = new Vector2(tensorData[0, 0, 0, boxIndex], tensorData[0, 0, 1, boxIndex]);
    Size = new Vector2(tensorData[0, 0, 2, boxIndex], tensorData[0, 0, 3, boxIndex]);
    TopLeft = Center - Size / 2;
    BottomRight = Center + Size / 2;
    Confidence = tensorData[0, 0, 4, boxIndex];

    var classProbabilities = new List<float>();
    for (var i = 5; i < tensorData.width; i++)
    {
        classProbabilities.Add(tensorData[0, 0, i, boxIndex]);
    }
    var maxIndex = classProbabilities.IndexOf(classProbabilities.Max());
    MostLikelyObject = translator.GetName(maxIndex);
}
The first two numbers are the center location, the second two the size, the fifth number the probabililty of there being an object at all, and then rest a list of the individual class probabilities. The code fishes out the largest one, and discards the rest.
Find the locations in space
So. Now we have recognized items on the web cam picture. How do we locate those in space? Well, basically by revisiting and greatly enhancing by toy airplane project. Nothing like stealing from yourself ;)
Projecting on a virtual image
This is done by YoloGameObject. In its constructor you will see some fancy math footwork.
public YoloGameObject(
    YoloItem yoloItem, Transform cameraTransform,
    Vector2Int cameraSize, Vector2Int yoloImageSize,
    float virtualProjectionPlaneWidth)
{
    ImagePosition = new Vector2(
        (yoloItem.Center.x / yoloImageSize.x * cameraSize.x - cameraSize.x / 2) /
          cameraSize.x,
        (yoloItem.Center.y / yoloImageSize.y * cameraSize.y - cameraSize.y / 2) /
          cameraSize.y);
    Name = yoloItem.MostLikelyObject;

    var virtualProjectionPlaneHeight = virtualProjectionPlaneWidth * cameraSize.y /
       cameraSize.x;
    FindPositionInSpace(cameraTransform, virtualProjectionPlaneWidth,
       virtualProjectionPlaneHeight);
    TimeLastSeen = Time.time;
}
Remember I wrote the image was a bit stretched, because the webcam delivered 896 x 504 while we need 320x256? This calculation ‘unstretches’ it, and finds the position on the picture as if the picture still has the right proportions, that is, 455x256. Then it also transposes the center coordinate to use 0,0 as the center of the picture (instead of the top left), then divides it by the actual camera size, so the coordinates on the picture are always within (-0.5, -0.5) - (0.5, 0.5) range.
Now the idea is once again to pretend there is an image 1 meters hanging in the air before us. The horizontal width is 1.356 m (nicked from my previous project, but you can change all those settings in the editor) and the height is automatically calculated to maintain the same aspect ratio as the camera image.
private void FindPositionInSpace(Transform transform,
    float width, float height)
{
    var positionOnPlane = transform.position + transform.forward +
        transform.right * (ImagePosition.x * width) -
        transform.up * (ImagePosition.y * height);
    PositionInSpace = CastOnSpatialMap(positionOnPlane, transform);
}
And then it simply does a sphere cast to the Spatial Mesh, and assumes this is the object the model has recognized:
private Vector3? CastOnSpatialMap(Vector3 positionOnPlane, Transform transform)
{
    if (Physics.SphereCast(transform.position, SphereCastSize,
            (positionOnPlane - transform.position),
            out var hitInfo, MaxLabelDistance,
            LayerMask.GetMask(SpatialMeshLayerName)))
    {
        return hitInfo.point;
    }
    return null;
}
Showing the recognized location in 3D space
For that, we are going back where we started, that is: YoloObjectLabeler. When indeed a position has been found, this creates a label object in space and set its label to the name of the recognized object class. Unless it has been seen before on this location - then it’s seeing the same object once again, so it does not have to create yet another label. After that, it weeds oud stale objects, that have not been seen for a while. This all to prevent the whole space becoming full of labels, degrading the experience.
private void ShowRecognitions(List<YoloItem> recognitions, Transform cameraTransform)
 {
     foreach (var recognition in recognitions)
     {
         var newObj = new YoloGameObject(recognition, cameraTransform,
             actualCameraSize, yoloImageSize, virtualProjectionPlaneWidth);
         if (newObj.PositionInSpace != null && !HasBeenSeenBefore(newObj))
         {
             yoloGameObjects.Add(newObj);
             newObj.DisplayObject = Instantiate(labelObject,
                 newObj.PositionInSpace.Value, Quaternion.identity);
             newObj.DisplayObject.transform.parent = transform;
             var labelController = newObj.DisplayObject.
                GetComponent<ObjectLabelController>();
             labelController.SetText(newObj.Name);
         }
     }

     for (var i = yoloGameObjects.Count - 1; i >= 0; i--)
     {
         if (Time.time - yoloGameObjects[i].TimeLastSeen > labelNotSeenTimeOut)
         {
             Destroy(yoloGameObjects[i].DisplayObject);
             yoloGameObjects.RemoveAt(i);
         }
     }
 }
And finally, this little piece of code checks if the object has been seen before on this location and if so, updates its timestamp.
private bool HasBeenSeenBefore(YoloGameObject obj)
{
    var seenBefore = yoloGameObjects.FirstOrDefault(
        ylo => ylo.Name == obj.Name &&
        Vector3.Distance(obj.PositionInSpace.Value,
            ylo.PositionInSpace.Value) < minIdenticalLabelDistance);
    if (seenBefore != null)
    {
        seenBefore.TimeLastSeen = Time.time;
    }
    return seenBefore != null;
}
Conclusion
As you can see, once you understand how a model works, actually getting it to work for you is not that hard. In fact, the hardest part was getting the image feed from the camera, no thanks to ChatGPT who sent me off in a totally wrong direction. It was also wrong in writing code that accessed the model, and frequently hallucinated methods that simply do not exist. The same thing applies to GitHub CoPilot by the way. Only in a few instances CoPilot was able to generate useful code, and often it got in a kind of fight with ‘normal’ Intellisense. Anyway, ChatGPT, although it provided me mostly with incorrect code, could indeed provide me with general knowlegde about how to use a Yolo model. Also, it wrote the de-duplication code for me and the best tip of all: it recommended me Barracuda - although only as a second option.
What I learned the hard way is that using these ONXX models can be quite resource intensive. The Yolo model I used comes in a number of varieties:
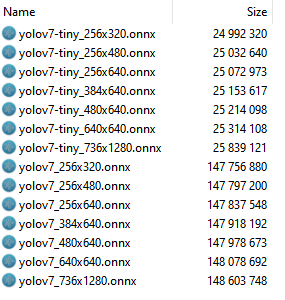
And naive as I was, I took the biggest one with the biggest picture size. The bigger picture, the better and the larger model would probably be more correct, right? Well, maybe that is so, but it’s also slow. See, the 320x256 model have 5040 boxes. The 1280x736 have 57960 boxes. You know what happens if you let that run in a HoloLens? Either it drops down to just to a few frames a second, or the ForwardAsync method need so many iterations it can only start to search for objects in space like every 20 seconds, and you have to hold your head still all the while. It’s not nearly realtime.
You can download the project here but you have to understand it comes without the model. I don’t like to republish someone else’s work - at least not when binaries are involved (and I consider a ONNX model as such). Please refer to the project’s README to find out how and where to download the model.
The whole project (sans the model) can be downloaded here. If you just want to play with the app, you can also download an msix here.