
 MVP Profile
 Try my app HoloATC!
  HoloLens 2
 Magic Leap 2
 Android phones
 Snap Spectacles
 MetaLense 2
 Buy me a drink ;)
 BlueSky
 Mastodon
 Discord: LocalJoost#3562
Custom editor configurable dependency injection using the MRTK ImplementsAttribute
If you ever have created or used the Mixed Reality Toolkit’s Extension Services, you have probably seen this:
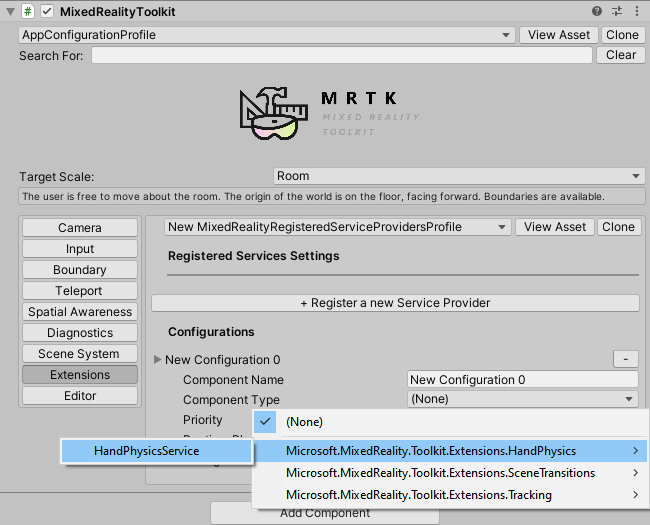
If you did create services using the Mixed Reality Toolkit/Utilities/Create Extension Service menu, your services showed up in that list as well. So apparently there is something in the MRTK that allows
- the editor to find custom implementation of
IMixedRealityExtensionService - the editor to configure a reference to the service type in settings
- the application to instantiate the service dynamically.
Have you ever wondered how this is possible? I could imagine 3, but not the other two. So I tried to find out. And find out I did.
The magic sauce
Referring to the numbers above:
ImplementsAttributeis apparently the attribute that allows the editor to find implementations of an interface. Any interface - not onlyIMixedRealityExtensionService.SystemTypeis apparently a type that can hold a reference to the type of the concrete implementation.- Good old
Activator.CreateInstanceactually instantiates a dynamic instance.
This allows you to build your own dependency injection system pretty easily. To demonstrate how that works, I have built what is probably my most over-engineered Mixed Reality app ever: a configurable dependency injection driven calculator. I feel like a real architect now :)
Business classes
The ‘heart’ of any decent app is, of course, it’s business classes. Being a real architect *cough*, I started out with an interface:
namespace Application.BusinessObjects
{
    public interface ICalculateOperation
    {
        float Calculate(float a, float b);

        string Symbol { get; }
    }
}
And three implementations: MinusCalculation, MultiplyCalculation and PlusCalculation. The first one looks like this:
namespace Application.BusinessObjects
{
    public class MinusCalculation : ICalculateOperation
    {
        public float Calculate(float a, float b)
        {
            return a - b;
        }

        public string Symbol => "-";
    }
}
And I suppose you can work out the other two for yourself :P.
Configuration
The configuration is a scriptable object. This is an object that can have it’s values serialized to a file, and deserialized to a class (this one below). It’s both usable in the editor and in the application, and it’s mostly used for configuration purposes.
namespace Application.Configuration
{
    [Serializable]
    [CreateAssetMenu(fileName = "CalculatorConfig",
        menuName = "LocalJoost/CalculatorConfig", order = 0)]
    public class CalculatorConfig : ScriptableObject
    {
        public SystemType CalculationModule => calculationModule;

        [SerializeField]
        [Implements(typeof(ICalculateOperation), TypeGrouping.ByNamespaceFlat)]
        private SystemType calculationModule;
    }
}
Unpacking this:
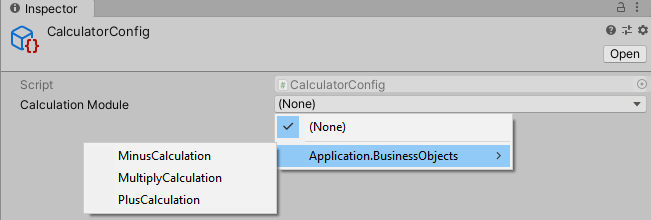
- Near the bottom you see the actual use of
ImplementsAttribute. You simply define which classes you want the UI to find - that is, what interface you want them to implement, and then something about the grouping. The result of usingByNamespaceFlatis this:

- One level with namespaces, a second with classes. There are a 3 other options:
None,ByNameSpaceandByAddComponentMenu, but I feelByNamespaceFlatone makes the most sense to me. Feel free check out the other options at your leisure. - On the top you see an attribute that creates an asset menu. Because you see, creating scriptable object classes is nice, but it’s the concrete serialized instances we need for configuration.
You see, the result of this CreateAssetMenu is this:

There is a new entry in the Assets/Create menu: LocalJoost/CalculatorConfig, exactly as described in the attribute. Now if you click “CalculatorConfig” a new file “CalculatorConfig” will be created in the active folder in the Project tab. The name is “CalculatorConfig” because we specified that in the fileName attribute of CreateAssetMenu
And lo and behold, if we click the drop down next to “Calculation Module”, that is standard set to “None”, we can select one of the calculation classes.
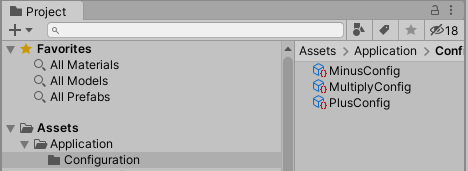
If you look in the Configuration folder you will see the three already defined configurations:
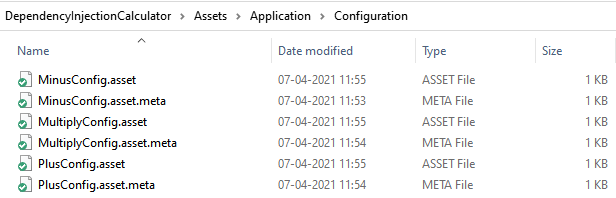
In the Windows File Explorer, they will show up as “.asset” files:
and the contents will be something like this:
%YAML 1.1
%TAG !u! tag:unity3d.com,2011:
--- !u!114 &11400000
MonoBehaviour:
  m_ObjectHideFlags: 0
  m_CorrespondingSourceObject: {fileID: 0}
  m_PrefabInstance: {fileID: 0}
  m_PrefabAsset: {fileID: 0}
  m_GameObject: {fileID: 0}
  m_Enabled: 1
  m_EditorHideFlags: 0
  m_Script: {fileID: 11500000, guid: ab0a2df84e998524b8ef58d6e8dd0a99, type: 3}
  m_Name: MinusConfig
  m_EditorClassIdentifier:
  calculationModule:
    reference: Application.BusinessObjects.MinusCalculation, Assembly-CSharp
Wiring it all together
The CalculationController is where it all comes together. It has two input fields and one output text that can be set from the editor:
[SerializeField]
private TMP_InputField input1;

[SerializeField]
private TMP_InputField input2;

[SerializeField]
private TextMeshPro resultText;`
Then it has a field you can drag one of the configurations in, and one private field for the instantiated calculator:
[SerializeField]
private CalculatorConfig calculatorConfig;

private ICalculateOperation calculator;
The Start method creates the actual calculator from the configuration - once, since Activator.CreateInstance is an expensive call:
private void Start()
{
    calculator = (ICalculateOperation) Activator.CreateInstance(
       calculatorConfig.CalculationModule);
}
and then finally, the Execute method does all the ‘heavy’ lifting, calling the actual calculator, showing the symbol and result in the output (or an error message).
public void Execute()
{
    if (float.TryParse(input1.text, out var v1) &&
        float.TryParse(input2.text, out var v2))
    {
        resultText.text =
            $"{v1} {calculator.Symbol} {v2} = {calculator.Calculate(v1, v2)}";
    }
    else
    {
        resultText.text = "Please enter two numbers";
    }
}
In the editor, you configure a button click like this:

Every button calls the same script method (CalculationController.Execute) but that script has a different configuration, each with a different concrete ICalculateOperation implementation.
The result
Closing thoughts
This is a rather contrived and over the top implementation of such an simple app, but I hope it hit home the concept of how you can achieve simple dependency injection, piggybacking on the Mixed Reality Toolkit components. Use wisely - Activator.CreateInstance, as was said before, is expensive and slow. Use this to load business classes for modules in your app, not to spawn individual game objects or stuff like that. This stuff is really meant for allowing senior developers to build the complex logic, while more junior developers can weave the app together from components.