
 MVP Profile
 Try my app HoloATC!
  HoloLens 2
 Magic Leap 2
 Android phones
 Snap Spectacles
 MetaLense 2
 Buy me a drink ;)
 BlueSky
 Mastodon
 Discord: LocalJoost#3562
Showing multiple location-based items based on QR codes using MRTK3 and HoloLens 2
Once again, I am revisiting the subject of displaying things in HoloLens 2 using QR codes. Developers who tried to use the code from my widely used example for reading QR codes and placing objects on them based upon location and rotation had trouble adapting it, since it basically stops as soon as it recognizes a QR code. I was asked how it could be adapted to continuously scan for objects. I was curious myself, so I took a shot at it. And this is how it works:
The idea is that you can use this to have multiple ‘experiences’ connected to multiple locations, for instance, if you want people to learn about a particular machine, building, or any other thing you can use to stick a QR code on. The QR code makes it possible to tie that experience to a particular location and align it potentially to the QR code’s orientation. You can see the airplane and the capsule taking both position and orientation of the QR code, while the ‘custom experience’ only takes the position and places the ‘experience’ above the QR code, using world orientation.
I am going to give a short recap of how things work, referencing my original articles from early 2021 where possible.
The QRCode service - recap and changes
If you want to know in detail how it works: basically the same as I described here
There are a few changes:
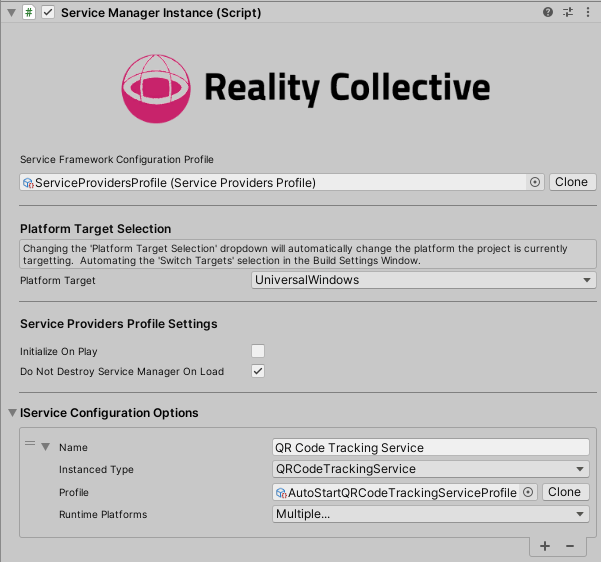
- The whole project now runs on MRTK3, so the service is no longer an MRTK2 service, but a RealityCollective ServiceFramework service.
- It uses a slightly newer version of Microsoft.MixedReality.QR and Microsoft.VCRTForwarders.140, but the process of installing them via Nuget for Unity is the same.
- The service profile now sports an
AutoEnableproperty, which makes the service start scanning for QR codes as soon as it starts.
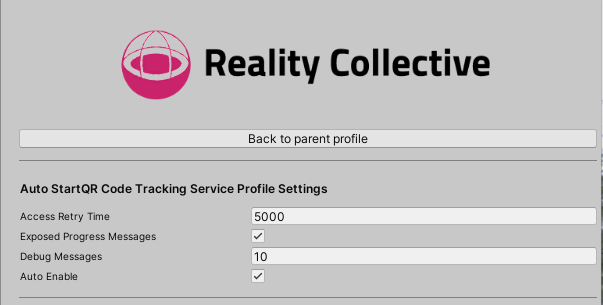
In the demo project, you will see the service now uses an “AutoStartQRCodeTrackingServiceProfile” with AutoEnable set to true
This automatically starts the service. As you can see in the piece of code below. Basically, only the last three lines are added.
public override void Update()
{
    if (qrTracker == null && accessStatus ==
      QRCodeWatcherAccessStatus.Allowed)
    {
        SetupTracking();
    }
}

private void SetupTracking()
{
    qrTracker = new QRCodeWatcher();
    qrTracker.Updated += QRCodeWatcher_Updated;
    IsInitialized = true;
    Initialized?.Invoke(this, EventArgs.Empty);
    SendProgressMessage("QR tracker initialized");
    if( profile.AutoEnable)
    {
        Enable();
    }
}
Processing QR codes
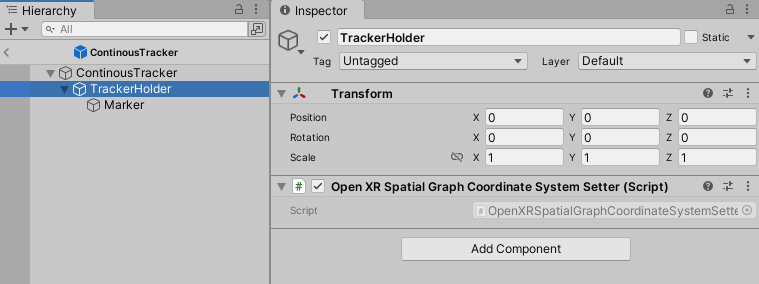
The scene setup is simple. For every QR code, there’s a Tracker and a TrackerDisplayer.
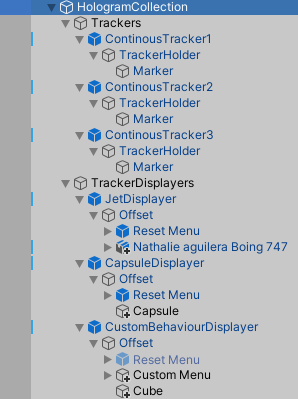
Tracker
Its main behaviour is called “ContinuousQRTrackerController” and I took the word “continuous” because, unlike in my previous samples, it does not stop the service once it has found a QR code, and you can individually reset it. You can see it looks for a QR code with payload “HLItem1”. You can, of course, change that to any value you like, as long as it matches the payload of the QR code you want to have tracked. Basically, the tracker does the following:
- Listen to the QR code tracking service’s
QRCodeFoundevent - Check if this matches the QR code set to its
locationQrValueserialized field - If that is the case, show the QR code marker scaled and aligned over the QR code.
Although the last part is actually done by the Spatial Graph Coordinate Setter behaviour.
![]()
Some highlights of ContinuousQRTrackerController’s code. At startup, it turns off the marker (more on that later), gets a reference to the QR tracking service, and waits a rather arbitrary 0.25 seconds to give the service time to start up. Then it sets up some events:
private IQRCodeTrackingService QrCodeTrackingService =>
    qrCodeTrackingService ??= ServiceManager.Instance.GetService<IQRCodeTrackingService>();

private async Task Start()
{
    markerHolder = spatialGraphCoordinateSystemSetter.gameObject.transform;
    markerDisplay = markerHolder.GetChild(0).gameObject;
    markerDisplay.SetActive(false);
    ResetTracking(false);
    // Give service time to start;
    await Task.Delay(250);
    if (!QrCodeTrackingService.IsSupported)
    {
        return;
    }

    QrCodeTrackingService.QRCodeFound += ProcessTrackingFound;
    spatialGraphCoordinateSystemSetter.PositionAcquired += SetPosition;
}
When a QR code is found, we first check if the message has data at all, if the marker is already displayed, or if it has just been reset by the user, in which case we don’t do anything at all. We also check if we haven’t just processed this QR code in the last 200 ms, and then and only then we ask the spatialGraphCoordinateSystemSetter to actually align the marker to the QR code.
private void ProcessTrackingFound(object sender, QRInfo msg)
{
    if (msg == null || markerDisplay.activeSelf || resetTime > Time.time)
    {
        return;
    }

    lastMessage = msg;

    if (msg.Data == locationQrValue &&
        Math.Abs((DateTimeOffset.UtcNow -
          msg.LastDetectedTime.UtcDateTime).TotalMilliseconds) < 200)
    {
        spatialGraphCoordinateSystemSetter.SetLocationIdSize(msg.SpatialGraphNodeId,
            msg.PhysicalSideLength);
    }
}
The marker is the blueish thing you see appear over the QR code:
ResetTracking is called from the little menus floating over the ‘experiences’, and they allow you to make the particular QR code trackable again. It gives you a two seconds grace period to get away from the QR code - this makes sense, otherwise, the QR code is immediately tracked again and immediately shows again.
public override void ResetTracking()
{
    ResetTracking(true);
}

private void ResetTracking(bool delayed)
{
    if (delayed)
    {
        resetTime = Time.time + 2;
    }

    markerDisplay.SetActive(false);
}
SpatialGraphCoordinateSystemSetter
Basically, this is nearly 100% equal to what I described earlier in this article about upgrading the whole shebang to OpenXR.. It sits on the gameobject below the continuous tracker
QRPoseTrackController
This is a behaviour that ties an object to a tracked QR code.
![]()
As you can see, the QRPoseTrackController for the Jet tracks the ContinuousTracker1. It starts as follows:
public class QRPoseTrackController : MonoBehaviour
{
    [SerializeField]
    private BaseTrackerController trackerController;

    [SerializeField]
    private bool setRotation = true;

    private AudioSource audioSource;
    private Transform childObj;

    private void Start()
    {
        audioSource = GetComponentInChildren<AudioSource>(true);
        childObj = transform.GetChild(0);
        childObj.gameObject.SetActive(false);
        trackerController.PositionSet.AddListener(PoseFound);
    }
Note it actually refers to a BaseTrackerController rather than a ContinuousQRTrackerController - this allows for building other controller logic. It also has an option to not only set location but also rotation. For the airplane and the capsule, this is set to true, for the ‘custom experience’ to false. On startup, it gets the child object, tries to find an optional AudioSource, and adds a listener to the TrackerController’s PositionSet event.
When a position is found, it shows the objects on the QR code’s location, optionally aligns it, and plays a sound. The Task.Yield thing is necessary because the AudioSource is on a game object that is initially disabled (in the Start method it says childObj.gameObject.SetActive(false), right?) and apparently Unity needs a frame to actually activate an AudioSource before it can play the sound.
private void PoseFound(Pose pose)
{
    if (setRotation)
    {
        childObj.SetPositionAndRotation(pose.position, pose.rotation);
    }
    else
    {
        childObj.position = pose.position;
    }

    childObj.gameObject.SetActive(true);
    Task.Run(PlaySound);
}

private async Task PlaySound()
{
    await Task.Yield();
    if(audioSource != null && audioSource.clip != null)
    {
        audioSource.Play();
    }
}
The only thing left is this little method
public void Reset()
{
    trackerController.ResetTracking();
    childObj.gameObject.SetActive(false);
}
This is the method called by the floating reset menu each ‘experience’ has, it basically deletes the whole experience, and resets the controller (giving you the 2-second grace time).
Some concluding words
QR codes are a powerful and simple way to have objects appear at particular locations without having to set up all kinds of holograms in advance. This way, you can quickly set up an ‘experience’, a training scenario, or a kind of guided tour. A bit like a poor man’s Microsoft Dynamics 365 Guides ;). There are a few things to consider when using this code, though:
- The QR scanner now runs all the time, so that takes a bit of performance
- One QR code can only be used in one location at the same time
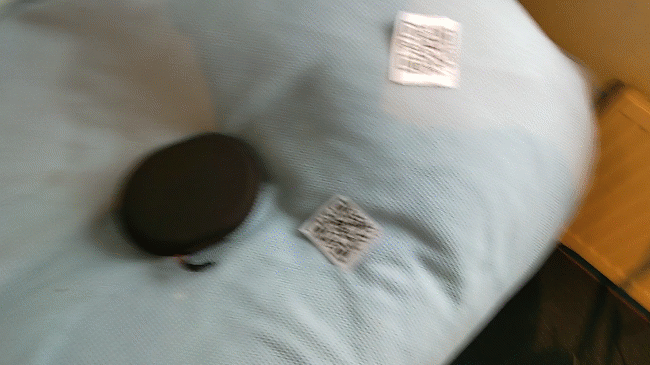
- The bigger the QR code, the faster and more reliable the scan. I would recommend QR codes no smaller than 10x10cm
Have fun playing with it. The demo project is in this branch of the QRCodeService repo. This concludes my blogging for 2023, I wish you a happy 2024 both in Mixed and real Reality :)