
 MVP Profile
 Try my app HoloATC!
  HoloLens 2
 Magic Leap 2
 Android phones
 Snap Spectacles
 MetaLense 2
 Buy me a drink ;)
 BlueSky
 Mastodon
 Discord: LocalJoost#3562
Using the non native keyboard in touch scenarios in MRTK3
History repeats itself - a little under four years ago, I wrote about how the non-native keyboard in MRTK2 could be made to play with the then-new HoloLens 2 - a device that introduced touch instead of air tap to control holograms and UI elements. I devised a simple behaviour that fixed that in early 2020 to make it touch-enabled, and that even made it into the MRTK2. Times have moved on, we are now on MRTK3 and in a multi-platform era. For fun, I have started to rebuild on of my apps - Walk the World - in MRTK3, because this always leads to interesting spelunking into the depths of SDKs. In this case, I was really happy to discover the non-native keyboard had made it into MRTK3. Unfortunately, I also quickly found out the very basic five-line trick I had used to enable touch could not be used anymore, so the non-native keyboard was basically back where it started: only operable by the HoloLens 1 hand ray/air tap combo.
This, of course, would not do. And, also of course, stubborn as I am, I banged against it until it worked again. Only this needs a little more code. But it’s also now a bit more beautiful, as the buttons actually are now animated:
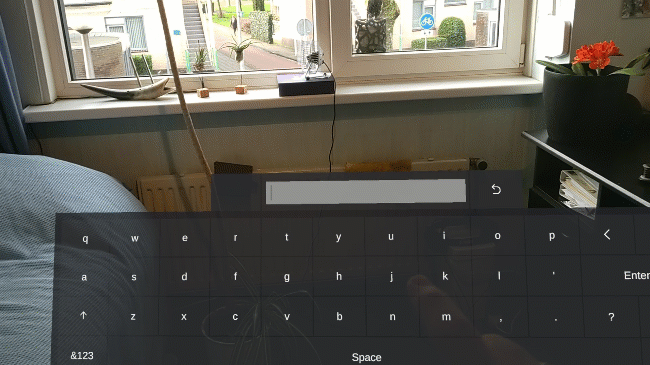
I hope y’all can appreciate the unplanned cameo of a Starling on the bird feeder outside the window :).
TL;DR: gimme the goods
If you are not interested in the why and the how:
- Go to the demo project on GitHub
- Copy all files under Assets/MRTK3Extensions into your project
- Drag the TouchableNonNativeKeyboard prefab on your scene
- Have some behaviour call
NonNativeKeyboard.Instance.Open();
And you have a keyboard. The TouchableNonNativeKeyboard has been scaled to what I think is a usable size, and also has a MRTK3 RadialView to keep it in view, and my helper behaviour AppearInCenterViewController to make it appear in the center of your view. It works the same as the normal NonNativeKeyboard. In fact, it just is the normal NonNativeKeyboard, just with some added stuff.
Where it all starts
The basic NonNativeKeyboardTouchAdapter is very simple: it changes some settings to the audio component because I think this works better for typing. All MRTK3 buttons have no spatial sounds, so why should these have it. Then it simply loops over all the Button child objects - even the inactive ones - and adds a NonNativeKeyTouchAdapter.
public class NonNativeKeyboardTouchAdapter : MonoBehaviour
{
    private void Awake()
    {
        var defaultAudioComponent = GetComponent<AudioSource>();
        defaultAudioComponent.playOnAwake = false;
        defaultAudioComponent.spatialize = false;
    }

    private void Start()
    {
        var buttons = GetComponentsInChildren<Button>(true);
        foreach (var button in buttons)
        {
            // The search box has an incorrect collider and should not act as a
            // button anyway
            if (button.gameObject.name != "search")
            {
                button.gameObject.EnsureComponent<NonNativeKeyTouchAdapter>();
            }
        }
    }
}
The NonNativeKeyTouchAdapter actually does all the work - for every key there’s one. Except “search”. I think that actually has a Button behaviour by accident, as its OnClick method goes nowhere.
NonNativeKeyTouchAdapter initialization
At Awake, it calculates a few things related to the button’s animation - where it should start, and where it should end.
private void Awake()
{
    defaultPosition = transform.localPosition;
    animatedPosition = defaultPosition + new Vector3(0, 0, AnimationMovementDelta);
}
In OnEnable, we make sure the button always is at the default position, because it might have been halfway when the key disappeared. The keyboard consists of several panes, and another one appears if you press the “ABC” button or the “&123” button. For the same reason, we must reset the lastClickTime (we don’t want a button to be pressable again too quickly, otherwise it will quickly repeat) and the location of the button collider should also be set. Why this is, I will explain later.
private void OnEnable()
{
    transform.localPosition = defaultPosition;
    lastClickTime = Time.time;
    if (isInitialized)
    {
         buttonCollider.center = buttonColliderDefaultCenter;
    }

    Initialize();
}
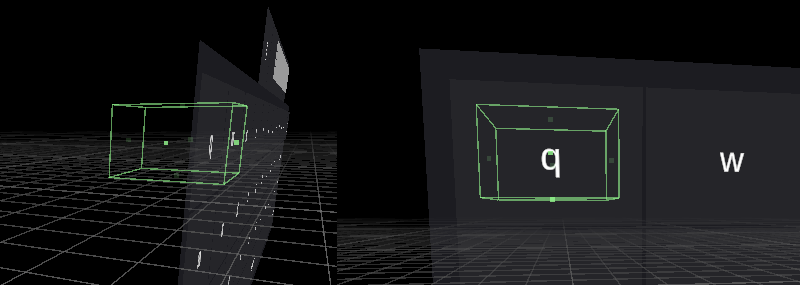
Creating a collider
Initialization should only be done once - and why I used OnEnable to kick it off instead of Awake or Start I will explain later as well.
First order of business is, of course, check if we did not already initialize in a different round of OnEnable. Then we make a collider around the button that is a bit smaller than the actual size, to make it less likely the user hits two keys at once. The collider also is moved off-center; a bit ‘backwards’ so you won’t accidentally press ‘through’ the button easily.
private void Initialize()
{
    if (isInitialized)
    {
        return;
    }
    isInitialized = true;

    var rectTransform = GetComponent<RectTransform>();
    buttonCollider = gameObject.EnsureComponent<BoxCollider>();
    var size = new Vector3(
        rectTransform.rect.size.x - ColliderMargin,
        rectTransform.rect.size.y - ColliderMargin,
        ColliderThickness);
    buttonCollider.size = size;
    buttonColliderDefaultCenter = new Vector3((size.x + ColliderMargin) / 2.0f,
        (-size.y - ColliderMargin) / 2.0f, ColliderZDelta);
    buttonCollider.center = buttonColliderDefaultCenter;
The resulting collider, when made visible, looks like this:
Setting up interaction
Before we do that, we first grab some stuff we will need:
image = GetComponent<Graphic>();
var defaultColor = image.color;
var button = GetComponent<Button>();
Then we add a StatefulInteractable and set up the first event. Using my own blog about the available events, I took the firstSelectEntered event, which is fired when something enters the collider. When this event is launched by a PokeInteractor (i.e. your index finger) and it has not been clicked in the last ReClickDelayTime seconds (1 by default), it fires the normal button’s event, as if it was been clicked ‘the old way’. It also starts a coroutine to animate the button to its pressed position
interactable = gameObject.EnsureComponent<StatefulInteractable>();
interactable.firstSelectEntered.AddListener(selectArgs =>
{
    if (selectArgs.interactorObject is not PokeInteractor ||
        Time.time - lastClickTime < ReClickDelayTime)
    {
        return;
    }

    button.onClick.Invoke();
    StartCoroutine(MoveButton(defaultPosition, animatedPosition));
});
Its mirror image is of course: when the user stops pressing the button, it moves the button back to its ‘unpressed’ position
interactable.lastSelectExited.AddListener(_ =>
{
    StartCoroutine(MoveButton(animatedPosition, defaultPosition));
});
And then there’s this little line:
button.interactable = false;
We don’t want the Button behaviour to interfere with us when using touch. We literally only hijack its OnClick event and then turn it off. Otherwise, hover events go off and hand ray interaction is still possible, giving a pretty confusing experience.
Reinstating the hover color
Unfortunately, turning off the Button behaviour disables all hover events, which is not nice, so we add that back simply using this, using the Button’s highlightedColor property
    interactable.firstHoverEntered.AddListener(hoverArgs =>
    {
        SetColorOnHoverPoke(hoverArgs.interactorObject,
                            button.colors.highlightedColor);
    });

    interactable.lastHoverExited.AddListener(hoverArgs =>
    {
        SetColorOnHoverPoke(hoverArgs.interactorObject, defaultColor);
    });
}

private void SetColorOnHoverPoke(IXRHoverInteractor interaction, Color color)
{
    if (interaction is PokeInteractor)
    {
        image.color = color;
    }
Some animation as a finishing touch
In the standard non-native keyboard, there is no animation at all, and neither did my MRTK2 behaviour add that. In the meantime, I am like 4 years along in my experience and ideas about UX, so I thought it cool to make the keys actually move. And they do, using this simple routine using a simple Vector3.Lerp.
private IEnumerator MoveButton(Vector3 startPos, Vector3 endPos)
{
    if (transform.localPosition == endPos)
    {
        yield break;
    }
    const float rate = 1.0f / AnimationTime;
    var i = 0.0f;
    while (i < 1.0f)
    {
        i += Time.deltaTime * rate;
        var newPos = Vector3.Lerp(startPos, endPos, Mathf.SmoothStep(0f, 1f, i));
        transform.localPosition = newPos;
        buttonCollider.center =
          buttonColliderDefaultCenter - (newPos - defaultPosition);
        yield return null;
    }
}
I actually had to look up how to use that Lerp in one of my very first HoloLens blogs from July 2016 because these days I always use LeanTween - but I did not want to create a dependency on that now. Also: there is something funky about this routine, as you might have noticed - it does something with the button’s position alright, but also something with the collider’s center position. This is because I quickly found out that when you move a button backwards, the collider is dragged along. And if you then just touch the button, you get this stupid effect:
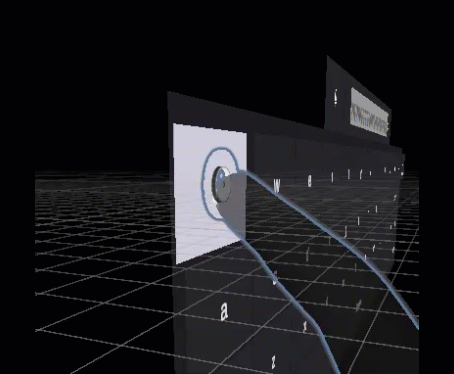
So that’s why that when the button moves backward, the collider moves forward in exactly the opposite direction - with the net result the collider stays in the exact same place, while the visible graphics do not, and the ping-pong effect as shown above does not show.
Now to make sure button and collider positions don’t get messed up by buttons disappearing and re-appearing we keep a reference to the initial position of both collider and button itself, and that is why they are always reset to their starting position at the start of OnEnable.
So why the initialize on Enable and not on Awake?
For that, you actually have to do the spelunking in the MRTK3 I talked about. You see, every button also has a NonNativeValueKey behaviour. This behaviour is a child class of NonNativeKey and that does something funky in its Awake method
protected virtual void Awake()
{
    if (Interactable == null)
    {
        Interactable = GetComponent<StatefulInteractable>();
    }

    // If there is a StatefulInteractable, that is used to trigger the FireKey
    // event. Otherwise the Button is used.
    if (Interactable != null)
    {
        Interactable.OnClicked.AddListener(FireKey);
    }
    else
    {
        if (KeyButton == null)
        {
            KeyButton = GetComponent<Button>();
        }
        if (KeyButton != null)
        {
            KeyButton.onClick.AddListener(FireKey);
        }
    }
}
It checks if there’s a StatefulInteractable around, and if so, it wires the click event not to the button, but to the interactable. And we want it to work like it did, so we can hijack the Button’s OnClick and not have it mess with the StatefulInteractable. This is not a problem for the first keyboard_Alpha panel, as that is active by default, so the Awake events for those buttons already done before we can add the StatefulInteractable. But for the panels that are default inactive, there’s suddenly a StatefulInteractable when they awake. As a workaround, the initialization of my NonNativeKeyTouchAdapter is done on OnEnable, so whatever happens - whenever the button’s NonNativeValueKey buttons awake, they will never find a StatefulInteractable and work as we want them to work.
One more thing
There is actually a bug in the keyboard: the sounds only play for the keyboard_Alpha panel. This is because the MRTK3 KeyboardAudio behaviour only looks for active buttons and as I said before, the other panels are inactive. So on TouchableNonNativeKeyboard I have disabled KeyboardAudio and added behaviour FixedKeyboardAudio. It’s almost identical, but it looks for all buttons (using GetComponentsInChildren<Button>(true) instead of just GetComponentsInChildren<Button>()).
Concluding words
So why would you use this? Well, I think the days of only building single device apps are gone. These days, you try to target as many devices as possible. The Non Native Keyboard gives a consistent look & feel for text input, and is also easily to control as to where it appears and how - which native keyboards not always allow. In my approach, I have tried to mess with the original NonNativeKeyboard as little as possible - the TouchableNonNativeKeyboard prefab is a simple Prefab Variant from NonNativeKeyboard, with literally only a bit of scaling changed, as well as three added behaviours: NonNativeKeyboardTouchAdapter, and the already mentioned RadialView and AppearInCenterViewController.
I hope you will find it useful. The demo project, once again, is at GitHub