
 MVP Profile
 Try my app HoloATC!
  HoloLens 2
 Magic Leap 2
 Android phones
 Snap Spectacles
 MetaLense 2
 Buy me a drink ;)
 BlueSky
 Mastodon
 Discord: LocalJoost#3562
MRTK2 to MRTK3 - migrating Extension Services to the Reality Collective Service Framework
One of the great but really underrated and underutilized boons of the MRTK2 are Extension Services. Unfortunately, in MRTK3, Extension Services, as well as the boilerplate code generator, are gone. Completely. The MRTK3 builds upon Unity’s Subsystems and while this might be a solution in the long run, it’s a serious hindrance when you have utilized services heavily (like me) and want to move forward with MRTK3, even for testing purposes. I could only find the rather terse Unity API documentation, but no concrete examples of how to build Unity Subsystems from scratch. And if I look at the definition of an MRTK3 subsystem…

I fear rebuilding services into this might structure not be very straightforward. This might just be my limited mind. Fortunately, I ran into this:
Introducing the Reality Collective Service Framework
A group of Mixed Reality developers, spearheaded by fellow MVP Simon ‘darkside’ Jackson (who was also instrumental in setting up the MRTK in the first place) have been working for years on something called XRTK - a kind of ‘alternative MRTK’ - and have now banded into the Reality Collective. Now this name may sound quite Marxist to you ;) but recently they fielded something very interesting: the Service Framework
This is basically an improved version of the MRTK Extension Services Host, completely independent of the actual MRTK itself. It has no external dependencies but a Reality Collective ‘Utilities’ package, containing a set of shared base classes for all other components.
Installing the Reality Collective Service Framework
There are basically two ways of doing so:
- Using OpenUPM
- Adding the scoped registry yourself, manually.
Installing via OpenUPM
OpenUPM is one of those tools that are very easy to use, provided you first can find out how to use them (and what you need to install, and how). Personally I hate command line interfaces with a vengeance. Because you see:
- First you have to install Node Package Manager
- Then you have to install OpenUPM
- Then you have to learn the OpenUPM commands.
However, I found this video helpful in understanding the basics of usage. But since I also hate long explanatory videos, I will condense the basics for you:
- Once you have installed NPM, open a command prompt.
- Enter “npm install -g openupm-cli” and wait.
- When the install process is finished, change directory to the root folder of your project. This is typically the folder that has the folders “Assets”, “Packages” and “ProjectSettings” in it
- Enter “openupm add com.realitycollective.service-framework”
From now on, you only have to use the last step when you are installing the Service Framework into a Unity project.
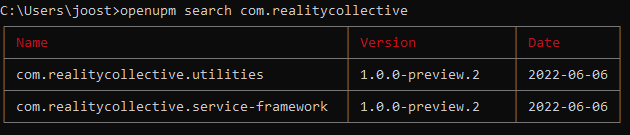
Note: openUPM as also search capabilities. For instance, try “openupm search com.realitycollective” and you will get the following 90s style result:
Installing via a scoped registry
- Click Edit/Project Settings
- Select Package Manager
- Click the + button indicated by the red arrow in the image below
- Enter name, URL and scope as shown in the image below
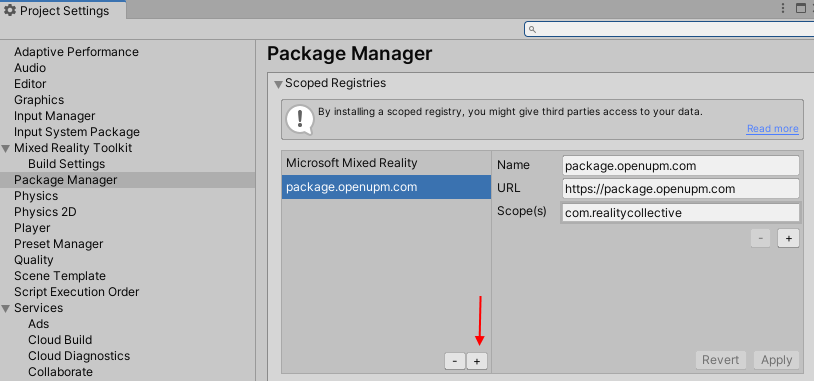
- And hit apply
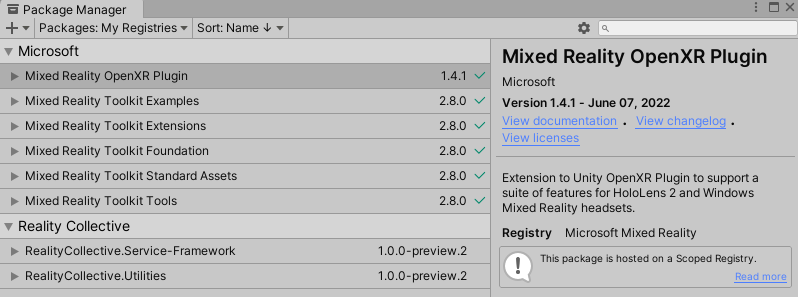
If you look into the package manager itself, you will now see two Reality Collective entries you can install:
It’s yours to decide what you find easier. And if you want to install NPM and openUPM for just that. But mind you, there’s more on UPM than just Reality Collective. I wonder why no-one ever made a simple Unity editor plugin for it.
Migrating an actual service
To demonstrate the principle, I am going to migrate the QRCodeService I wrote a while back ago to the Service Framework. Mind you, the rest of the project is still on MRTK2. To this end, I took up the OpenXR branch, updated the MRTK en the OpenXR plugin, and went to work.
Typically, an Extension Service exists out of three items:
- The concrete implementation class
- The service interface
- The service profile (‘settings’)
Step 1: remove the service from the Extensions Services host
This is pretty easy
Step 2: change the interface
Also not rocket science. The interface is now defined as:
public interface IQRCodeTrackingService : IMixedRealityExtensionService
This should become:
public interface IQRCodeTrackingService : IService
And to this end you should add
using RealityCollective.ServiceFramework.Interfaces;
On top of the file.
Step 2: change the profile
The profile is now defined as:
[MixedRealityServiceProfile(typeof(IQRCodeTrackingService))]
[CreateAssetMenu(fileName = "QRCodeTrackingServiceProfile",
   menuName = "MRTKExtensions/QRCodeTrackingService Configuration Profile")]
public class QRCodeTrackingServiceProfile : BaseMixedRealityProfile
{
You can change that to:
[CreateAssetMenu(fileName = "QRCodeTrackingServiceProfile",
   menuName = "MRTKExtensions/QRCodeTrackingService Configuration Profile")]
public class QRCodeTrackingServiceProfile :
  BaseServiceProfile<IServiceDataProvider>
Get rid of the MixedRealityServiceProfile attribute, and add these usings on top:
using RealityCollective.ServiceFramework.Definitions;
using RealityCollective.ServiceFramework.Interfaces;
Step 3: change the concrete implementation class
The top of this says:
[MixedRealityExtensionService(SupportedPlatforms.WindowsUniversal)]
public class QRCodeTrackingService : BaseExtensionService,
  IQRCodeTrackingService
{
    private QRCodeTrackingServiceProfile profile;
    public QRCodeTrackingService(string name, uint priority,
                                 BaseMixedRealityProfile profile) :
           base(name, priority, profile)
    {
        this.profile = (QRCodeTrackingServiceProfile) profile;
    }
This should be changed to:
[System.Runtime.InteropServices.Guid("dd1c8edc-8888-4510-872a-ced01fca424a")]
public class QRCodeTrackingService : BaseServiceWithConstructor,
   IQRCodeTrackingService
{
    private QRCodeTrackingServiceProfile profile;
    public QRCodeTrackingService(string name, uint priority,
                                 QRCodeTrackingServiceProfile profile) :
           base(name, priority)
    {
        this.profile = profile;
    }
And add this using:
using RealityCollective.ServiceFramework.Services;
Note:
- There’s a Guid on top. This needs to be unique. The Service Framework, just like it’s MRTK cousin, comes with a wizard that takes care of it. If you manually migrate stuff, you need to take care of it. Take a random Guid.
- The constructor is a bit different: in stead of a base profile that you need to cast hard to its desired/expected type, the constructor neatly takes the actual concrete implementation of the profile
- The base constructor call does not have the profile in it anymore.
Step 4: migrate all service calls
This comes down to: find all calls that try to access the service, like this:
MixedRealityToolkit.Instance.GetService<IQRCodeTrackingService>());
and change them into
ServiceFramework.Instance.GetService<IQRCodeTrackingService>());
This also requires the following using:
using RealityCollective.ServiceFramework.Services;
In the case of this app, that’s the following classes:
- QRCodeDisplayController
- QRTrackerController
- QRTrackingServiceDebugController
Step 5: Add and configure the Service Manager Instance
I created an empty game object “services” in the root of my main scene, then added a “Service Manager Instance” to it. This immediately tells you that you need to create a profile.
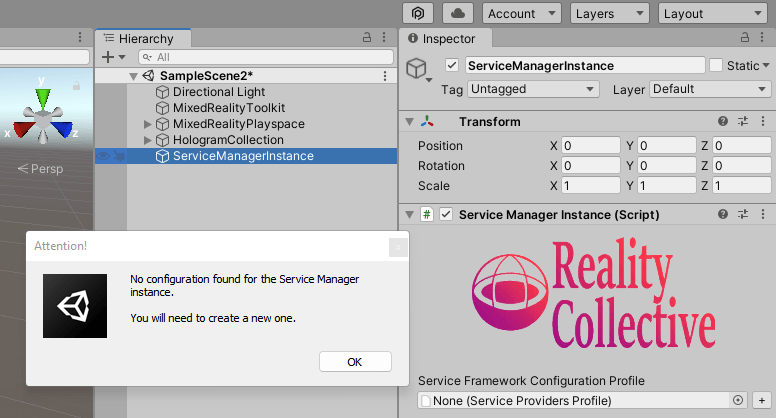
So I click the little plus sign to the right of the box “None (Service Providers Profile)” and this creates a file “ServiceProvidersProfile.asset” in the root of the project - not necessarily the smartest place to keep it, but it will do for the moment.
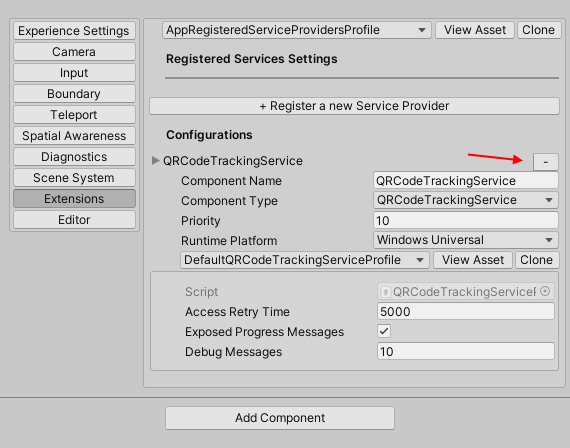
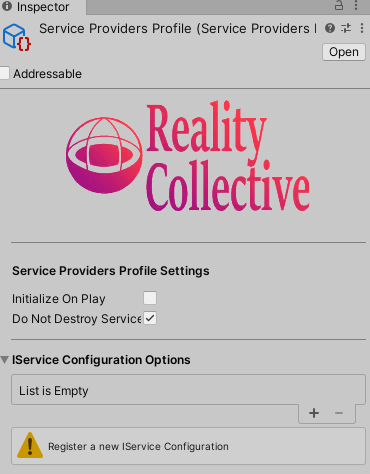
For those who have used the MRTK extension services, this is now familiar territory. Click the plus sign on the configuration screen below, next to “List is empty”
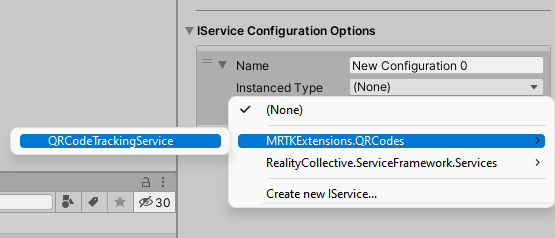
Then select the service:
Then select a settings profile. The fun things is - configuration assets created with the MRTK Extension Services are still valid after migration, so I can still use DefaultQRCodeTrackingServiceProfile for settings. And then I define Editor and Universal Windows as the platforms I expect this service to run on.
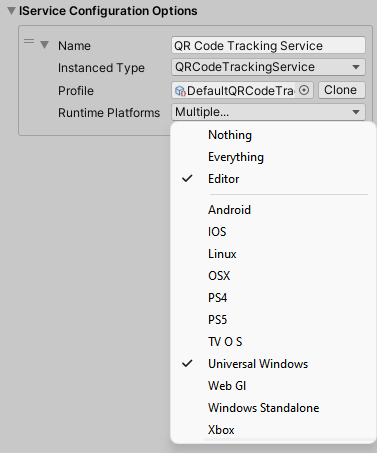
And that’s all. You can compile and run the app and it will run just like before. I fact, you won’t see any difference ;)
Note: for this project, make sure the configured Service Manager Instance is available in both SampleScene and SampleScene2.
Concluding words
All this allows code that should typically be regarded as a service - access to a device, a data source, central app state, specific reusable code - to get a proper place. And since the service is identified and accessed by its interface rather than its implementation, it also instigates a form of dependency injection, which in turn allows for proper separation of concern, mocking, unit testing - all the things we have come to know and love as proper patterns to build scalable, robust and reusable code. I sang it’s praise as early as December 2018, when it was still called “MRTK vNext”. Using services avoids the general mess you typically see in Unity solutions - all kinds of behaviours tightly coupled all over the scene doing ‘something’, and if there are ‘services’ as all, they are usually hosted in a behaviour somewhere in a the scene or even worse - a usually bad implementation of a ‘Singleton’.
I have successfully used the Service Framework to migrate AMS HoloATC to MRTK3 - the services where my big blocker, and the Service Framework made me fly right over it. I even contributed a little to the project so you can see properties of running services. This code was originally written for MRTK2 but was easy to adapt for the Service Framework.
In this branch you can see the code. In a follow up post, I am going to upgrade the whole project to MRTK3.