
 MVP Profile
 Try my app HoloATC!
  HoloLens 2
 Magic Leap 2
 Android phones
 Snap Spectacles
 Buy me a drink ;)
 BlueSky
 Mastodon
 Discord: LocalJoost#3562
Cross-platform spatial QR code tracking for HoloLens 2 and Magic Leap 2 with a ServiceFramework Service, part 1
QR codes AGAIN???
Indeed, it seems like I never can stop talking about QR codes. But the XR world has changed. First of all, there’s more headsets than HoloLens 2 these days - and technology is evolving, which necessitates multi-platform development. Second, the OpenXR standard gets more and more adoption, which facilitates multi-platform development. And where implementation details differ, you can iron those out using one of my favorite toolkits: the Reality Collective Service Framework. Which is exactly what I did. With a simple service architecture, I have been able to make an app that tracks and positions QR codes in space - and it runs, without any code changes, on both platforms. You literally only have to select the target platform in Unity - Universal Windows Platform or Android - and build the app.
This will be a blog post in two parts. In the first part (this one) I will explain how the service implementation I have created can be configured and used, the explanation of the implementation details will be in the next one.
OpenXR support for marker tracking
Microsoft now supports QR code tracking in HoloLens 2 using their Mixed Reality OpenXR plugin, which is still actively being developed. I found a piece of sample code that showed how things worked. So QR code tracking on HoloLens 2 is now in the OpenXR package itself, and we don’t need to add the Microsoft.MixedReality.QR NuGet package anymore, which is just as well, as its usage was quite a bit more complex than the OpenXR one, and more importantly: it made compilation for Android builds fail, which made cross-platform development harder.
Magic Leap now offers OpenXR Marker code tracking using OpenXR with their new 2.3.0 SDK. In addition, they also offer tracking other types of markers.
All the necessary code is, as usual, in a GitHub project, including two sample scenes, that look like this:
![]()
Configuration
The demo project comes with two sample scenes.
- SimpleMarkerDemo shows a simple marker over every QR code it can possibly find, scaled to fit over the code and shows a text with the QR code’s contents.
- DifferentMarkersDemo only responds to QR codes containing HLItem1, HLItem2 or HLItem3, and shows a cube over the first one, a capsule over the second, and an airplane over the third.
In both demo scenes you will find the service configured like this:
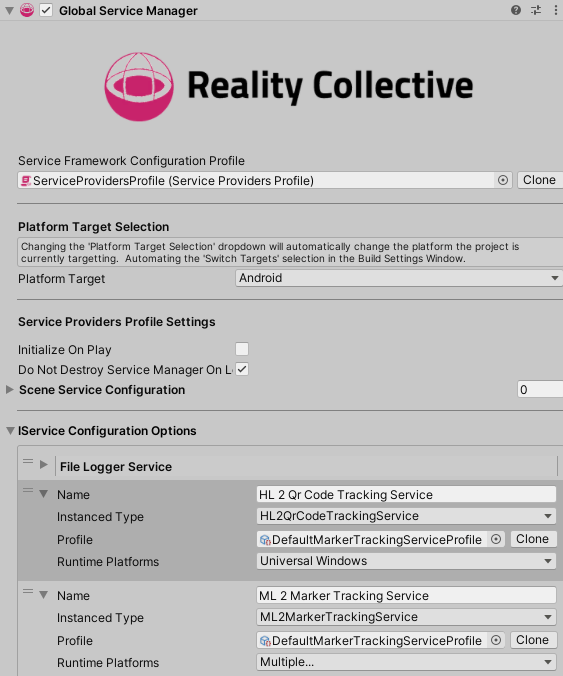
The HL2 Qr Code Tracking Service is the implementation for HoloLens 2, the ML2 Marker Tracking Service is the implementation for Magic Leap 2 (duh) - the first one will kick in on UWP builds, the second on Android build. The File Logger Service, which I wrote about almost a year ago, I left in there, but is not necessary for the demo. It proved to be an invaluable aid in ironing out runtime issues on the Magic Leap 2 though.
If you have selected Android as build target, you will see these configuration options:

For HoloLens 2, you have only one option:
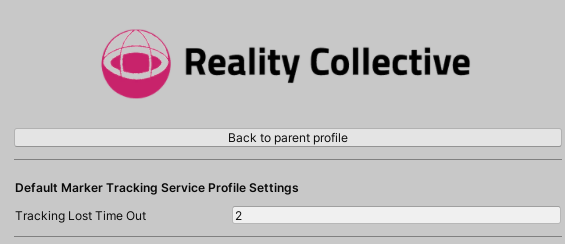
The Magic Leap 2 you can track more than just QR codes, but to be honest, I have not looked much into it. I know for a fact both QR codes and Aruco markers can be spatially tracked, but I have not heard of the four ones. Although the service I wrote supports Aruco markers, I have not tested it, and in any case that breaks the cross-platform idea - since HoloLens does not natively support Aruco markers. As to the “Detector Profile” you can select - there are five different predefined targets and you can also define custom targets. For tracking QR codes I have found that Default actually works best.
The Service Interface
Every Service Framework Service has an interface by which it is referenced, this allows multiple implementations whose details are opaque (and irrelevant) to the calling code. If you are a regular reader of this blog, you know the deal, but if you are not familiar with this concept, I would suggest having a look at the Service Framework documentation. As you can see, the service is pretty simple: it only has one event:
public interface IMarkerTrackingService : IService
{
    event Action<ITrackedMarkerChangedEventArgs> MarkersChanged;
}
ITrackedMarkerChangedEventArgs is also not quite rocket science:
public interface ITrackedMarkerChangedEventArgs
{
    IReadOnlyList<ITrackedMarker> Markers { get; }
}
And the data yields is this:
public interface ITrackedMarker
{
    string Id { get;  }
    public string Payload { get; }
    public Pose Pose { get; }
    public Vector2 Size { get; }
    public float LastSeenTime { get; }
    public bool IsTracked { get; }
}
- Id is some unique identifier for the tracked code
- Payload is the actual contents encoded in the tracker marker
- Pose is the actual position and rotation of the marker in world space
- Size is the size of the marker
- LastSeenTime is the last time (in game seconds) the tracker was seen
- IsTracked indicates if the code is actually tracked.
Simple example
In the Managers game object in the SimpleMarkerDemo scene you will find one behaviour: SimpleMarkerVisualizer. It starts like this:
public class SimpleMarkerVisualizer : MonoBehaviour
{
    [SerializeField]
    private GameObject markerPrefab;

    private IMarkerTrackingService trackingService;
    private readonly Dictionary<string, GameObject> markers = new();

    private async void Start()
    {
        await ServiceManager.WaitUntilInitializedAsync();
        trackingService = ServiceManager.Instance.GetService<IMarkerTrackingService>();
        trackingService.MarkersChanged += OnMarkersChanged;
    }
}
It has a prefab it can instantiate for displaying markers, a reference to the tracking service, and a dictionary for already known markers. Thus it knows when to add a new one, or update an existing one. In the Start method, it first waits for the ServiceManager to be completely ready initializing all its services, then finds the tracking service, and finally it hooks itself up to the service’s single event.
OnMarkersChanged is extremely simple:
private void OnMarkersChanged(ITrackedMarkerChangedEventArgs args)
{
    AddOrUpdateTrackedMarkers(args.Markers.Where(t => t.IsTracked));
    RemoveUntrackedMarkers(args.Markers.Where(t => !t.IsTracked));
}
it adds game objects for newly tracked codes, updates ones we have seen before, and removes those we have lost. The real thing happens in the next bit:
private void AddOrUpdateTrackedMarkers(IEnumerable<ITrackedMarker> trackedMarkers)
{
    foreach (var marker in trackedMarkers)
    {
        if (!markers.TryGetValue(marker.Id, out var markerGameObject))
        {
            markerGameObject = Instantiate(markerPrefab, marker.Pose.position,
               marker.Pose.rotation);
            markerGameObject.GetComponent<AnnotationController>().
               SetText(marker.Payload);
            markers.Add(marker.Id, markerGameObject);
        }
        else
        {
            markerGameObject.transform.position = marker.Pose.position;
            markerGameObject.transform.rotation = marker.Pose.rotation;
        }

        ScaleMarker(markerGameObject, marker.Size);
    }
For all tracked markers, we first check if we have seen this one before using its ID. If we did not so see it before, we add a new game object at the observed location and rotation, put the payload in the text, and add the game object to the Dictionary of known markers. If we did see it before, we just update its position and rotation. In both cases, we scale the marker to the observed size:
private void ScaleMarker(GameObject marker, Vector2 size)
{
    var scaleFactor = Mathf.Sqrt(size.x * size.y);
    marker.transform.localScale = new Vector3(scaleFactor, scaleFactor, scaleFactor);
}
I nicked this piece of code from either a HoloLens or a Magic Leap sample, but I can’t find it back. Anyway, on to removing untracked markers:
private void RemoveUntrackedMarkers(IEnumerable<ITrackedMarker>untrackedMarkers)
{
    foreach (var marker in untrackedMarkers)
    {
        if (markers.ContainsKey(marker.Id))
        {
            Destroy(markers[marker.Id]);
            markers.Remove(marker.Id);
        }
    }
}
Hardly rocket science, right?
Example showing different game object per QR code
This sample is a bit more complex, but only just. Like I wrote earlier, the DifferentMarkersDemo has a behaviour that only shows markers on QR codes HLItem1, HLItem2 and HLItem3 (I was too lazy to make new ones, so I reused QR code prints from a previous blog). The PerMarkerVisualizer can be configured like this:

This is done using a list of MarkerConfig objects. A MarkerConfig is only this:
[Serializable]
public class MarkerConfig
{
    public string PayLoad;
    public GameObject Prefab;
    public bool Scale;
}
It tells the PerMarkerVisualizer behaviour what prefab to instantiate for which payload, and whether it needs to scale the marker or not. As you can see, only the airplane is not scaled - this means it will always show up at the same size, regardless of the marker size.
Instead of a private GameObject markerPrefab on top the PerMarkerVisualizer it sports this field, which should not come as a surprise:
public class PerMarkerVisualizer: MonoBehaviour
{
    [SerializeField]
    private List<MarkerConfig> markerConfiguration;
There is also a few slight changes at the AddOrUpdateTrackedMarkers method:
private void AddOrUpdateTrackedMarkers(IEnumerable<ITrackedMarker> trackedMarkers)
{
    foreach(var marker in trackedMarkers)
    {
        var markerConfig = GetMarkerConfigForPayload(marker.Payload);
        if( markerConfig == null)
        {
            continue;
        }
        if (!markers.TryGetValue(marker.Id, out var go))
        {
            go = Instantiate(markerConfig.Prefab, marker.Pose.position,
               marker.Pose.rotation);
            go.GetComponent<AnnotationController>().
               SetText(marker.Payload);
            markers.Add(marker.Id, go);
        }
        else
        {
            go.transform.position = marker.Pose.position;
            go.transform.rotation = marker.Pose.rotation;
        }

        if( markerConfig.Scale)
        {
            ScaleMarker(go, marker.Size);
        }
    }
}
We first try to find the prefab that is configured to be displayed for the code we have observed - if any - and the middle part is nearly the same. At the end the call to the ScaleMarker method is now conditional based upon the Scale field in the configuration.
For the sake a of being complete, the GetMarkerConfigForPayload is a simple LINQ query
private MarkerConfig GetMarkerConfigForPayload(string payload)
{
    return markerConfiguration.FirstOrDefault(p => p.PayLoad == payload);
}
Things to keep in mind
At this moment, it looks like HoloLens 2 is a bit faster at initial detection and subsequent tracking of QR codes than Magic Leap 2, as well as a bit more accurrate. You might initially even think it does not work at all on Magic Leap 2 - but it simply takes a bit more time before the game objects show up for the first time. This might be of course due to my implementation. Magic Leap 2 also seem to require more light. Both things might improve still, because so far, Magic Leap have been improving both firmware and SDKs at a rather furious pace.
Another thing to keep in mind, and this goes for both devices: if there are multiple identical QR codes in view, it will just pick one, and ignore the other. Both APIs show this behavior, and so, by inference, do the service implementations I built on top of them.
Finally: unless I am missing something, it seems you cannot make a video recording or a screenshot while you are tracking QR codes on a Magic Leap 2. The background of the recording is just black - you cannot see the environment on it. I suppose the same camera that is used to make video recordings is also used for tracking, and apparently it cannot do both simulataneously. The short movie you see on top op this blog is shot with a HoloLens 2 only. But trust my word: it looks and behaves nearly the same on both devices. Having said that, event the HoloLens movie doesn’t really do reality justice: the experience is must smoother and the markers rather quickly follow the QR codes when you move those. But when you are not sacrificing half your device’s performance on recording - not so much.
Concluding words
I have said it multiple times and I will say it again: the devices that are now on the market are awesome, but wise persons never put all their eggs in one basket. Being able to build and deploy for multiple devices and platforms is imperative for business continuity in the brutal XR market of today. The honeymoon ‘oh wow’ period is long over, all former web3-experts-turning-blockchain-experts-turning-metaverse-experts are now all AI ‘experts’, and those of us who have chosen to stay here because we fell in love with the tech and want to keep on dreaming in 3D, simply cannot get away anymore with making a beautiful POC for a single device. We have to continue to be awesome, but also earn our keep now, have our tool belt filled with cross-platform tools, and meet the customer where they are.
As I wrote already: all code is, as usual, on GitHub. In the next part I will explain in detail how I actually built both service implementations, for those who want to dig deeper.