
 MVP Profile
 Try my app HoloATC!
  HoloLens 2
 Magic Leap 2
 Android phones
 Snap Spectacles
 MetaLense 2
 Buy me a drink ;)
 BlueSky
 Mastodon
 Discord: LocalJoost#3562
Full underlay passthrough transparency with MRTK3 GA on Quest 2/Pro
Hey, didn’t I write about this before? Indeed, I did, but last Monday I got a report from José Rocha that my sample didn’t work anymore after he followed my upgrade tutorial for MRTK3 GA. After trying that myself on the sample, I had to agree he was right: instead of full transparency, I got to see the default Unity Skybox. Ugh.
The solution turns out to be extremely simple. After some plodding around in the MRTK3 GA sources, searching for the word “SkyBox” found me the CameraSettingsManager behavior. Where it comes from, I don’t know, but it is certainly the solution.
To get transparency back, follow these simple steps:
- Add a component “CameraSettingsManager” somewhere in the scene. I added it to the “Camera Offset” in the MRTK XR Rig, because that looked like a logical place to put it, but I think you can put it anywhere
- Expand the Opaque section
- Change “SkyBox” into “Color”
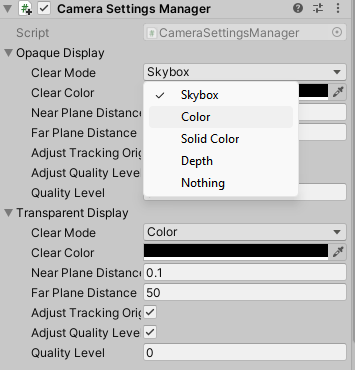
- Click the color box, drag the Alpha slider all the way to the left. There should be four zeroes in a row now.
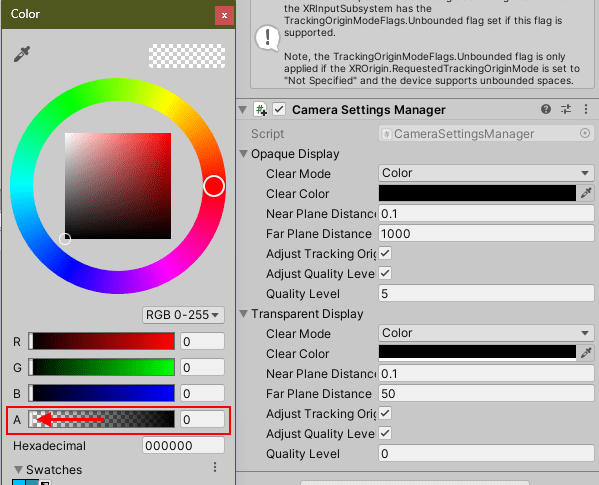
… and you are done. I have updated the underlay branch of my sample project to reflect this change.