
 MVP Profile
 Try my app HoloATC!
  HoloLens 2
 Magic Leap 2
 Android phones
 Snap Spectacles
 MetaLense 2
 Buy me a drink ;)
 BlueSky
 Mastodon
 Discord: LocalJoost#3562
Solution: Visual Studio 2019 and Unity 2019.4.x LTS are very slow when adding/changing files
Although I like to stay at the minimum recommended version for the MRTK (currently 2018.4.20f1), for the app we are currently developing for my employer we need to target ARM64 and for that you need 2019.4.8f1 (until short, the latest LTS). This has an unintended and very unwanted side effect: adding files to your solution becomes slow. Like extremely slow. You might wait well over 15 seconds, especially with scripts. Renaming files - same problem. Visual Studio asks you to reload the project, all 99 (or 101, depending on your settings) are unloaded and reloaded, you might even get some errors as extra. And all the while it’s doing that both Unity and Visual Studio itself are not responsive. It’s maddening.
But there are ways to get around it.
Possible solutions
- Change the project setting to Windows Standalone, and only change it back when you need to build on a device
- Set Visual Studio Code to be your External Script Editor
The first solution has been suggested to me by Edd Smith. I presume it works, but when you often need to test and deploy on a device (like me), you will need to change configuration often and this in itself will take time - and it will make the deploy to a device yet even longer than it already is.
Visual Studio Code to the rescue
Wait! Read on! Yes, I am partial to Visual Studio as well. I have lived in it for a little short of two decades. But please hear me out and go ahead, install Visual Studio Code. Then, open Unity, select Edit/Preferences, hit “External tools” and from the drop down “External Script Editor” select “Visual Studio Code”.
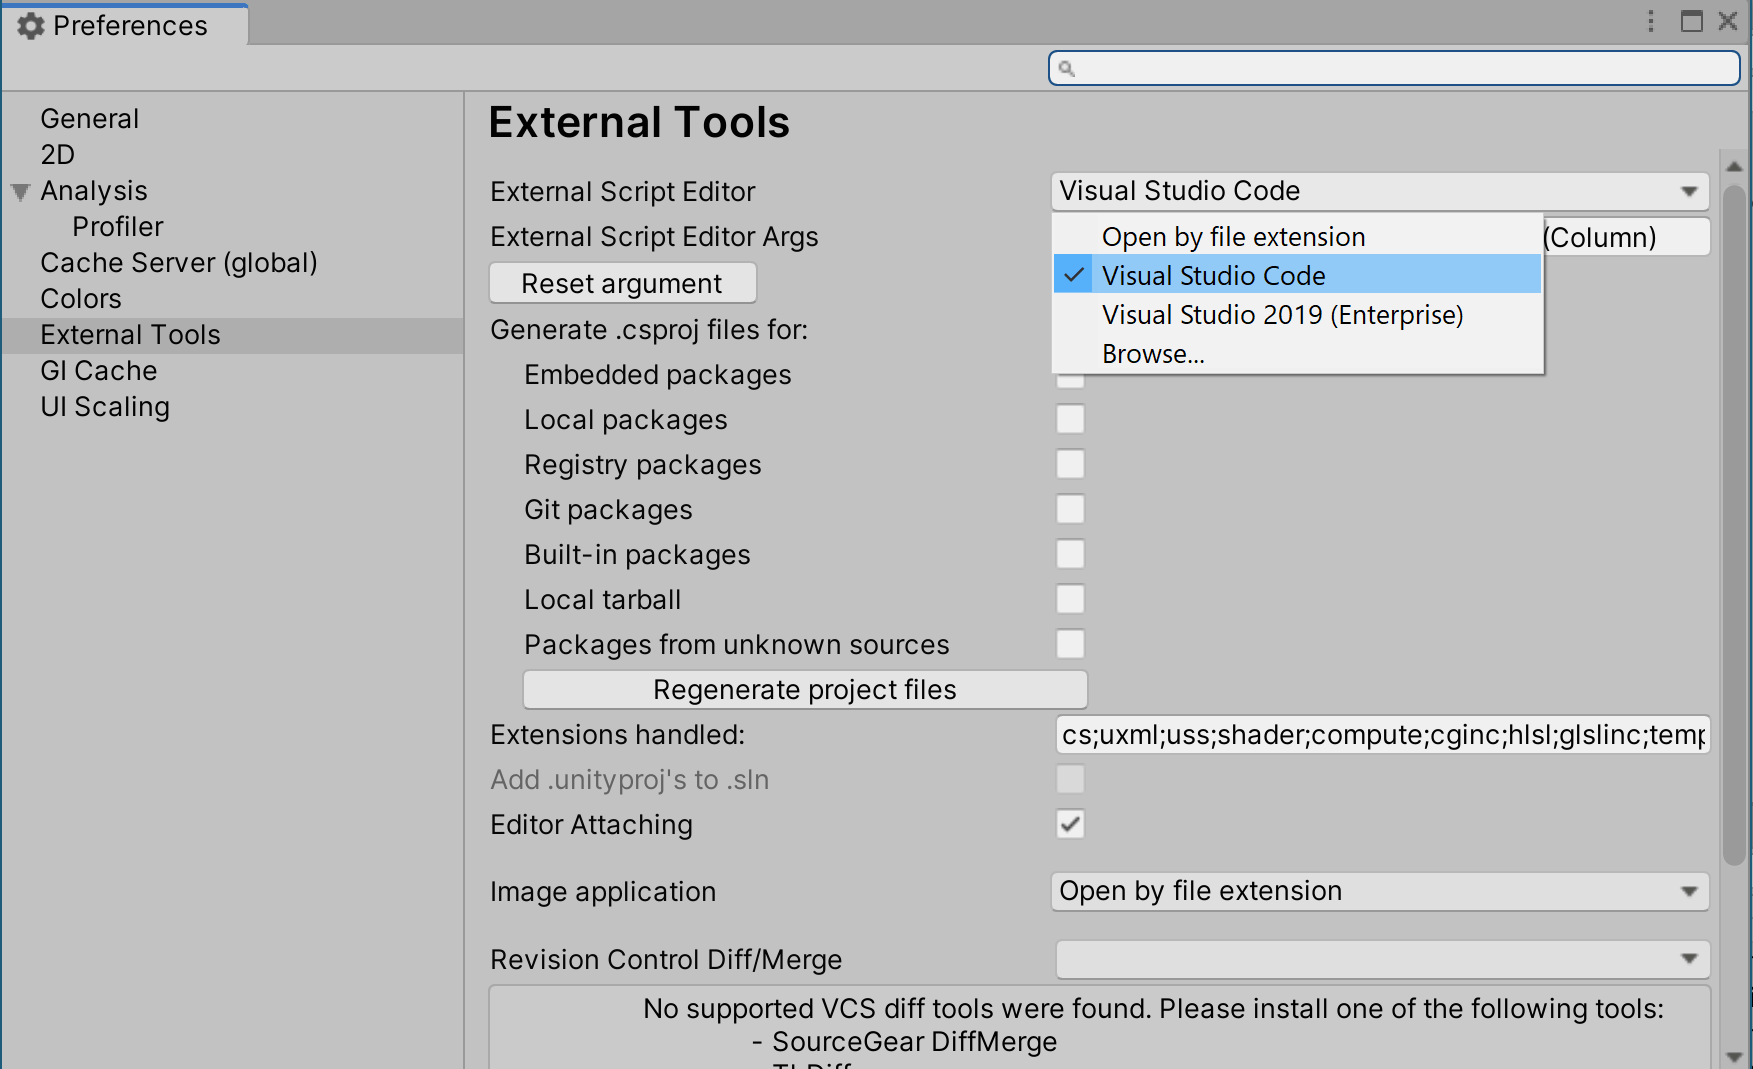
If you now double-click a script in Unity, it will open Visual Studio Code in stead of Visual Studio 2019.
You will also notice adding files, both in Visual Studio Code and in Unity, will take mere seconds.
“But I really like Visual Studio”
Yeah, me too, and now comes the crazy part. Unity, for some reason, still creates the .sln and .csproj files, although Visual Studio Code does not seem to use them. If you open Visual Studio 2019 by clicking the .sln file, it will just open the generated solution with all it’s projects as always. Everything will still work. Adding files in the Unity Editor will only make one project reload. . Adding a C# file from Visual Studio will make Unity hiccup for a few seconds, then resume. It’s not as fast as Visual Studio Code but at hell of a lot faster than it used to be when Visual Studio 2019 was selected as editor in Unity.
But I really like Visual Studio Code
It takes all sorts ;). You can actually use Visual Studio Code as your Unity External Script Editor if you like. I am actually going to give it a go, although for a lot of things I will probably fall back to Visual Studio 2019. The process for setting it up is actually nicely documented at this page and does not involve a lot of work. Basically you install the product itself, the C# for Visual Studio Code tools and the Debugger for Unity and you are all set.
What is not documented are the small things you need to do next:
- Hit the run button. That is simply the arrow with the bug on it

- You will get the message to the left on the picture above, which is not very intuitive to me - not being familiar with the product. You first click the link “create a launch.json file”, which will reveal a “Select Environment” drop down
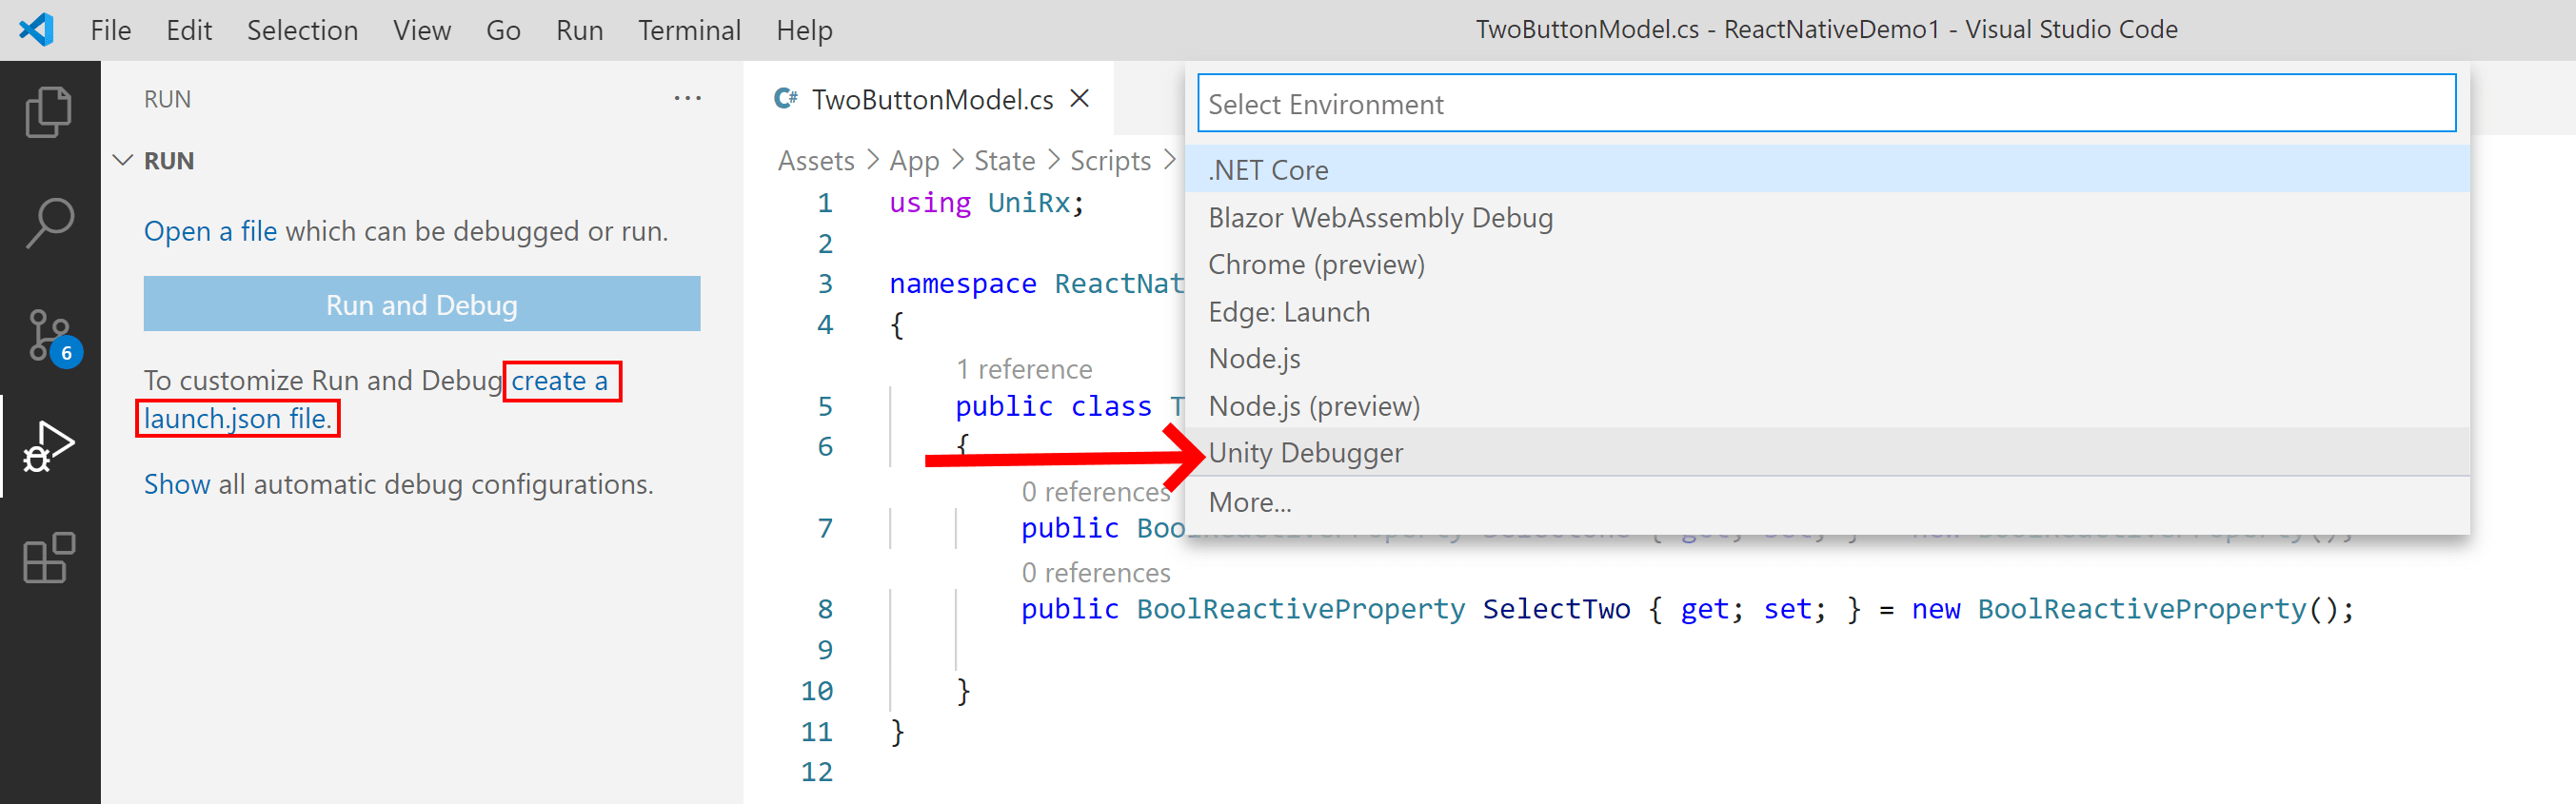
- Select “Unity Debugger” as indicated by the arrow
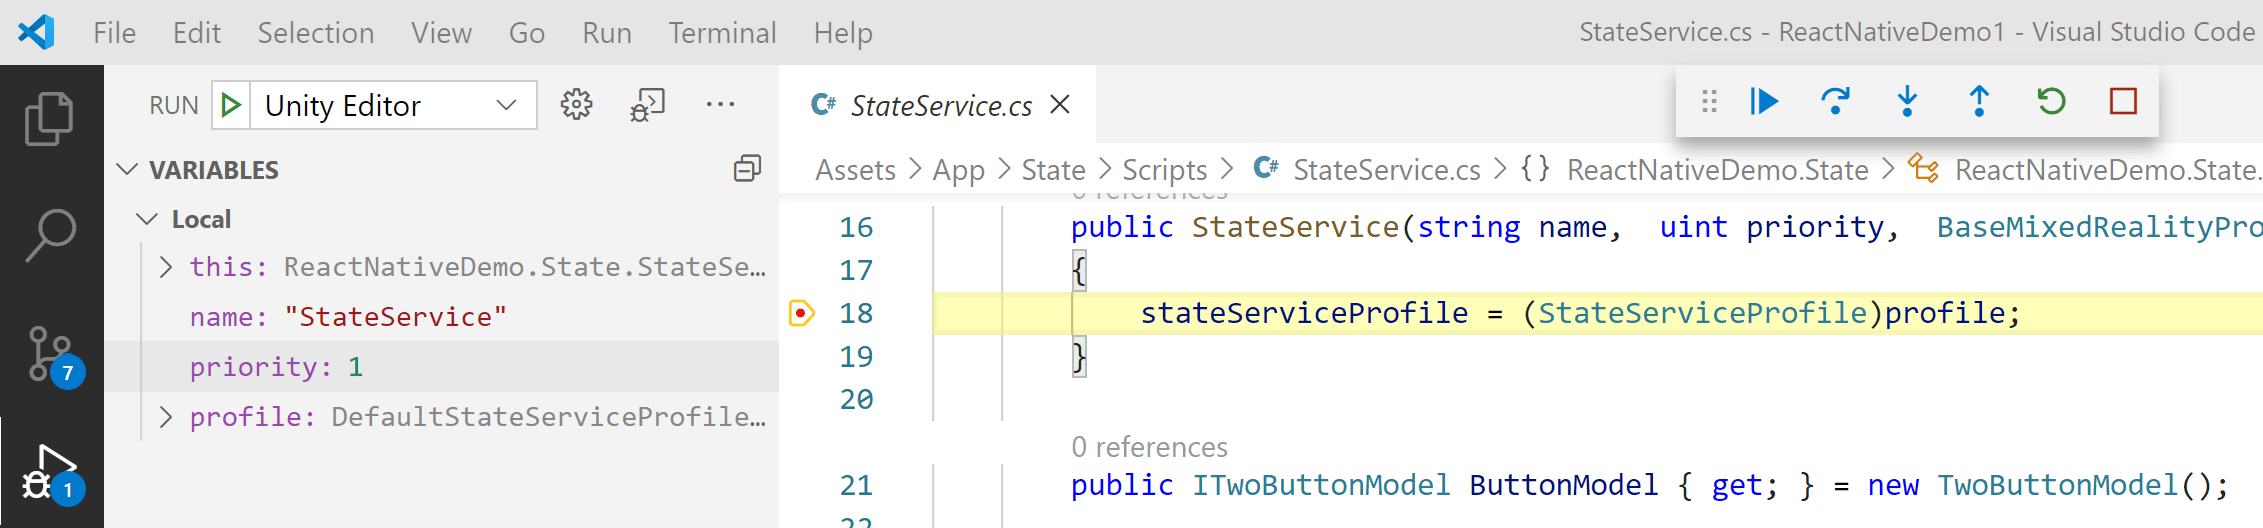
- From now on, you can start the debugger by clicking the arrow next to “Run”

- Then start Unity and bingo. Look ma, I hit a break point ;)
Probably simple and obvious for someone used to Visual Studio Code, but it took me a few minutes to figure out what I was supposed to do.
Fine tuning Visual Studio Code for Unity use
Visual Studio Code 2019 is like a smart assistant when it comes to editing Unity code. It hides all stuff you can’t or not supposed to edit from it, and basically only shows code. Visual Studio Code just takes a folder structure and its attitude is more like “you asked for it, you get it” and simply dumps everything on your desk. You’ll see everything Visual Studio 2019 hides for you: meta files, scene files, prefabs, animations, controllers, as well as a solution file and a large bunch of project files … and somewhere between that your C# scripts.
Fortunately you can coax Visual Studio Code into be a bit more helpful as well. Click File/Preferences/Settings. Then, in the search box on top, enter “files:exclude”. Here you can add “glob patterns” that hide files you don’t want to see. I added quite a lot:
- .vs
- **/*.anim
- **/*.asset
- **/*.controller
- **/*.csproj
- **/*.fbx
- **/*.mat
- **/*.meta
- **/*.mp3
- **/*.nuspec
- **/*.prefab
- **/*.sln
- **/*.unity
- **/*.wav
- Assets/links.xml
- Library
- obj
And most likely I still forgot a few that I will add later. You can, by the way, simply copy these settings and add them to %APPDATA%\Code\User\settings.json. There they are added to the settings file like this:
{
    "files.exclude": {
        ".vs": true,
        "**/*.anim": true,
        "**/*.asset": true,
        "**/*.controller": true
    }
}
Conclusion
I have no idea why selecting Visual Studio Code as External Script Editor makes both Unity and Visual Studio 2019 work together a lot faster. I can speculate - I guess Unity is trying to do some magic tricks to coax Visual Studio 2019 into some kind of desired behavior, but as a result makes it reload the entire project structure on every single name change or file add. This locks Unity in the process (or something), and sometimes throws in errors for extra fun and generally creates a lot of mayhem.
By selecting Visual Studio Code, all this mayhem goes away. It doesn’t make sense, but it works. As this is a no code blog post, no sample project today. Sorry ;).