CubeBouncer revisited - setting up Mixed Reality for Quest 3 with MRTK3 and Unity 6
Like I said in a previous post, now Microsoft have announced they have stopped producing HoloLens 2, with no successor being announced, it is important to make sure your apps run on other devices too, if you want yourself and your apps to remain relevant in the XR space. You have already seen me doing quite some things with Magic Leap 2, but recently I got myself a Quest 3 as well. And although I did play quite a bit with Quest (2) before, and even published an app for it, I wanted to see how true Mixed Reality worked on Quest 3. Equally important, I wanted to know how that could be set up with MRTK3. To put it more bluntly: I wanted to see how much from my investment in Mixed Reality could be carried over, and how far.
So I went back to the very beginning of my Mixed Reality journey, when I wrote the first of a five-part series blog post about an in hindsight hilariously simple app, CubeBouncer, for HoloLens 1, in July 2016. I also grabbed my Hand Smash Service from early 2021, although that required some code upgrading (and improvement). For extra fun, I also did not use a stable MRTK3 version, but, 4.0.0-pre1, and built it with Unity 6, because there is nothing more fun when entering a space you are not yet familiar with, than adding yet another boatload of stuff you do not know yet on top of it and try to get it to work. No pain, no gain ;)
But lo and behold, after I had put it all together and done some tinkering and a wee bit of code, I re-ran my first self-built MR experience from way back when. And to my surprise, it worked, and not only that…
I’d say it does work pretty darn well.
What do we want in a Mixed Reality app at minimum?
In my opinion, for proper XR, we need the following things:
- Full pass-through or see-through
- No boundary nonsense - we are not working in VR
- A spatial map
- Occlusion
- Hand tracking - controllers are not intuitive and run out of battery at inconvenient times, and you may also want to manipulate other equipment while using the device. Hands-free is the key, IMHO
Optionally we need some kind of spatial/directional sound. This is highly undervalued and underutilized in XR applications, I think it is pretty important to have.
So let us set up a project.
Initial setup
Unity
I took Unity 6000.0.25f1, and used the Universal 3D template. After the project is opened, switch platform to Android.
MRTK3
I usually am not very picky about what I take from MRTK3:
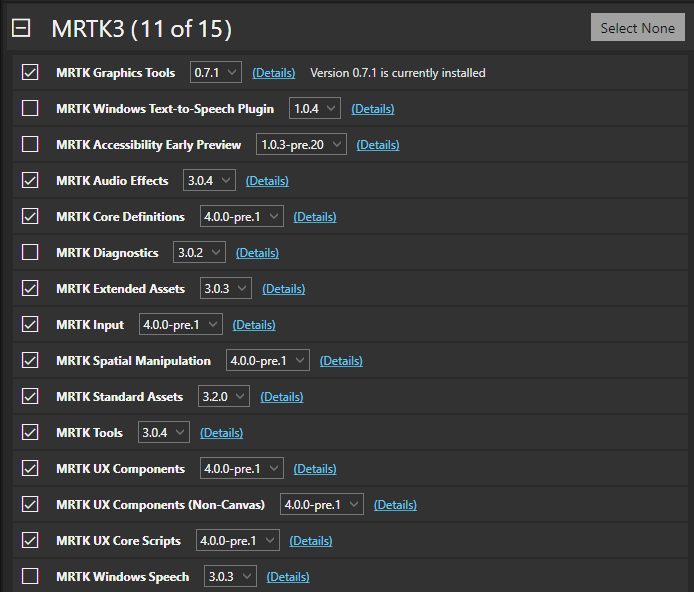
I usually take more or less everything, except for the Accessibility Early Preview as that never seems to have gotten out of preview; I also skip Diagnostics as I am not using that, and in this case, I skipped the Windows Text-to-Speech plugin and the Windows Speech component - as Quest does not support those anyway.
Create and set MRTK3 profile
Do not, ever, take the MRTK3 default profile unless you are absolutely, positively sure you are never, ever for all eternity going to change the default. Because if you do, you will change the profile in the unpacked MRTK3 package, and that will work fine until you commit your changes to Git and pull them back again - your changes are gone. So what you do is:
- Find the default MRTK Profile. it is in “Library\PackageCache\org.mixedrealitytoolkit.core\Configuration\ Default Profiles” and is called MRTKProfile.asset
- Copy that over to your own assets. Just the asset file, not the meta file
- Give it a different name, for instance AppMRTKProfile.asset
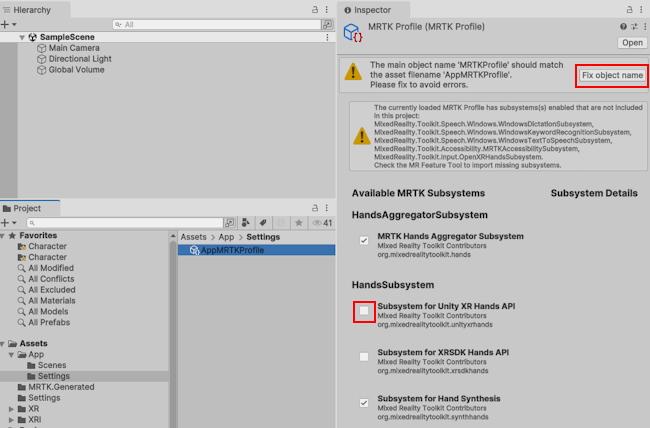
Select the AppMRTKProfile in your Unity editor, hit the button “Fix object name” and then tick the checkbox “Subsystem for Unity XR Hands API”
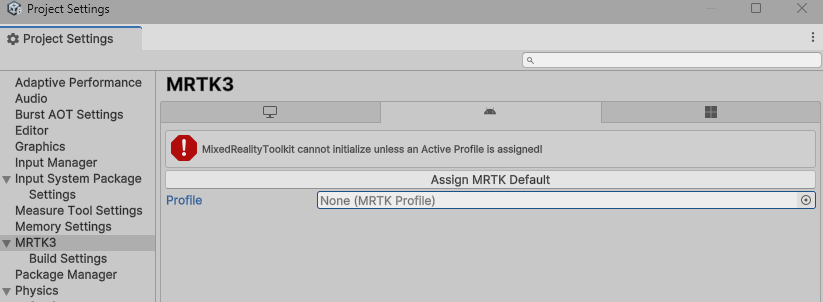
Then in the MRTK3 settings for both Android and Windows Standalone select your profile:
 .
.
After that, it should look like this
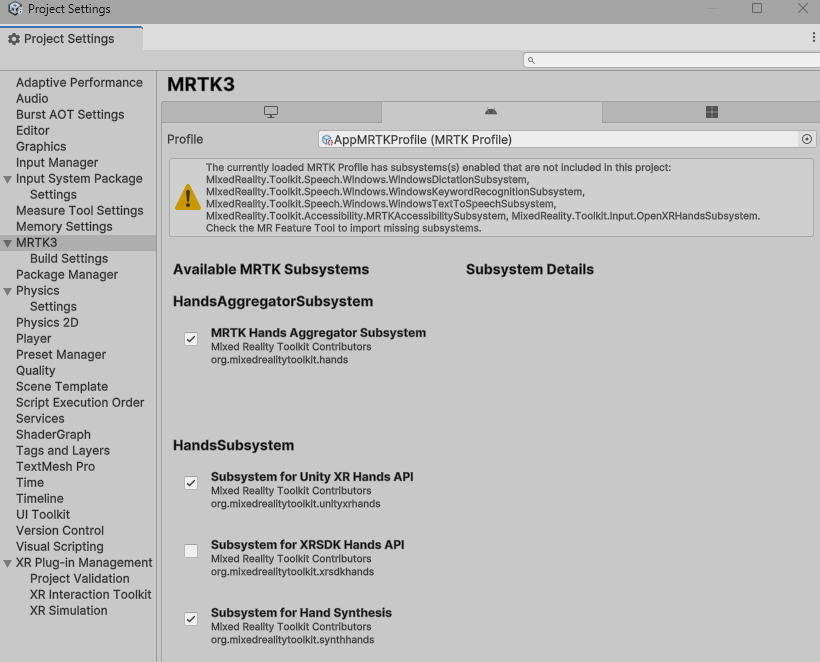
and you can ignore it complaining about missing subsystems.
Install meta components
I have installed three packages from the Asset Store:
If you install the first one, it will show you at one point this:
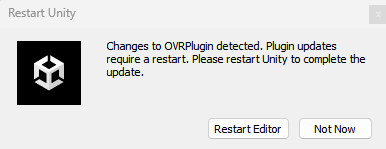
Agree, and this will indeed restart the editor. The Meta XR Audio SDK is not strictly necessary, but that gives us the Spatial Audio, or at least the Meta variant of that.
OpenXR setup
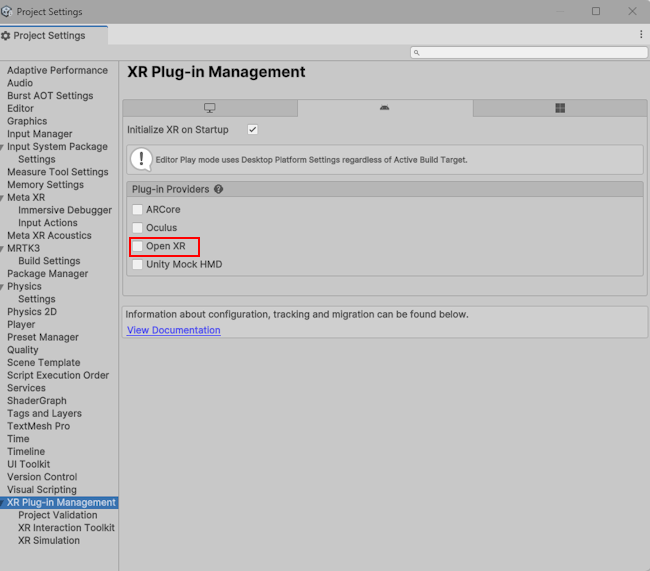
In Project Settings/XR Plugin management select OpenXR:
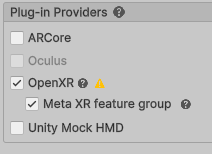
Make sure the Meta XR group is selected as well
Select Project Validation, then hit “Fix All” until the list does not get shorter anymore ;)
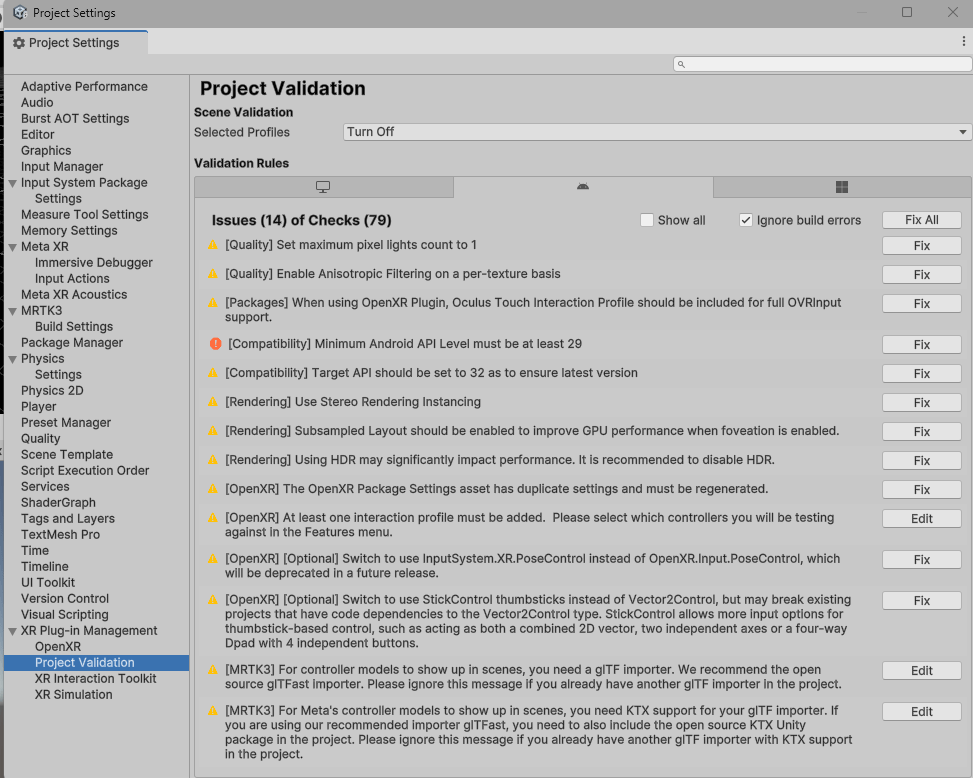
In the end, only this should remain
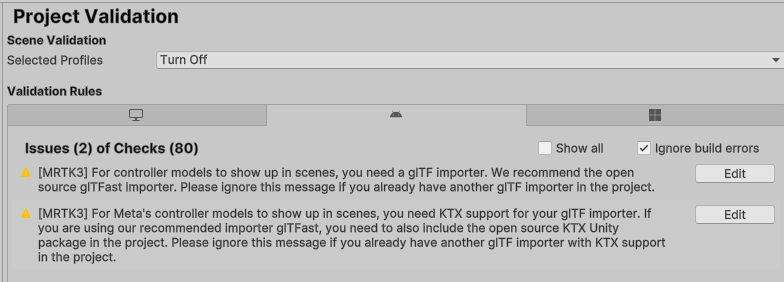
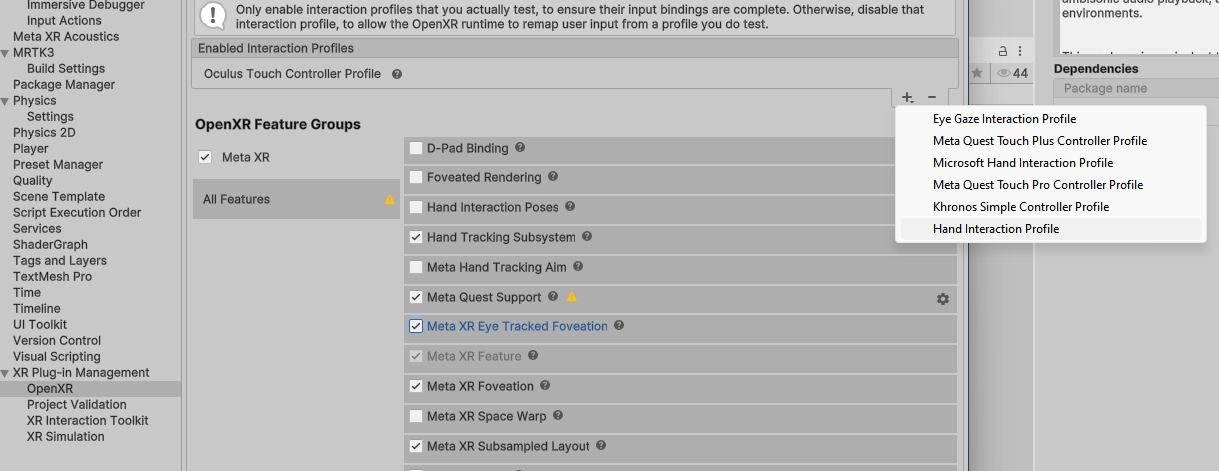
Back to the OpenXR tab again, make sure all the boxes are ticked, and add a hand interaction profile
However, you will see one warning remaining. If you click the warning, you get this cryptic and very unhelpful warning about the “Screen Space Ambient Occluding render feature”
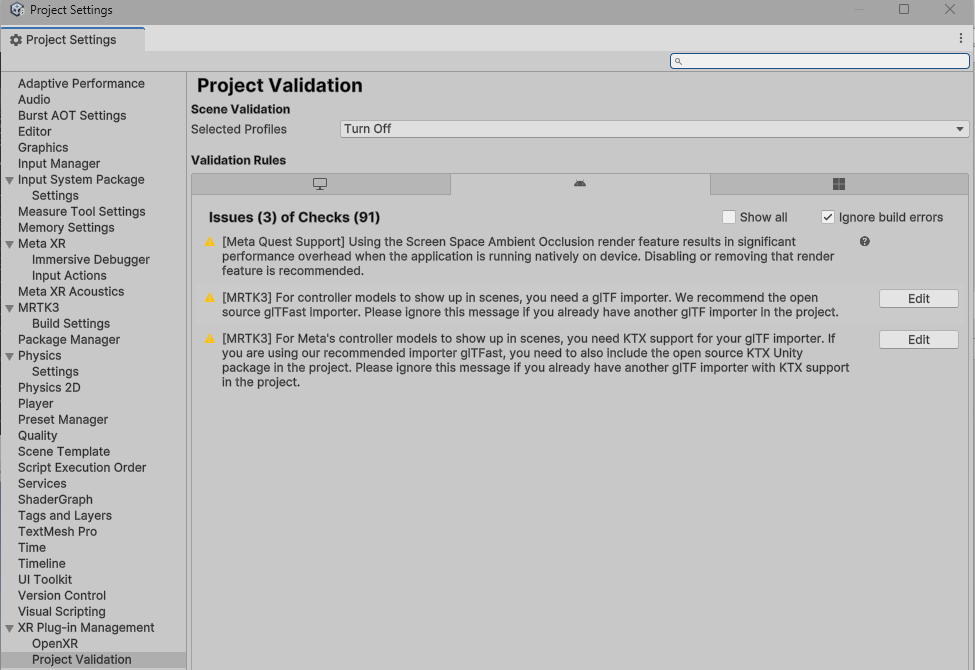
What I have found out, more by luck than by knowledge or GoogleBinging, is that this is caused by the “PC_Renderer” asset. This has a “Screen Space Ambient Occlusion” component.
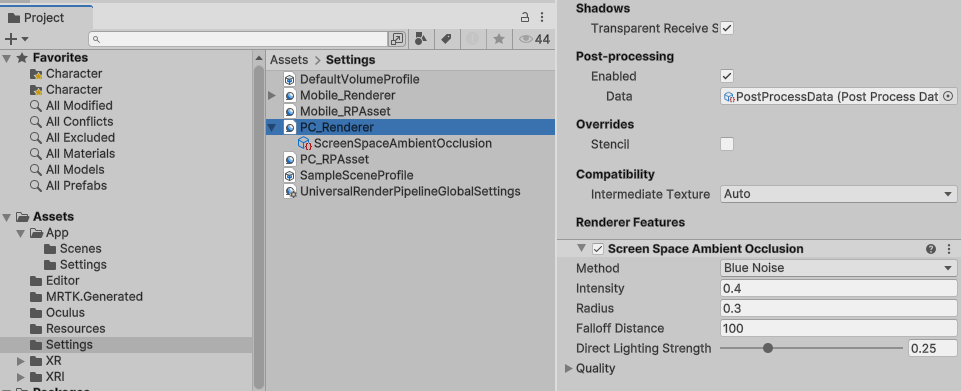
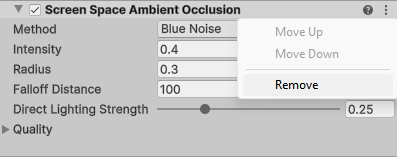
If you press the three dots menu on the right of it and hit “Remove” and then hit CTRL-S it is gone, and so is your warning
Scene setup
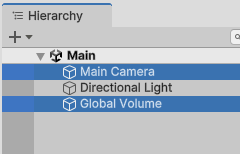
You now still have the default scene “SampleScene”. I always rename that to “Main”. Anyway, there are three things in it, and two are going to be deleted so that only “Directional Light” remains.
Next steps:
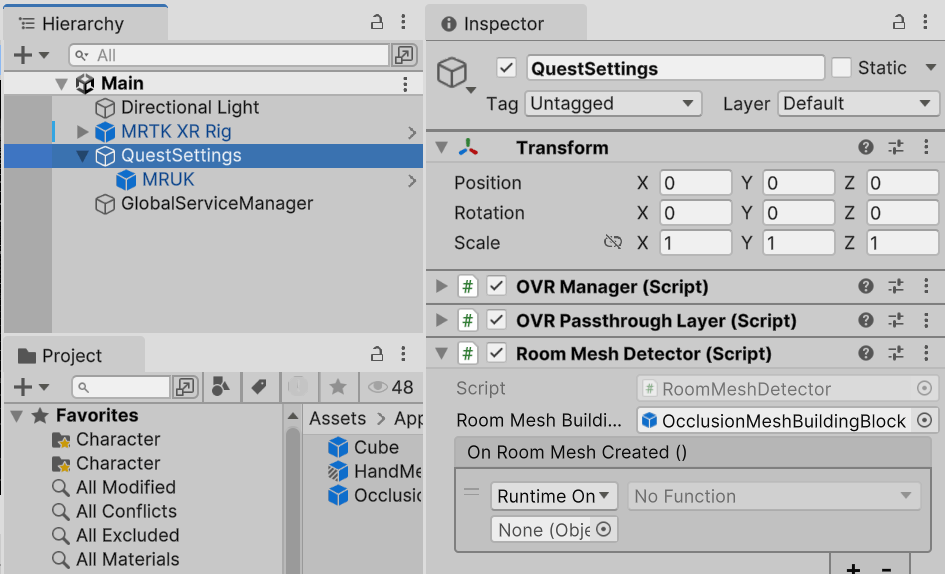
- Drag an “MRTK XR Rig” onto the scene (search in “Packages” or “All”).
- Create an empty game object “QuestSettings” (or whatever name you fancy)
- Add the Meta “OVR Manager” script to it
- Add the Meta “OVR Passthrough Layer” script to it.
- Find the prefab MRUK and drag it into the QuestSettings game object
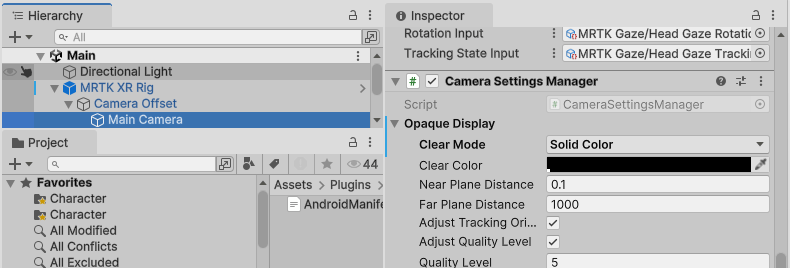
- Find the main Camera’s “Camera Settings Manager”, expand “Opaque display” and change “Clear mode” from “Sky Box” to “Solid color”.
- Drag my script “RoomMeshDetector” on the QuestSetting game object and drag my OcclusionMeshBuildingBlock game object on it (I will explain this later in this post)
Configure OVR Manager
In the “General” section, I have changed these 6 settings from the default:
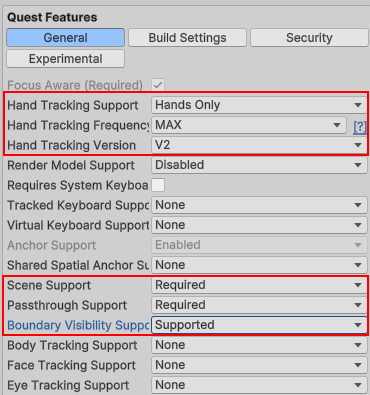
The first three obviously manage the hand tracking settings.
- Scene support indicates the app needs access to the spatial map
- Passthrough support enables - duh - pass-through VR
- Boundary visibility support needs to be at “Supported”. You would not think it from the wording, but this is required to be able to turn off the boundary
In the “Build Settings” section, I have ticked three boxes. First these two:

- “Enable passthrough” needs to be set here again, for some reason, to support pass-through.
- And because you have selected “Boundary visibility support” in the “General” section, you can turn it off there by ticking “Should Boundary Visibility be suppressed”. I guess “Boundary off” was too short.
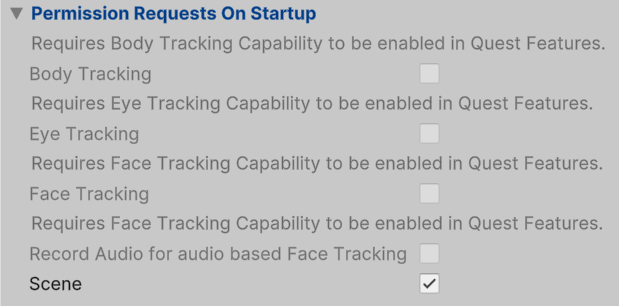
And then all the way at the bottom of the Build Settings section, you need to expand the section “Permission Requests On Startup” and tick the box “Scene”
Configure OVR Passthrough Layer
Choose placement “Underlay”. Default is “Overlay”, which will place reality over your virtual objects and render them invisible. I can think of a few applications for this, but why Underlay is not the default eludes me.

Meta settings
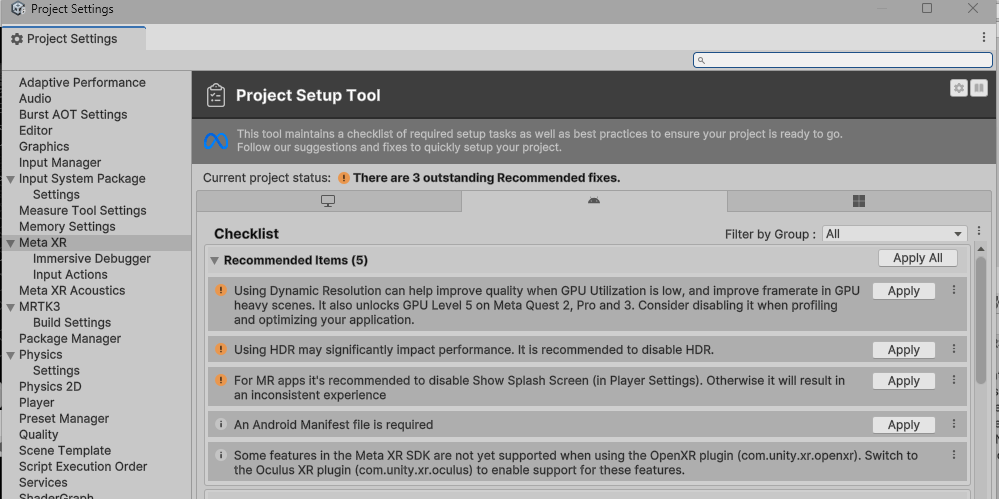
This is simple: click Click Meta/Tools/Project Setup Tool and hit “Apply All”
Player settings
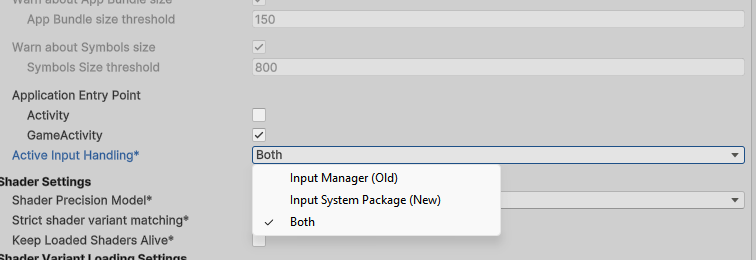
In player settings, under “Other settings”, find the input “Active Input Handling” and set it now to “New”. If you do not, you will get a warning saying Both is not supported in Android upon building your APK. I have no idea what consequences ignoring this warning has, but I like to avoid problems if I can.
Finally, although not strictly necessary but very recommendable, I would change the package name into something unique rather than taking the Unity default.

Scanning and using the spatial map on Quest
Quest treats scanning the room like setting up a guardian border: something you do in advance, not while the app runs. The MRUK prefab kind of automates that process: if there is no spatial map found for the room you are in, it asks you to scan the room. That is, most of the time. Sometimes you have to set it up manually in advance. For that, use “Settings/Physical Space/Space Setup Setup” in your Quest menu. However, be aware the scan is static. This is very much different from HoloLens and Magic Leap - and Apple Vision Pro, I learned yesterday. Those headsets actively scan the environment all the time and update the spatial mesh accordingly. Not so in Quest. If you have set up and scanned the room, that is it. If you move things like furniture around the spatial map will not be updated until you yourself decide to re-scan the room - and things will not bounce off the (moved) furniture or be occluded by it.
In addition, the Building Block that builds a Spatial Mesh leaves a few things to be desired. It features a RoomMeshController script that on startup tries to load a Spatial Mesh, and if it fails to do so in about 10 seconds, it stops. That works fine most of the times, except the very first time you run the app in a room that has not been scanned before. Then the app start the scanning, of course. After scanning, the 10 seconds have long passed, and you will never get a spatial map, until you run the app again. To solve that, I have created this litte script RoomMeshDetector:
public class RoomMeshDetector : MonoBehaviour
{
    [SerializeField]
    private GameObject roomMeshBuildingBlock;

    private GameObject roomMesh;
    private float lastTimeCreated;
    private bool isRoomMeshActive = false;

    public UnityEvent OnRoomMeshCreated;

    private void Start()
    {
        lastTimeCreated = Time.time -5;
#if UNITY_EDITOR
        isRoomMeshActive = true;
        OnRoomMeshCreated?.Invoke();
#endif
    }

    private async void Update()
    {
        if(isRoomMeshActive)
        {
            return;
        }

        if (!(lastTimeCreated + 5 < Time.time)) return;
        if(roomMesh != null)
        {
            Destroy(roomMesh);
        }
        roomMesh = Instantiate(roomMeshBuildingBlock);
        await Task.Delay(100);
        var roomMeshAnchor = FindAnyObjectByType<RoomMeshAnchor>();
        if(roomMeshAnchor != null)
        {
            isRoomMeshActive = true;
            OnRoomMeshCreated?.Invoke();
            return;
        }
        lastTimeCreated = Time.time;
    }
}
You are supposed to configure the roomMeshBuildingBlock with the RoomMeshBuildingBlock, it will try every 5 seconds if it sees a RoomMeshAnchor in the scene, and if not, it will destroy the old game object, then and create a new one, until the RoomMeshAnchor is found. It is kind of crude, but since Meta made the building block with all kinds of internal classes, this was the best sure-fire way I could think of. This will always show a spatial map, whether you had to scan first or not. The event OnRoomMeshCreated can be used to fire off some process that needs to wait until the spatial map is around. In the full CubeBouncer demo I have used it to make my HologramCollection active, effectively enabling the hand menu and showing the first grid of cubes.
However, if you use the standard RoomMeshBuildingBlock your spatial map will look like this:

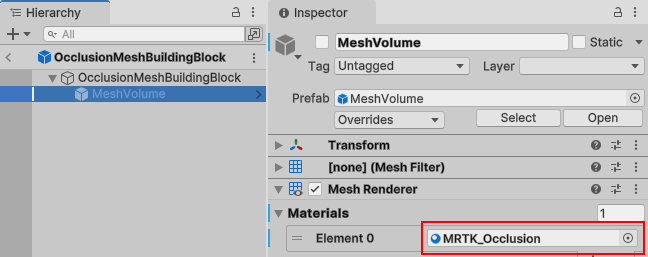
And although a wireframe material is fine for debugging purposes, it is not what you would like to have for a proper Mixed Reality experience. For that, you can use my OcclusionMeshBuildingBlock, as I wrote before. This is basically a copy of RoomMeshBuildingBlock, but then with the MeshVolume’s material set to MRTK_Occlusion instead of RoomMeshMat
and then have the changed MeshVolume be used by the RoomMeshController
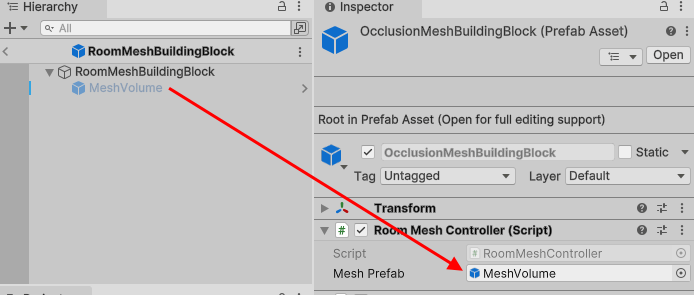
After that, you will have an invisible spatial map, but one that does occlude virtual objects behind real objects.
Adding some things to show off
At this point, if you deploy the app, it will ask you for permission to access your Spatial Data, it might ask you to scan your room first if you have not set up any room yet - this is all taken care of by the Meta SDK. After that, you will notice your hands are being tracked, the hand rays do not run into infinity but end at real objects, so the spatial map is working - but apart from that, it does nothing at all.
So for fun and to make the result more demo-able, I have added the cube bouncer code to the demo project. If you want the empty project, to use as a starter, you can take the empty-starter-project branch. I will describe components of the ‘cube bouncer’ in a later post in more detail, although it is basically the same app as well over 8 (gulp) years ago, although I improved a few things that made me cringe seeing it back - I do seem to have learned a thing or two about Unity in the intervening years.
Concluding words
Let me make this clear: this is not a HoloLens 2 or Magic Leap 2 class device. I do not think this will fly in industrial environments, because of safety regulations. You see, the issue with see-through VR is: you do not see reality. You see a reconstructed image made by software. If you get up close to things, you get some really weird effects sometimes. If the device fails for some reason, you are suddenly blind. You have no peripheral vision. However, for less than €500, you can now buy a device that will run HoloLens-like apps that will do a lot, if not most of the things that made HoloLens such a magical unique device in 2016. Mixed Reality development is now no longer limited to the happy few who are rich enough to buy an extremely expensive device, or who have employers rich enough to do that for them. A lot of scenarios that used to require an almost $4K device that needed quite some expertise to use and maintain, now can be run off a relatively low-priced consumer-class device. I especially think of training scenarios, like the apps that teach you how to successfully perform CPR or how to deal with house and office fires that I used to work on at my previous job.
The future of Mixed Reality, sadly and unfortunately, is not HoloLens. I will cherish it forever for blazing the trail and lighting the XR fire in me. Yet, now I have now successfully converted MRTK3 apps that were originally HoloLens 2 apps to run on Magic Leap 2, Quest 3, and even Apple Vision Pro, I am happy to see its legacy will live on. There is a way forward, my friends in Mixed Reality. The dream lives on!
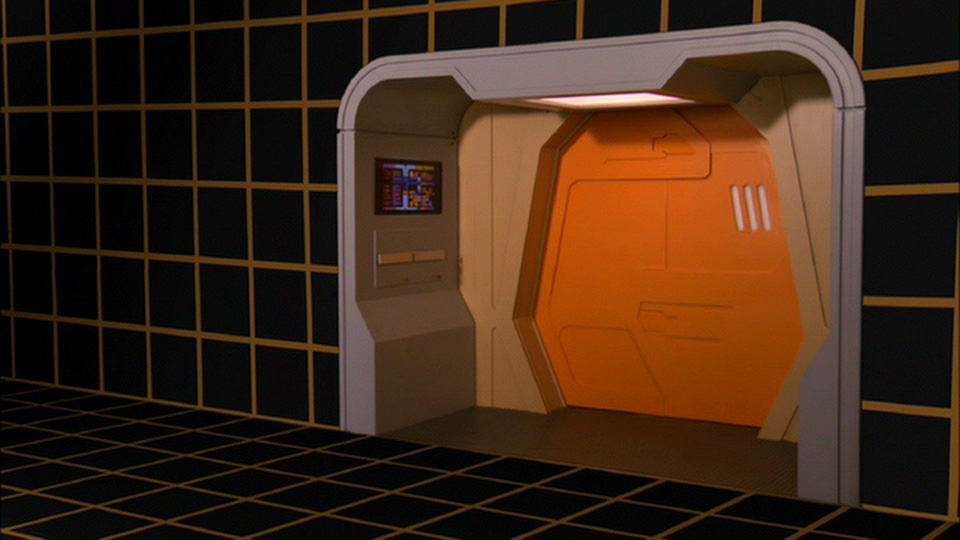
Computer, resume HoloDeck program! ;)

 MVP Profile
 Try my app HoloATC!
  HoloLens 2
 Magic Leap 2
 Meta Quest
 Android phones
 Snap Spectacles
 Buy me a drink ;)
 BlueSky
 Mastodon
 Discord: LocalJoost#3562