
 MVP Profile
 Try my app HoloATC!
  HoloLens 2
 Magic Leap 2
 Android phones
 Snap Spectacles
 MetaLense 2
 Buy me a drink ;)
 BlueSky
 Mastodon
 Discord: LocalJoost#3562
Making Surface Magnetism work on specific surfaces by sorting Scene Understanding surfaces into separate layers
In a previous post I showed how you can use Surface Magnetism to make an object ‘stick’ to the Spatial Mesh while placing it. But what if you want to use only specific parts of the Spatial Mesh to play along? Like the floor or the walls alone? Well then you can use Scene Understanding, an exiting package that can be separately installed using the MRTK feature tool. As you can see - the airplane can now only move across the floor - and the floor is designated red (while the walls are green).

But this does not quite work out of the box
If you look at the Surface Magnetism solver, you will notice you can actually make it work on specific layers, not only Spatial Awareness.
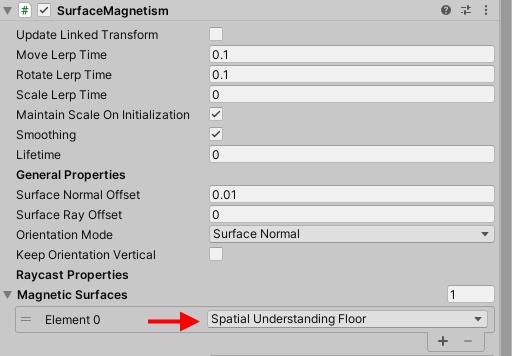
So it’s logical to think: “let’s define a separate layer for Floor” (and Wall, while we are at it)
and put the Scene Understanding default layer to Floor only, and it puts the recognized objects in a specific layer, Surface Magnetism works on it, and we are done, yes?
No.
Because whatever setting you make, all recognized surfaces end up in the same layer: 31, Spatial Awareness. I initially thought of defining two Scene Understanding observers with separate layers and separate materials, and although that works, it ends up all in the same layer, having the same material.
Why is this? A little research
In WindowsSceneUnderstandingObserver, line 1054, there’s a little piece of code that creates the actual observed object
private void InstantiateSceneObject(SpatialAwarenessSceneObject saso)
{
    // Until this point the SASO has been a data representation
    surfaceTypeName = $"{saso.SurfaceType} {saso.Id}";

    saso.GameObject = new GameObject(surfaceTypeName)
    {
        layer = DefaultPhysicsLayer
    };
Now the interesting things is, DefaultPhysicsLayer comes from it’s base class BaseSpatialObserver, where it’s defined thus:
public int DefaultPhysicsLayer { get; } = DefaultSpatialAwarenessLayer;
and DefaultSpatialAwarenessLayer is defined at this near the top of the class
public const int DefaultSpatialAwarenessLayer = 31;
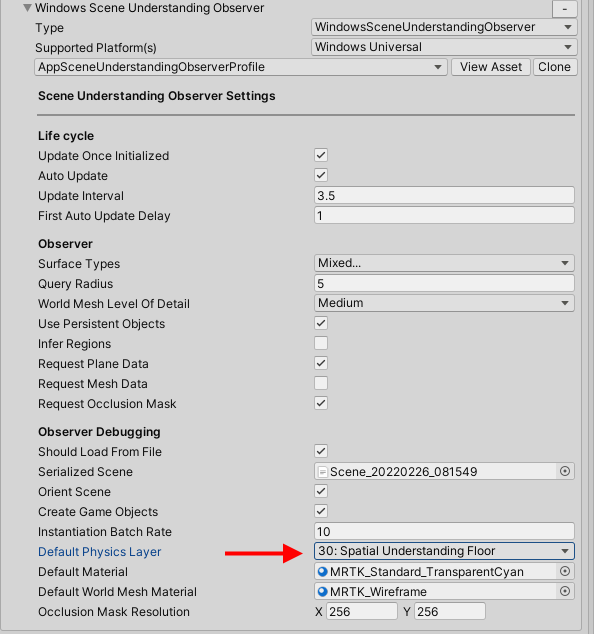
So although there is indeed a property in SceneUnderstandingObserverProfile in which you can set the layer in which the WindowsSceneUnderstandingObserver should put it’s observed objects, but it’s actually completely ignored. BaseSpatialObserver.DefaultPhysicsLayer is a read-only property hard locked to the Spatial Awareness Layer.
Well that’s a bummer. Fortunately, there’s also a nice workaround. And of course, me being an ‘architect’, it’s an MRTK extension service.
Sorting into layers - usage
Meet SceneUnderstandingLayerSortingService. It’s usage is extremely simple:
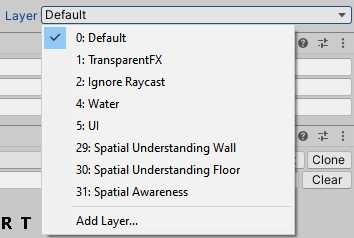
- define target layers in Layer pull down on top of your Inspector (the sample contains settings for layer 29 for walls and layer 30 for floors)
- register
SceneUnderstandingLayerSortingServiceas an extension service, - simply start to assign surface types to layers.
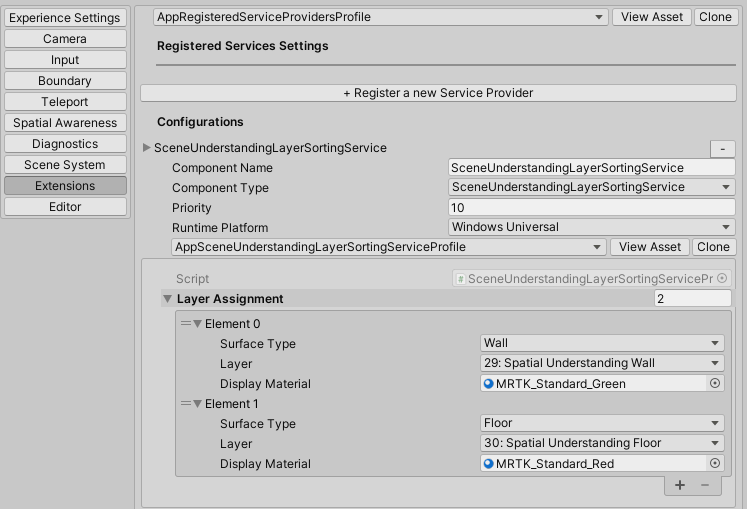
Floors end up in the Floors layer, Walls in the Walls layer. And then, indeed, your SurfaceMagnetism behaviour can work on the floor only, or the walls only, or the floor and the walls only. You might want to clear the Display Material settings, unless you like to have green walls and red floors. Floors and walls will then simply have the materials provide by the WindowsSceneUnderstandingObserver
How it works
Actually, a lot of the code is nicked from DemoSpatialMeshHandler, a base class for the giant DemoSceneUnderstandingController demo behaviour that is in the MRTK samples. The SceneUnderstandingLayerSortingService implements ISceneUnderstandingLayerSortingService as generated by the MRTK Extension Service wizard, but that interface, apart from being a IMixedRealityExtensionService child, also is a child from another interface:
public interface ISceneUnderstandingLayerSortingService : IMixedRealityExtensionService,
    IMixedRealitySpatialAwarenessObservationHandler<SpatialAwarenessSceneObject>
{
}
This requires SceneUnderstandingLayerSortingService to implement three methods:
void OnObservationAdded(
  MixedRealitySpatialAwarenessEventData<SpatialAwarenessSceneObject> eventData);

void OnObservationUpdated(
  MixedRealitySpatialAwarenessEventData<SpatialAwarenessSceneObject> eventData);

void OnObservationRemoved(
  MixedRealitySpatialAwarenessEventData<SpatialAwarenessSceneObject> eventData);
To have these actually being used, we have to register handlers
private void RegisterEventHandlers<T, TU>()
	where T : IMixedRealitySpatialAwarenessObservationHandler<TU>
	where TU : BaseSpatialAwarenessObject
{
    if (!isRegistered && CoreServices.SpatialAwarenessSystem != null)
    {
      CoreServices.SpatialAwarenessSystem.RegisterHandler<T>(this);
      isRegistered = true;
    }
}
This piece of code is literally nicked from DemoSpatialMeshHandler, as is it’s UnregisterEventHandlers counterpart. RegisterEventHandlers needs to be called from the SceneUnderstandingLayerSortingService’s Initialize and Enable methods.
WindowsSceneUnderstandingObserver in action
We are only interested in OnObservationAdded, that’s called when the WindowsSceneUnderstandingObserver adds a detected surface.
So what happens: as soon as it detects a surface, it’s added to the scene as a game object at a specific place:
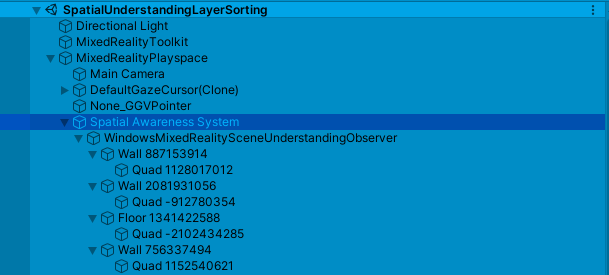
And the objects called “Wall somenumber” and “Floor somenumber” are the actual SpatialAwarenessSceneObject that are being passed on to OnObservationAdded. You see they all have only one child - a quad. This is because I only requested quads in the WindowsSceneUnderstandingObserver registration:
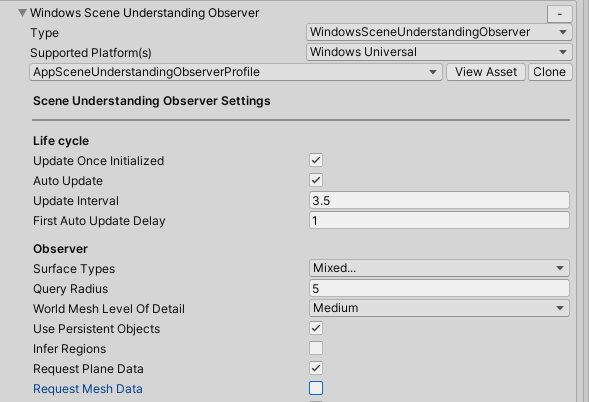
If I had checked the check mark next to “Request Mesh Data” every object would have had a mesh child as well:

But anyway: OnObservationAdded. Actually pretty simple:
public void OnObservationAdded(
  MixedRealitySpatialAwarenessEventData<SpatialAwarenessSceneObject> eventData)
{
    var layerAssignment =
      sceneUnderstandingLayerSortingServiceProfile.LayerAssignment.
         FirstOrDefault( p => p.SurfaceType =
            eventData.SpatialObject.SurfaceType);
    if (layerAssignment != null)
    {
        eventData.SpatialObject.GameObject.transform.
           SetLayerRecursively(layerAssignment.Layer);
        if (layerAssignment.DisplayMaterial != null)
        {
            foreach (var renderer in
               eventData.SpatialObject.GameObject.
                   GetComponentsInChildren<Renderer>())
            {
                renderer.material = layerAssignment.DisplayMaterial;
            }
        }
    }
}
- First, find the configuration setting for the added object’s SurfaceType
- If there is a setting defined for that type:
- Set the object’s layer recursively to the setting’s layer (using a MRTK extension method)
- If an override display material was defined, find all renderers and change the material.
If a surface type has not settings in this service, it’s skipped and simply left to the default settings in the WindowsSceneUnderstandingObserver.
And that’s all. Now you can configure SurfaceMagnetism to work on a limited set of recognized surface types.
A few minor things
If you want to use Scene Understanding, be sure to install the Scene Understanding Feature using the MRTK Feature Tool

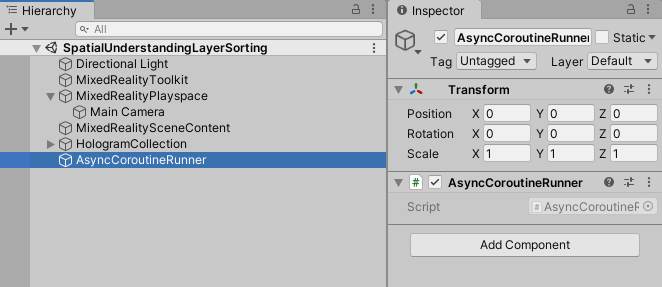
For Scene Understanding to work, there needs to be an AsyncCoroutineRunner in the scene, which I have added thus:
Concluding remarks & credits
Adding Scene Understanding makes your app a lot more intelligent and makes great use of the HoloLens’ capabilities of making the real and the virtual blend together seamlessly. At Velicus, we use it for instance to put up virtual fire extinguishers on a real wall ;). This gives training scenario’s that extra touch of reality that makes the actual training all the more valuable.
Shout out to my fellow developer and colleague Bilal Douiyeb who got tasked to research SurfaceMagnetism and Scene Understanding without much prior knowledge, and came up with the idea of putting a single surface type into a separate layer, using a hacked version of DemoSceneUnderstandingController.
The demo project can be downloaded from GitHub, as usual. There are two other little valuable gems this project that I have not touched upon in this post - to prevent if from becoming overly long. I will describe them soon in follow up posts. Also, I have the feeling there’s more to tinker and learn about Scene Understanding in general. Stay tuned :).