
 MVP Profile
 Try my app HoloATC!
  HoloLens 2
 Magic Leap 2
 Android phones
 Snap Spectacles
 MetaLense 2
 Buy me a drink ;)
 BlueSky
 Mastodon
 Discord: LocalJoost#3562
Placing holograms on any surface using the MRTK surface magnetism
After revisiting my good old FloorFinder by request of a community member, I started playing around with Surface Magnetism because one of my colleagues started to use this in the Velicus apps. I found out there were precious little samples of this feature and decided to write a small, as simple as possible demo application for it. If only how to learn myself the in and outs of it. It started out as a modified version of the FloorFinder and it shows:
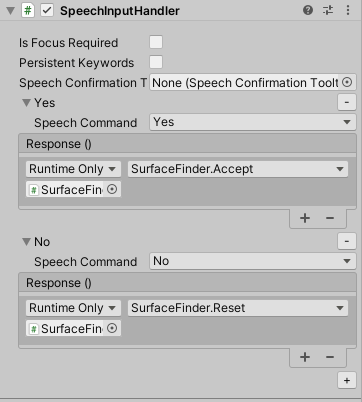
It basically does the same and works the same. Speech command “No” restarts the placement process, “Yes” confirms it. As long as you keep moving your head, the plane moves. As soon as you stop, it will propose a placement location. If you accept, it will place the ‘real’ plane. But unlike before, it will accept any surface and make the plane stick to it like a fly on the wall.
Scene setup
In stead of the FloorFinder, we now have the `SurfaceFindIt basically does the same and works the same. Speech command “No” restarts the placement process, “Yes” confirms it. As long as you keep moving your head, the plane moves. As soon as you stop, it will propose a placement location. If you accept, it will place the ‘real’ plane. But unlike before, it will accept any surface and make the plane stick to it like a fly on the wall.
![]()
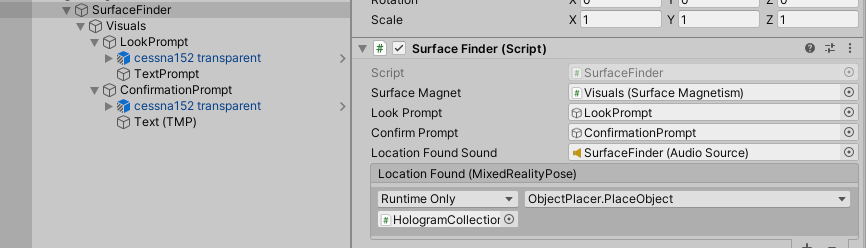
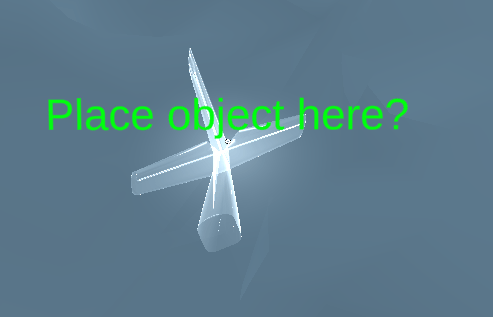
This is just the same Cessna 152 from the FloorFinder blog but in all parts of the model the material is changed into the “Shader Ball Refractive Glass” material from the MRTK examples. This thing sits both in the look prompt as well as the confirmation prompt, resulting in the visual effect the plane stops moving and gets a different text above (“Look at a surface, hold still to place” versus “Place object here?”). There are smarter ways to fix this, but this approach is very flexible and simple. You can easily now have different objects for moving phase and the proposing a location phase.
One level higher, on HologramCollection, the ObjectPlacer is still in place. Only now it places a prefab containing the (full color) model, in stead of the model directly. There a good reason for that, and I will come to that later.

Surface Magnetism setup
On the Visuals objects, there is (of course) a SolverHandler and a SurfaceMagentism behaviour.
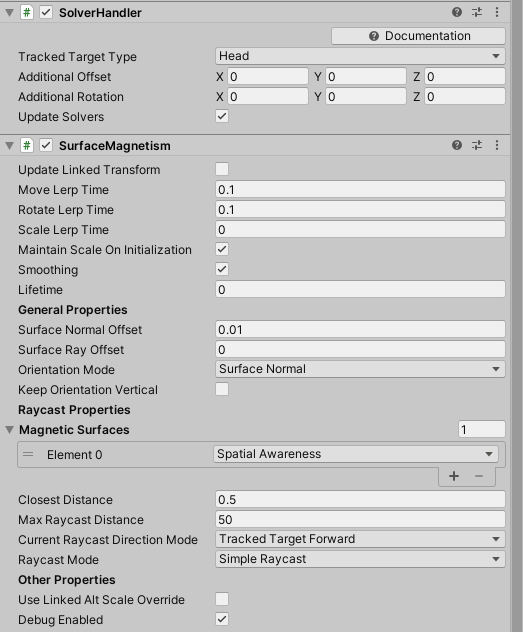
These are basically the default settings, except for two things: under General Properties I have set Orientation Mode to “Surface Normal”, and Surface Normal Offset of 0.01. This will basically place the object on the surface, aligned to the surface, at 1 cm distance from the surface. On a floor it would be 1 cm above it. I have found that to give the best effects in this demo.
Note, below the SurfaceMagentism behaviour is a RadialView behaviour
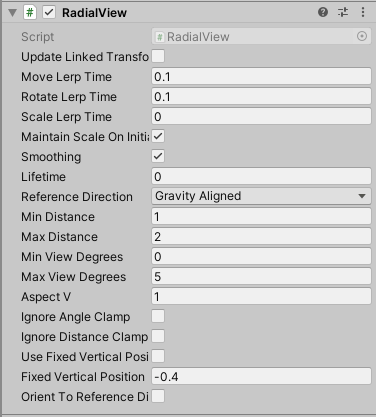
This might look weird, as there are now two solvers trying to do something different: one tries to place the object on a surface, the other tries to keep it in view. The reason for this is that initially, at startup, the app is still building the Spatial Mesh and the SurfaceMagentism can’t project the object on it. And you see nothing, for about two seconds, which I found a bit confusing myself. So initially the RadialView puts the object in front of you, hangs it to your gaze, and then quickly the SurfaceMagentism takes over.
Time for some code - SurfaceFinder
And now, time for some code of course. The SurfaceFinder starts like this:
public class SurfaceFinder : MonoBehaviour
{
    [Tooltip("Surface magnetism component being used to control the process")]
    [SerializeField]
    private SurfaceMagnetism surfaceMagnet;

    [SerializeField]
    [Tooltip("Prompt to encourage the user to look at the floor")]
    private GameObject lookPrompt;

    [SerializeField]
    [Tooltip("Prompt to ask the user if this is indeed the floor")]
    private GameObject confirmPrompt;

    [SerializeField]
    [Tooltip("Sound that should be played when the conform prompt is displayed")]
    private AudioSource locationFoundSound;

    [SerializeField]
    [Tooltip("Triggered once when the location is accepted.")]
    private UnityEvent<MixedRealityPose> locationFound =
               new UnityEvent<MixedRealityPose>();

    private float delayMoment;
    private float initTime;
    private Vector3? foundPosition = null;
    private Vector3 previousPosition = Vector3.positiveInfinity;
    private SolverHandler solverHandler;
    private RadialView radialView;
}
The editor fields all have explanation tool tips so I will skip those, save for one. If you have looked at the FloorFinder solution first, you will notice the locationFound event now holds a MixedRealityPose, and not just a Vector3. Think of a MixedRealityPose as a transform without a game object. It has a location and a rotation, has a forward, and a host of other useful features. And it can be used to return a rotation and location in one go, like I do now.
As for the other fields:
delayMomentis the time the behavior waits before accepting a new location, after a reject. This is to actually give the user a chance to start moving before the next location is proposedinitTimeis the startup delay - during this time, theRadialViewis active and SurfaceMagnetism is dormant. After that time, the roles are reversed. This, as I wrote above, to enable the app to build up the Spatial Map.- foundPosition is the position the
SurfaceFinderhas found and proposes as location previousPositionis the position found in the previous loop. The distance betweenfoundPositionandpreviousPositionis calculated to check if the user has stopped moving their head- solverHandler is a reference to the
SolverHandlerthat controls bothRadialViewandSurfaceMagentism. By disabling this,SurfaceFindercan stop the moving object and propose the location to place the ‘real’ (colored) airplane on. radialViewis of course theRadialViewused in the first seconds after startup
All right. In Awake the initial setup is done:
private void Awake()
{
    solverHandler = surfaceMagnet.GetComponent<SolverHandler>();
    radialView = surfaceMagnet.GetComponent<RadialView>();
    surfaceMagnet.enabled = false;
    radialView.enabled = true;
    initTime = Time.time + 2;
}
References to the required components are retrieved, and initially the radialView controls where the object to place will appear - for all but two seconds.
In OnEnable we call Reset:
private void OnEnable()
{
    Reset();
}

public void Reset()
{
    previousPosition = Vector3.positiveInfinity;
    delayMoment = Time.time + 2;
    foundPosition = null;
    lookPrompt.SetActive(true);
    confirmPrompt.SetActive(false);
    solverHandler.enabled = true;
}
And this method is also called, just like in the FloorFinder, by the SpeechInputHandler that is on the SurfaceFinder object. Reset basically sets all the fields (back) to the values they need to have to (re)start placing the object, and is also called by the SpeechInputHandler on the SurfaceFinder game object.
All the work is then done in CheckLocationOnSurface, which is called in Update every game loop cycle
private void Update()
{
    CheckLocationOnSurface();
}

private void CheckLocationOnSurface()
{
    if (Time.time > initTime && radialView.enabled)
    {
        radialView.enabled = false;
        surfaceMagnet.enabled = true;
        delayMoment = Time.time + 2;
    }

    if (foundPosition == null && Time.time > delayMoment)
    {
        if (surfaceMagnet.OnSurface)
        {
            foundPosition = surfaceMagnet.transform.position;
        }

        if (foundPosition != null)
        {
            var isMoving =
              Mathf.Abs((previousPosition - foundPosition.Value).magnitude) > 0.005;
            previousPosition = foundPosition.Value;
            if( !isMoving )
            {
                solverHandler.enabled = false;
                lookPrompt.SetActive(false);
                confirmPrompt.SetActive(true);
                locationFoundSound.Play();
            }
            else
            {
                foundPosition = null;
            }
        }
    }
}
- When
initTimeis over and theradialViewis still active, we assume the app now has had enough time to build a Spatial Mesh forSurfaceMagnetismto work on. So we disable theradialView, enablesurfaceMagnetand give the user 2 seconds time to position the object on the surface before we start proposing to place it on a location. - If
surfaceMagnetreports it hit a surface, we retain it infoundPosition - If we find a position and the distance between
foundPositionandpreviousPositionis larger than 0.005, the user is apparently still moving his or her head so has not decided on where to place the object. Since the initialpreviousPositionis set toVector3.positiveInfinity, the first position will always be rejected and only stored inpreviousPosition - And if the user is not moving,
- we disable the
solverHandlerso the object stops moving - we disable the
lookPrompt - enable the
confirmPrompt - and play a sound (‘pringggg’)
- we disable the
Since the LookPrompt and the ConfirmationPrompt game objects basically contain the same transparent airplane but a different text, you will only see the text change.
Finally, there’s the Accept method, also called by the SpeechCommandHandler
public void Accept()
{
    if (foundPosition != null)
    {
        locationFound?.Invoke(new MixedRealityPose(
            foundPosition.Value, solverHandler.transform.rotation));
        lookPrompt.SetActive(false);
        confirmPrompt.SetActive(false);
        gameObject.SetActive(false);
    }
}
That basically calls the locationFound event, but now passing on a MixedRealityPose as a parameter.
The final bits
The ObjectPlacer is nearly the same in the previous FloorFinder, but it accepts the MixedRealityPose in stead of a Vector3, and now not only sets the object’s position, but also it’s rotation
public class ObjectPlacer : MonoBehaviour
{
    [SerializeField]
    private GameObject objectToPlace;

    public void PlaceObject(MixedRealityPose pose)
    {
        var obj = Instantiate(objectToPlace, gameObject.transform);
        obj.transform.position = pose.Position;
        obj.transform.rotation *= pose.Rotation;
    }
}
One more thing
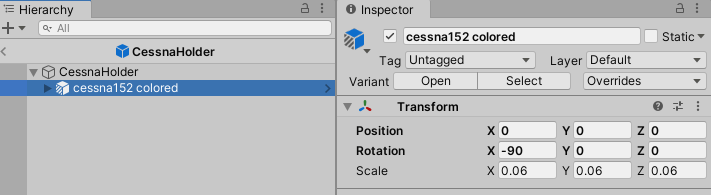
I promised to explain why the ObjectPlacer did not use the Cessna model directly, but had it wrapper in a prefab. There is some weird stuff going on that I have not quite been able to put my finger on. You see, if you use the model ‘just like that’ in surface magnetism, it rotates the airplane 90° forward, so basically nose down on a floor:
So what I simply did was create two prefabs (one for the colored Cessna and one for the transparent one), and rotate -90° over the X axis and that solved the problem.
Why this is necessary is not entirely clear to me, but hey, it works. Maybe one of my readers can explain it ;)
Conclusion
Surface magnetism is fun and since it uses one of the USPs of HoloLens 2 - interaction with the physical world - can be utilized to, well, mix with reality and add just that extra WOW to your app.
And that’s about all of it. You can, as always, find the complete working project on GitHub.