
 MVP Profile
 Try my app HoloATC!
  HoloLens 2
 Magic Leap 2
 Android phones
 Snap Spectacles
 MetaLense 2
 Buy me a drink ;)
 BlueSky
 Mastodon
 Discord: LocalJoost#3562
Running an MRTK3 app on an Android Phone
On September 6 2022, fellow MVP Zaid Zaim, who is also busy with MRTK3, mailed me with to ask me if I thought MRTK3 apps could run on phones as well. I had to admit I didn’t really know, but that promptly got me yet another side project (like I didn’t have enough already ;) ) because I had to find out now. I have an Android phone, and since the Quest 2 runs on Android as well, how hard could it be?
So close, yet so far
So I took AMS HoloATC, that I recently showed off running on the Quest 2 without any code changes, and deployed the Android version to my phone. The good news was: deployment worked. The bad news:
- The camera position was not tracked - it was just a faux 3D visualization on a flat screen. If I rotated or moved the phone, I could not change my view or move over the airfield.
- The background was simply black - not an AR view
- Since I had no hand tracking, I could not perform a ‘raw air tap’ to indicate I was satisfied with the position
- Even if I skipped that part, there was no way to select things by hand ray or poking - for the same reason
- Since I could not rotate the camera, I could not check if gaze actually worked.
The best news: I could work around all those issues. There is a way to make MRTK3 apps run on a phone and have them do all the things I listed above. To demonstrate how I did that, I made a little demo app, that runs both on HoloLens and Quest 2 - and now also on a phone.
The demo app
This simply shows a kind of field, that moves into your view, tracks your head movement and tries to align the ‘field’ to your head. If you do a raw air tap, the field stops moving and six red cubes appear. If you gaze at a cube, it will display a green sphere on top of it, and if you touch a cube or air tap while pointing the hand ray at it, it will turn blue. It’s a rather weird and artificial looking app, but it’s showing all the things I had to tackle to get AMS HoloATC to run on a phone, with some proper interaction.
Custom scripts
Apart from some stuff from my MRTKExtensions, which I have already have migrated to MRTK3, there’s only two custom scripts to consider: TapToPlaceInViewDirection, that basically makes sure the ‘field’ stays in view where ever you look, and rotates it to it points to the camera while staying horizontal - until you do the raw air tap. Not very sophisticated, but it does the trick. I won’t go into very much detail, but it sits in Managers and uses my MRTK3ConfigurationFindingService to detect hand gestures. Below is an excerpt:
private void Start()
{
    sceneObjects.SetActive(false);
    m3Cfg = ServiceManager.Instance.
      GetService<IMRTK3ConfigurationFindingService>();

    m3Cfg.LeftHandStatusTriggered.AddListener(OnHandTrigger);
    m3Cfg.RightHandStatusTriggered.AddListener(OnHandTrigger);

    startTime = Time.time + delay;
    isJustEnabled = true;
}


private void OnHandTrigger(bool status)
{
    if (status)
    {
        InitialLocationComplete();
    }
}

private void InitialLocationComplete()
{
    if (isActive)
    {
        LeanTween.cancel(worldObject);
        isActive = false;
        sceneObjects.SetActive(true);
        confirmSound.Play();
    }
}
If an air tap is detected, it basically disables itself so the field stays put. The other custom script is TestObjectController
public class TestObjectController : MonoBehaviour
{
    [SerializeField]
    private GameObject cube;

    [SerializeField]
    private Color selectColor;

    [SerializeField]
    private GameObject gazeSphere;

    private Color originalColor;

    private Renderer cubeRender;

    private void Start()
    {
        cubeRender = cube.GetComponent<Renderer>();
        originalColor = cubeRender.materials[0].color;
        gazeSphere.SetActive(false);
    }

    public void Activate(bool status)
    {
        cubeRender.materials[0].color = status ?
          selectColor : originalColor;
    }

    public void GazeActivate(bool status)
    {
        gazeSphere.SetActive(status);
    }
}
This sits in each of the TestObject prefab, changes the color when Activate is called, and shows the green sphere when GazeActivate is called. To have these methods called at the right moment, I have added an MRTK Base Interactable to the TestObject, and configured the IsGazeHovered and the Select events thus:
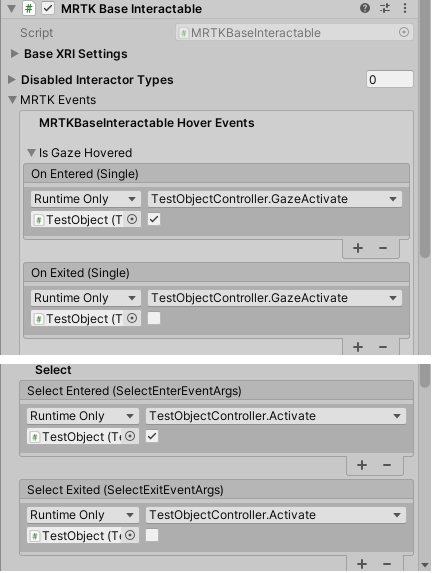
And that’s it. The app itself is very simple, neither very useful nor attractive, but it fulfills it’s purpose - showing what needs to be done to get this working on a phone. Let’s go!
Configuration changes
Disable the Vulkan graphics API, in “Other settings”

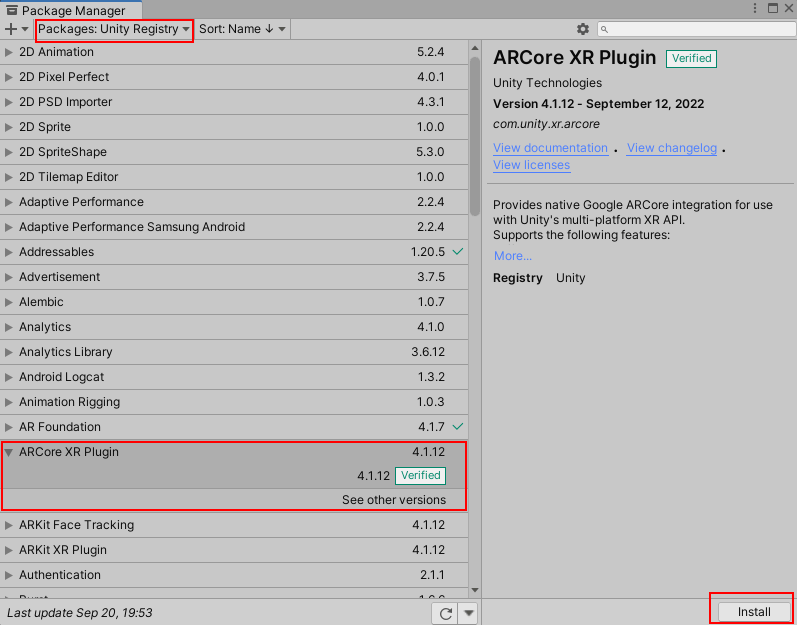
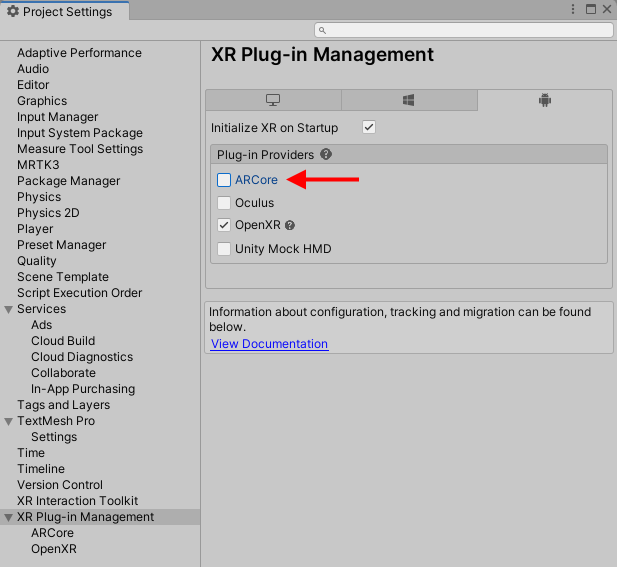
Installing and configuring AR Core
First, click Window/Package Manager. Select “Unity Registry” as package source, find the ARCore XR plugin in the list, and hit install
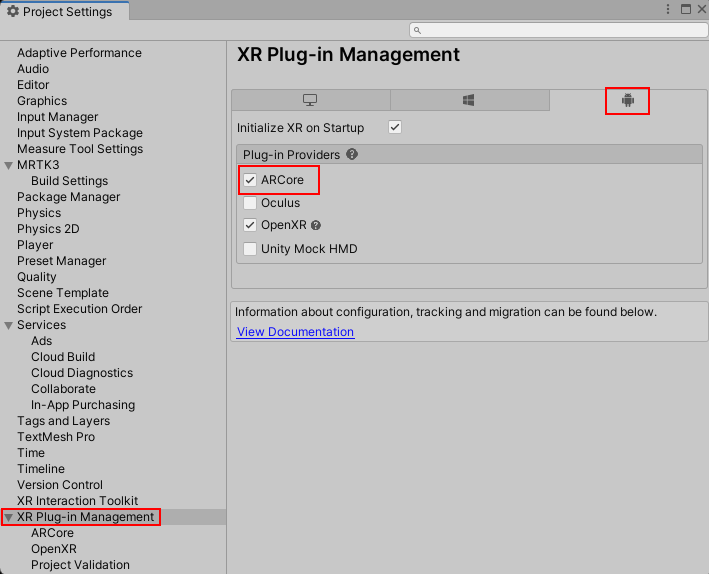
Then, click Edit/Project Settings, select XR Plug-in Management, then select the Android tab, and check “ARCore”
Configuring the camera
Select the main camera. It’s in MRTK XR Rig/Camera Offset game object
If you go to the Inspector, at the bottom you will see the Tracked Pose Driver.

This now will need to track device position and device rotation as well. How to set this, can best be explained in this very little animation:
![]()
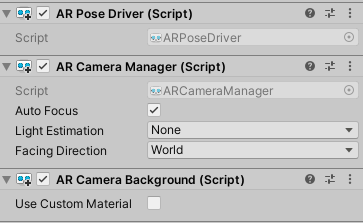
Add AR Pose Driver AR Camera Background to the Camera. The last one automatically adds an AR Camera Manager to the camera as well, which is exactly what we need:
Create an AR Session
This is very easy. Right-click in your scene hierarchy, select XR/AR Session.
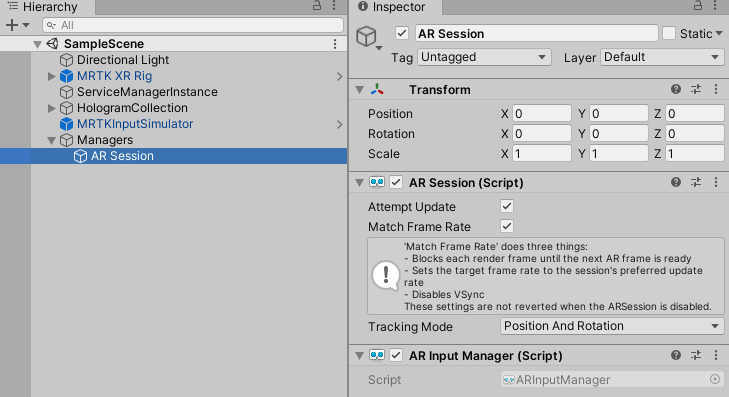
Unity creates it in the scene root, I moved mine to Managers. At this point, when you deploy to your phone, it will ask for permission to take photos and videos, and if you do, it will show the ground plate showing over the background of reality - and it will move and rotate with the camera as you move and rotate your phone, just as in a headset. So now we have a proper AR application. But there’s no interaction yet.
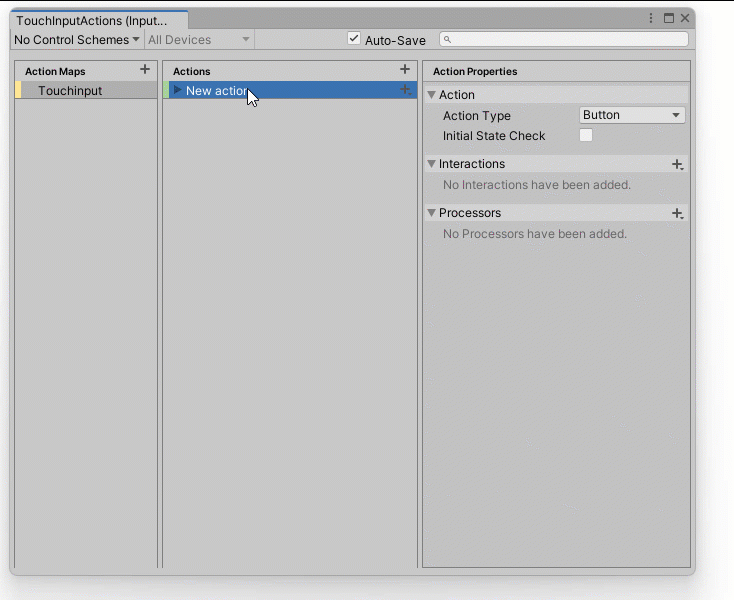
Create and configure touch input actions
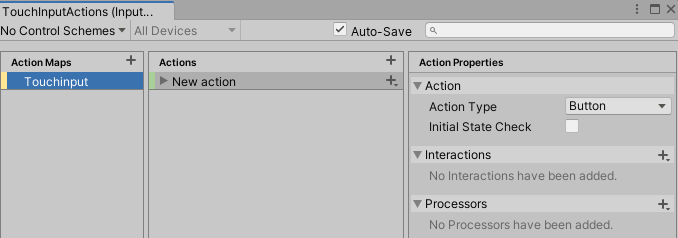
Select the Configuration folder in your assets, right-click, then select Input Settings (all the way to the bottom) and call the file TouchInputActions. Double click the file. Then,
- Click the “+”” button next to Action Maps
- Call your action map “TouchInput” (or whatever you like)
- Check the “Auto-Save” checkbox if you value your sanity
Now we need to define a touch screen input action. On a flat screen, that is (of course) a Vector2. How this is done, is also best explained in this little animation:
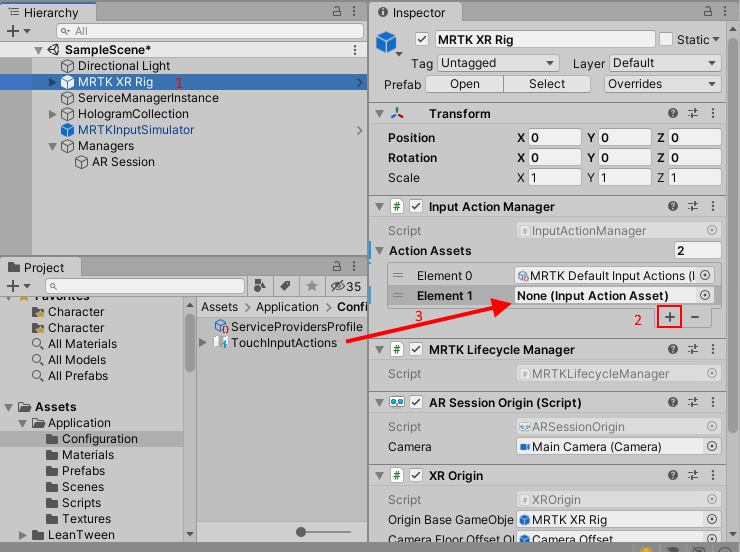
You need to make the Input Action Manager aware of the new input. That behaviour sits in the MRTK XR Rig. Select the MRTK XR Rig in the hierarchy, then hit the “+” button under “Action settings”, and finally drag your newly created and configured TouchInputActions onto the Input Action Manager’s new “Input Action Asset”.
Intercepting a tap on the screen
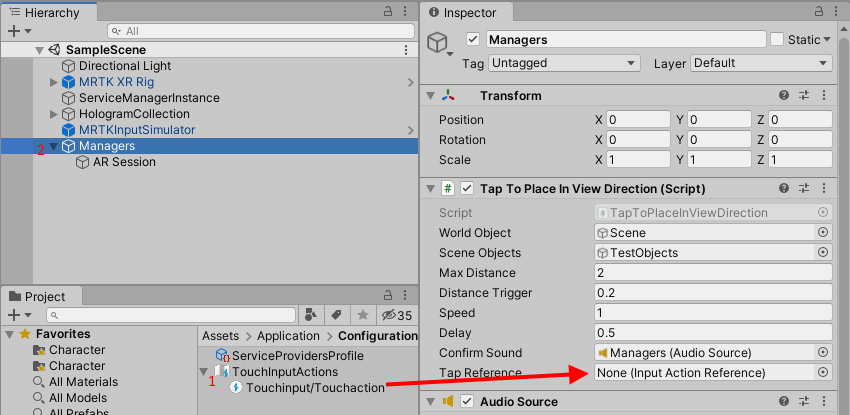
Going back to my simple TapToPlaceInViewDirection, we add a serializable field:
[SerializeField]
private InputActionReference tapReference;
In the Start method, we simply add:
tapReference.action.performed += ctx => InitialLocationComplete();
Select TouchInputActions in Configuration, and expand it, so TouchInput/Touchaction is visible. In the hierarchy, select Managers, and drag the TouchInput/Touchaction into the newly formed Tap Reference field. Like so:
Now, if you tap your phone’s screen after the ‘field’ is on the location you want, you hear the familiar ‘pringgg’ sound that I have been using as confirmation sound since my very first HoloLens app. The ‘field’ stays put, the cubes appear - and not only that. If you point the phone to a cube, you will see the green sphere appear. Dig this - once your AR camera is tracked, ‘gaze’ works out of the box in MRTK3! But, how to select seprate objects? We don’t have any hands to work with. We can only tap on the screen.
Making objects selectable by screen taps
I have no idea if this the best way to do it, but it is certainly a way to do it. I have used something like this before, about 4 years ago when, I had some very basic version of AMS HoloATC built directly on ARCore, but that required a lot of hack and slash work. This is much simpler. The basic idea comes from this Unity tutorial, although I had to find out how to do this using the Interaction Toolkit
Meet TapRayCastActivator
public class TapRaycastActivator : MonoBehaviour
{
    [SerializeField]
    private InputActionReference tapReference;

    private void Start()
    {
        tapReference.action.performed += OnTap;
    }

    private void OnTap(InputAction.CallbackContext ctx)
    {
        ProcessTapValue(ctx.ReadValue<Vector2>());
    }

    private void ProcessTapValue(Vector2 touchPos)
    {
        var ray = CameraCache.Main.ScreenPointToRay(touchPos);
        if (Physics.Raycast(ray, out var hit))
        {
            var hitGameObject = hit.transform.gameObject;
            var controller =
                hitGameObject.GetComponent<ITapRayCastActivatable>() ??
                hitGameObject.GetComponentInParent<ITapRayCastActivatable>();
            controller?.Activate();
        }
    }
}
When we defined the Touchinput action, it was defined as a value of Vector2. Thus, the tap event includes a Vector2 value - the screen position - that we can read from the callback’s ‘context’. The interesting thing is: CameraCache.Main.ScreenPointToRay(touchPos) then generates a 3D ray from your 2D touch position parallel to the view direction of the camera - so you only have to do a Physics.Raycast with that ray to see if any collider is hit by that ray, that is - if the user has tapped ‘on the object’. If so, the code tries to find an ITapRayCastActivatable in either the object itself or it’s parent - and then calls it’s Activate method.
ITapRayCastActivatable itself is a dead simple interface
public interface ITapRayCastActivatable
{
    void Activate();
}
So the only thing left to do is make TestObjectController implement ITapRayCastActivatable and add this code:
private bool lastTapStatus = false;
private float lastInvokeTime = float.MinValue;

public void Activate()
{
    if (Time.time - lastInvokeTime > 0.2f)
    {
        lastInvokeTime = Time.time;
        lastTapStatus = !lastTapStatus;
        Activate(lastTapStatus);
    }
}
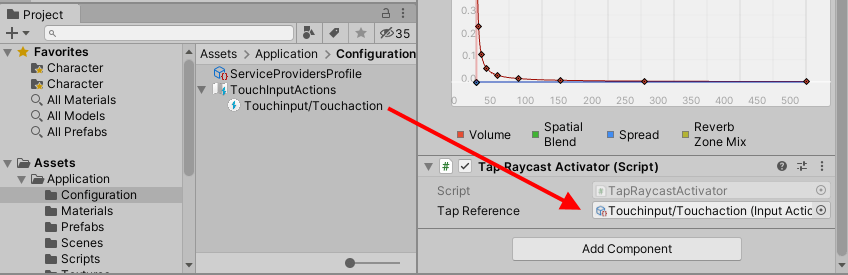
Then we need to add TapRayCastActivator somewhere in the hierarchy - I added it to the Managers game object. Finally, we need to drag the Touchaction onto the TapRayCastActivator’s Tap Reference field
and we are done. Tapping on the screen ‘on a cube’ now works as a kind of toggle - a tap turns the cube blue, the next tap red again, etc. It actually runs on my phone, at about 6 seconds in you can see the shadow of me holding it ;)

UPDATE: and does it still work on the Quest 2?
The first question I got, when I talked about this with a fellow MVP, was: “will it still run on Quest 2 after all these changes?” The answer is no. If you deploy it as-is, the answer is no.
However, if you follow the following procedure, it actually will:
- Go to the player settings
- Select XR Plug-in Management
- Disable the ARCore plugin again
- Build the APK anew and deploy
And that is all. As you can see, MRTK3 is pretty flexible, it even runs on ARCore. To say I am suitably flabbergasted is an understatement.
Concluding words
As always, there’s a project to go with a post like this. You can find the resulting code here.. If you want to have the starter code (the app that runs on HoloLens 2 and Quest 2), have a look at this branch.
Now I eagerly await comments telling me stuff like this can be much easier/nicer/better etc ;)