
 MVP Profile
 Try my app HoloATC!
  HoloLens 2
 Magic Leap 2
 Android phones
 Snap Spectacles
 MetaLense 2
 Buy me a drink ;)
 BlueSky
 Mastodon
 Discord: LocalJoost#3562
Using Azure Web PubSub and WebSockets for multi user XR experiences with MRTK3
Currently I am building a new version of my now 7 years old HoloLens app AMS HoloATC. In am cleaning out the cruft that accumulated from going from HoloToolkit to MRTK and MRTK2, it’s now based on MRTK3, totally cross-platform, and with some new features. One of those features is: I wanted to make it instantly visible in other devices when someone selects an airplane. Currently, that data comes only with the back end data - and that is only refreshed about every 20 seconds, so it may take a while before user A sees the airplane user B selected. Now of course, there’s Photon Unity Network (PUN) but that’s now slowly being deprecated (and a bit heavy handed for such a simple requirement), there’s also Fusion but that’s not supported on HoloLens (yet) - long story short, inspired by the WebSockets based remote app controller my colleague Timmy Kokke built for some of our products and project at Velicus, I decided to try my hand at using WebSockets for that goal. And I got it to work, too:
Azure Web PubSub service
When researching on how I could host a WebSockets server in an Azure function, I stumbled on something unexpected: The Azure Web PubSub service. This is a ready-to-run, out of the box WebSockets server, which can easily send, receive and distribute messages over WebSockets to connected devices, handling all the nasty hooplah around making, registering and maintaining connections. There’s even a nice SDK around it. You only have to create the service in your portal, name it, and off you go. There are only a few drawbacks:
- The documentation is not very clear (IMHO)
- The SDK is not supported by or usable in Unity applications
- The documentation about the REST API is very sparse, and - to me - pretty much incomprehensible.
Steps for connecting to and using the Azure Web Pub Sub
After a lot of experimenting, I found out you need to do the following steps to be able to use the service from Unity:
- Obtain a WSS-URL for the service that gives you the right to connect to the service with the right privileges, for a certain amount of time
- Connect to that URL using the System.Net.WebSockets.ClientWebSockets API
- Wait for the “connected” event message to be received
- Send a message to join a group
After that, you can send to and receive messages from that group. A “group” is a simple identifier, a string. It can literally be everything. You can use this to limit the number of recipients. I use it for instance to notify only the people looking at Amsterdam airport of an airplane above that particular airfield being selected - people looking at Atlanta won’t care.
Creating a Web Pub Sub service
This is almost hilariously easy. From your Azure Portal Home, click “Create a resource” and search for “web pubsub service”

Click create, give it a name (and a subscription, resource group and area - the standard things) and hit “Create”. And you are done.
Obtain the service WSS-URL using an Azure function
This was the most confusing part for me. But the gist is this: the service’s URL is not fixed, but should contain a parameter that exactly tells the service if you can connect, if you can join groups, send messages - and for how long that’s valid. So it expires after a certain time. Kind of like a Shared Access Signature for an Azure Blob. You have to request that URL using the service’s “Connection string” and ask for required privileges. The NuGet package Azure.Messaging.WebPubSub makes that very easy for you, but like I said: that won’t work with Unity. I could not find a way do that via a REST API. The only thing I could find was something about a JWT token. After hours of experimenting, it was clear I was getting nowhere using that REST API, especially as I could not find any samples. Following the old saying that where there’s a will, there’s a workaround - I created an Azure function to do the work Unity could not do itself. Because that function can indeed use Azure.Messaging.WebPubSub. So I created a bog standard Azure HttpTrigger, added said NuGet package, and off we go:
namespace WebPubSubServer
{
    public static class WebPubSubConnector
    {
        [FunctionName(nameof(WebPubSubConnector))]
        public static async Task<IActionResult> Run(
            [HttpTrigger(AuthorizationLevel.Function, "get", Route = null)]
            HttpRequest req)
        {
            var user = req.Query["user"];
            if (user.ToString() == string.Empty)
            {
                return new BadRequestObjectResult("no user supplied");
            }

            var connectionString =
              Environment.GetEnvironmentVariable("PubSubKey");
            var serviceClient =
             new WebPubSubServiceClient(connectionString, "Hub");
            var url = await serviceClient.GetClientAccessUriAsync(
                DateTimeOffset.Now + TimeSpan.FromHours(2), user,
                new List<string>
                    {
                        "webpubsub.joinLeaveGroup",
                        "webpubsub.sendToGroup"
                    }, CancellationToken.None);
            return new OkObjectResult(url.ToString());
        }
    }
}
After you created your hub and published this function, simply add an Application setting “PubSubKey” to your function’s configuration that contains the Web PubSub Service’s “Connection string”
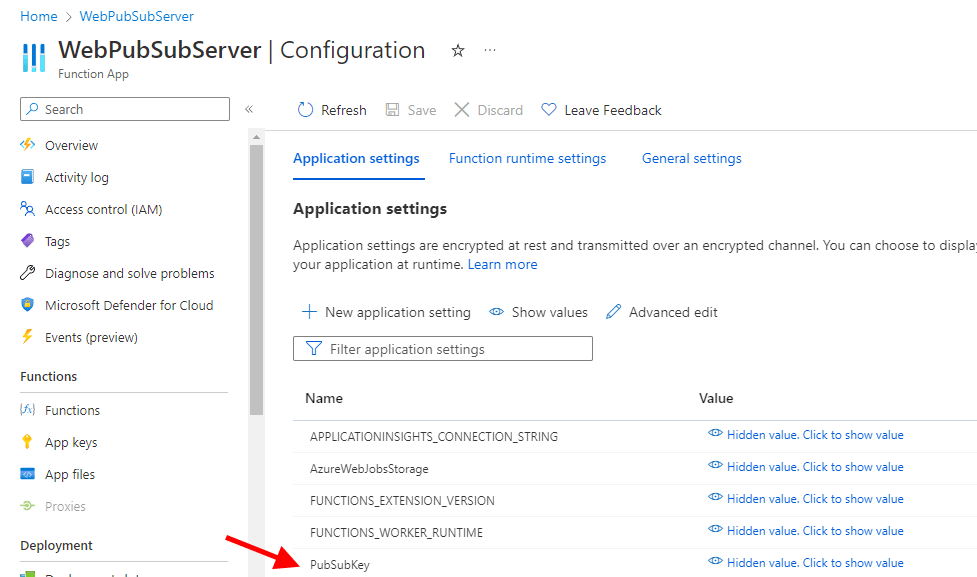
You can find that key here:
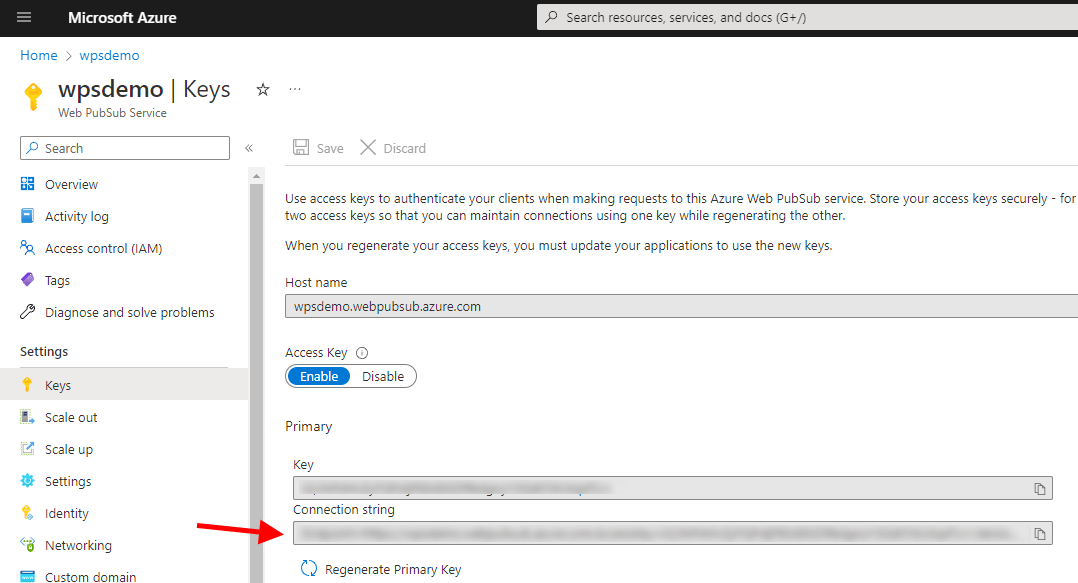
Calling this function will return a WSS-URL that will give the user the right to connect to the hub “Hub” for the next two hours, join and leave groups, and send messages to groups. The result will be something like this: “wss://wpsdemo.webpubsub.azure.com/client/hubs/Hub?access_token=” followed by a very long string containing seemingly random characters, probably containing some encoded data.
Implementing a Web PubSub client in Unity
Getting the WSS-URL
Of course I implemented this as a service, and since MRTK3 does not support services out of the box anymore, I used the Reality Collective Service Framework.
First order of business: create a simple profile that allows you to set the URL of the function that retrieves the WSS-URL for you:
public class WebPubSubClientServiceProfile : BaseServiceProfile<IServiceModule>
{
    [SerializeField]
    private string connectionLoadString;

    public string ConnectionLoadString => connectionLoadString;
}
You have to provide the function URL, including the function key, in the function’s profile
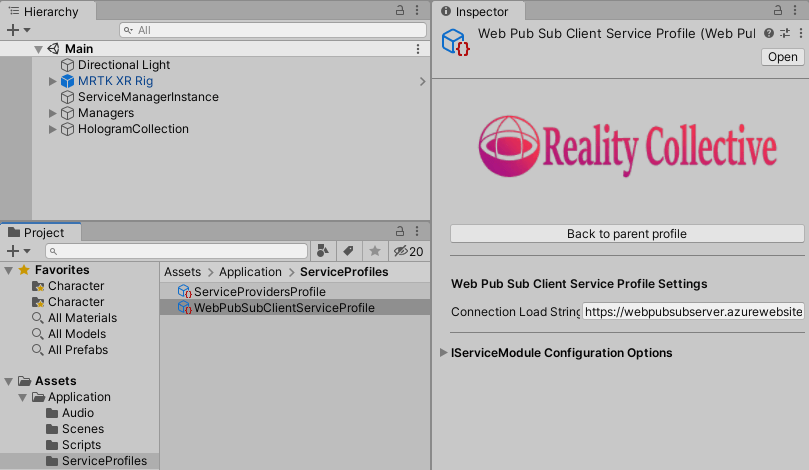
You can find that URL here:

The actual service then starts using that ConnectionLoadString to actually perform the retrieval. This is pretty much bog standard code:
public class WebPubSubClientService : BaseServiceWithConstructor, IWebPubSubClientService
{
    // stuff omitted

    public WebPubSubClientService(string name, uint priority,
      WebPubSubClientServiceProfile profile)
        : base(name, priority)
    {
        this.profile = profile;
    }

    public override void Initialize()
    {
        InitializeAsync();
    }

    private async Task InitializeAsync()
    {
        try
        {
            var user = "tempUser";
            var paramDelimiter = profile.ConnectionLoadString.Contains("?") ? "&" : "?";
            var request = new HttpRequestMessage(HttpMethod.Get,
                $"{profile.ConnectionLoadString}{paramDelimiter}user={user}");
            using (var client = new HttpClient())
            {
                var response = await client.SendAsync(request);
                var result = await response.Content.ReadAsStringAsync();
                await SetupWebSocketConnection(result);
            }
        }
        catch (Exception ex)
        {
            Debug.LogException(ex);
        }
    }
As you can see, a simple get request. Note you have to provide a user. In this simple implementation this is a fixed name, you are free to change that into some name the user needs to provide.
Making the actual Web Sockets connection
Anyway, if everything goes all right, “result” should contain the WSS-URL, and we can actually set up the web socket connection:
private async Task SetupWebSocketConnection(string url)
{
    webSocket = new ClientWebSocket();
    webSocket.Options.AddSubProtocol("json.webpubsub.azure.v1");
    await webSocket.ConnectAsync(new Uri(url), CancellationToken.None);
    Debug.Log("WebPubSubConnected");
    ListenForMessages(); // intentionally not awaited
}
“json.webpubsub.azure.v1” is a subprotocol. The documentation says that with the help of this, “an authorized client can join a group using join requests and publish messages to a group using publish requests directly”. More information can be found here. However, its use will become clear momentarily.
Listening for messages
After we finished setting up the connection, we can start listening for messages, and notify the outside world of those:
private async Task ListenForMessages()
{
    Debug.Log("WebPubSubConnected listening");
    while (isListening)
    {
        var buffer = new ArraySegment<byte>(new byte[1024]);
        var receiveResult = await webSocket.ReceiveAsync(buffer,
           CancellationToken.None);
        var result = Encoding.UTF8.GetString(buffer.Array, 0,
           receiveResult.Count);
        var message = PubSubMessage.FromJson(result);
        Debug.Log($"WebPubSubConnected received {message}");
        OnMessageReceived.Invoke(message);
    }
}

public UnityEvent<PubSubMessage> OnMessageReceived { get; } =
  new UnityEvent<PubSubMessage>();
Don’t ask me about the why and how of ArraySegment, I just nicked that from a Microsoft sample, although I can’t remember which one anymore.
Interpreting the received messages
There’s three kinds of messages I expect:
- EventMessage (“system message” in Web PubSub lingo)
- AckMessage
- GroupMessage (plain “message” in Web PubSub lingo)
As you can see, there’s the line PubSubMessage.FromJson(result) that does the interpretation. That looks like this:
public class PubSubMessage
{
    [JsonProperty("type")]
    public string Type { get; set; }

    public static PubSubMessage FromJson(string json)
    {
        var msgType = JsonConvert.DeserializeObject<PubSubMessage>(json);
        if (msgType != null)
        {
            return msgType.Type switch
            {
                "message" => JsonConvert.DeserializeObject<GroupMessage>(json),
                "system" => JsonConvert.DeserializeObject<EventMessage>(json),
                "ack" => JsonConvert.DeserializeObject<AckMessage>(json),
                _ => null
            };
        }

        return null;
    }
}
So basically this class deserializes the message into an instance of itself, then determines based upon the values of its own “Type” property what it actually should be and deserializes the message a second time, in the right child class.
If you connect the first time, you should expect to get an EventMessage with its Event property set to “connected”, and after that, after every GroupMessage you send, an AckMessage comes back. Apart from logging its arrival on Debug.Log, my code ignores its arrival. The most interesting child class is GroupMessage:
public class GroupMessage : PubSubMessage
{
    [JsonProperty("from")]
    public string From { get; set; }

    [JsonProperty("fromUserId")]
    public string FromUserId { get; set; }

    [JsonProperty("group")]
    public string Group { get; set; }

    [JsonProperty("dataType")]
    public string DataType { get; set; }

    [JsonProperty("data")]
    public object Data { get; set; }

    public override string ToString()
    {
        return $"{GetType().Name} - from {From} ({FromUserId}) to {Group}: {Data}";
    }
}
This is the stuff we will send and receive. The property Data is the payload. Note it’s type is “Object”. This is necessary to make sure JSON deserialization doesn’t get awry in a later stage.
Sending messages
Before you can send or receive messages, you have to join a group. The group identifier can be, like I said, literally any string. For joining and leaving groups there are two simple public methods, each using an anonymous type to construct a message:
public void JoinGroup(string groupName)
{
    var message = new
    {
        type = "joinGroup",
        group = groupName,
        ackId = ack++
    };
    SendMessageInternal(message);
}

public void LeaveGroup(string groupName)
{
    var message = new
    {
        type = "leaveGroup",
        group = groupName,
        ackId = ack++
    };
    SendMessageInternal(message);
}
Notice the ackId. This needs to be unique for every message. This can be used to check if messages you have sent to the service actually are processed. For my simple implementation, I chose to ignore that, other than make sure it got updated at every instance a message is sent.
If you want to send data to a group, you simply use this method:
public void SendMessage(string groupName, object payload)
{
    var message = new
    {
        type = "sendToGroup",
        group = groupName,
        ackId = ack++,
        noEcho = true,
        dataType = "json",
        data = payload
    };
    SendMessageInternal(message);
}
This simply assumes the payload to be a JSON string, received as an object so it’s threated as not part of the message itself, but rather as an inert payload. Note that “noEcho” is set to “true”, which means every member of the group “groupName” will receive the message except for the sender.
The method that actually sends the message is also once again a bit cryptic:
private void SendMessageInternal(object message)
{
    if (webSocket is { State: WebSocketState.Open })
    {
        Debug.Log($"WebPubSubConnected sending {message}");
        var json = JsonConvert.SerializeObject(message);
        var bytes = Encoding.UTF8.GetBytes(json);
        var buffer = new ArraySegment<byte>(bytes);
        webSocket.SendAsync(buffer, WebSocketMessageType.Text, true,
           CancellationToken.None);
    }
}
The whole message is serialized to JSON, then comes more hand waving with ArraySegment and finally it’s actually transmitted. This is basically all the code there is. The rest is just demo code to make sure it works.
Demo code explained
The shapes you see each have a controller:
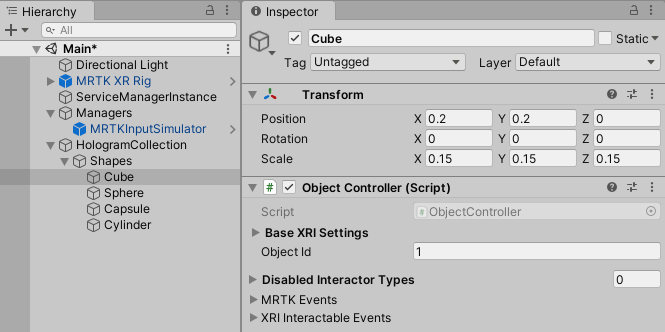
The code is is pretty simple:
public class ObjectController : MRTKBaseInteractable
{
    [SerializeField]
    private int objectId = -1;
    private Color baseColor;
    private Material objMaterial;

    public UnityEvent<int> OnObjectSelected { get; } = new UnityEvent<int>();

    private void Start()
    {
        objMaterial = GetComponent<Renderer>().material;
        baseColor = objMaterial.color;
    }

    protected override void OnSelectEntered(SelectEnterEventArgs args)
    {
        OnObjectSelected?.Invoke(objectId);
    }

    public void SelectById(int id)
    {
        objMaterial.color = id == objectId ? Color.red : baseColor;
    }
}
The important thing to note is that every shape has a unique id. When the user taps the object, OnSelectEntered is called and that notifies the world it is selected using event OnObjectSelected. There is also a public method SelectById that lets the color flip to red, or back to the original, based upon whether the supplied id is equal to this object’s id.
And then there’s this class, listening to events coming both from all the shapes and the service client:
public class MessageController : MonoBehaviour
{
    private IWebPubSubClientService webPubSubClientService;

    [SerializeField]
    private List<ObjectController> objectControllers = new List<ObjectController>();

    private const string groupName = "testgroup";

    private void Start()
    {
        webPubSubClientService =
           ServiceManager.Instance.GetService<IWebPubSubClientService>();
        webPubSubClientService.OnMessageReceived.AddListener(OnMessageReceived);
        foreach( var objectController in objectControllers)
        {
            objectController.OnObjectSelected.AddListener(OnObjectSelected);
        }
    }
We first get reference to client service, then add a listener to it’s OnMessageReceived event, then a listener to all shapes’ OnObjectSelected event.
The OnMessageReceived method then listens to anything coming from the service client
private void OnMessageReceived(PubSubMessage msg)
{
    if (msg is EventMessage { Event: "connected" })
    {
        webPubSubClientService.JoinGroup(groupName);
    }

    if(msg is GroupMessage groupMessage)
    {
        var objectData =
          JsonConvert.DeserializeObject<ObjectData>(groupMessage.Data.ToString());
        OnObjectSelected(objectData.Id, true);
    }
}
if we are connected, it immediately sends a join request to join a group “testgroup”. Otherwise, if it’s a group message, select the requested object. Notice that only here the actual payload gets deserialized!
For selecting the object, there’s these two methods:
private void OnObjectSelected(int id)
{
    OnObjectSelected(id, false);
}

private void OnObjectSelected(int id, bool isEventFromServer)
{
    foreach (var objectController in objectControllers)
    {
        objectController.SelectById(id);
    }

    if (!isEventFromServer)
    {
        webPubSubClientService.SendMessage( groupName,new ObjectData{Id = id});
    }
}
So if you are touching a shape, OnObjectSelected(int id) will be executed, which will call OnObjectSelected(int id, bool isEventFromServer) with isEventFromServer set to false. Thus, it will turn the selected object to red (and all other back to the original color), and inform the service client there’s an object selected. However, if someone else has selected the object, the OnObjectSelected(int id, bool isEventFromServer) will be called with isEventFromServer set to true - it will then only set the color of the right object to red, but not propagate the message back to the server.
Concluding words
With a simple service and very little code we have a working multi device experience. A very basic service I might add. But for my purpose it was very useful. You can download the complete project - Unity project and Azure function - here. Unlike my other projects, this does not run out of the box - you will need to
- create a Web PubSub service in Azure,
- deploy the WebPubSubConnector’s function
- configure the WebPubSubConnector function with the Web PubSub service’s connection string
- configure the WebPubSubClientService’s profile in the app with the WebPubSubConnector’s function
All this is, I hope, adequately explained in this post.
By the way, if anyone now thinks I am covertly saying my colleague has taken a dumb approach by writing a Web Socket Server himself in stead of using this… well, let’s say Velicus Remote™ (as my colleague jokingly christened it) does a heck of a lot more than just merely sending single messages around. This is a simpler approach for a much simpler use case - for someone too lazy to write a Web Sockets server himself ;). It doesn’t even keep state, or has message checking or fall back - this is just proving the point (and good enough for my purposes).
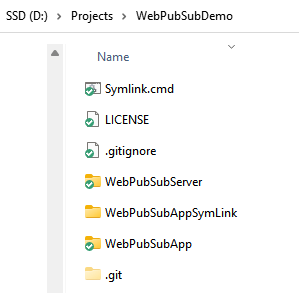
Oh, and by the way, the trick you see with two instances of the same Unity project in the movie on top: that’s a symlink. Basically it’s the trick described here. In the project’s root folder there’s a small batch file “Symlink.cmd” that does create the second instance for you:
This concludes my blogging for 2022. Enjoy your New Year’s Eve and see you in 2023!