
 MVP Profile
 Try my app HoloATC!
  HoloLens 2
 Magic Leap 2
 Android phones
 Snap Spectacles
 MetaLense 2
 Buy me a drink ;)
 BlueSky
 Mastodon
 Discord: LocalJoost#3562
Controlling a fan using a UWP on a Raspberry PI2 remotely
Part 4 of Reading temperatures & controlling a fan with a RP2, Azure Service Bus and a Microsoft Band
Intro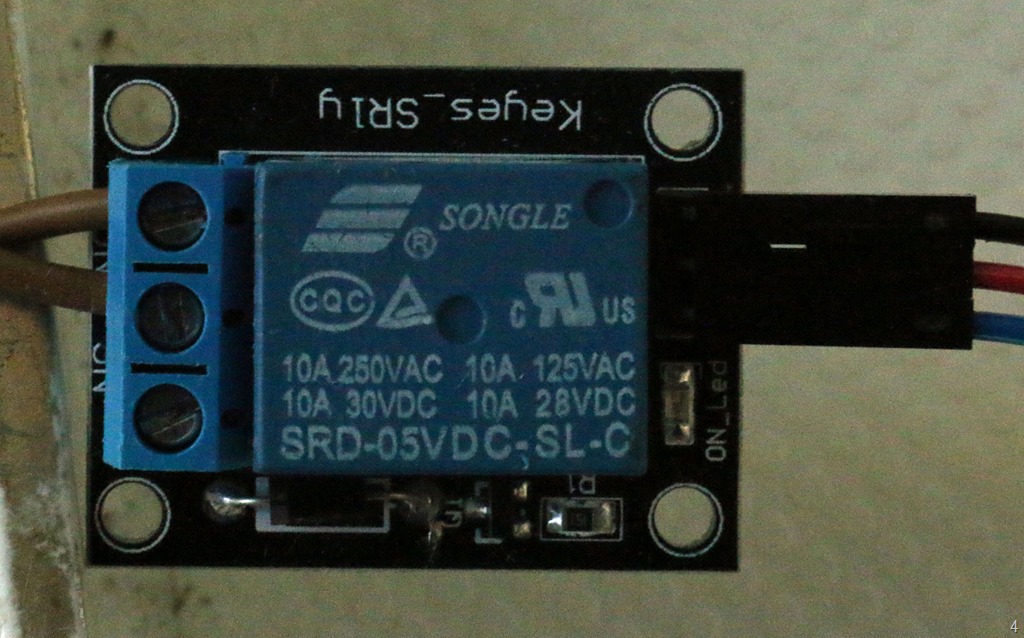 This article shows you how to control a device attached to a Raspberry PI2 remotely - that is, the Universal Windows App on the PI2 listens to commands coming off an Azure Service Bus queue.I have explained several details already in the previous posts in this series - I will go over some things more quickly than before.
The fan is controlled using a Keyes SRD-05VDC-SL-C switch, as displayed here to the right. This is a relay that controls mains power. The Raspberry PI2 is a very low power device operating in the 5V range, so controlling mains power (100-250V depending where you live) requires there be something in between the Raspberry and the actual mains power - this little device here. Connecting the mains power directly to the poor PI2's GPIO pins would most likely result in a spectacular but rather short fireworks, so that's quite inadvisable to do.
Basic app setup
As I explained before, I have set up this app using dependency injection, basically creating a set of very loosely couples objects that interact only through interfaces and/or events - an getting objects of which they are dependent on supplied via their constructor, in stead of newing them up themselves.
So, once again we have a look an the MainPage_Loaded in MainPage.xaml.cs of the TemperatureReader IoT app, and I have grayed out everything that is does not play a role in controlling the fan.
var gpioService = new GpioService();
var fanSwitch = new SwitchDevice(gpioService, Settings.SwitchPinId);
var controller = new AnalogTemperatureSensorController(gpioService);
var thermometer = new Thermometer(gpioService, controller);
var poster = new TemperatureQueueClient(QueueMode.Send);
var fanCommandListener = new FanSwitchQueueClient(QueueMode.Listen);
await fanCommandListener.Start();

fanCommandListener.OnDataReceived += (cs, cmd) =>
{
  Debug.WriteLine(
    $"Fanswitchcommand received {cmd.Status}; current status fan on =
      {fanSwitch.IsOn} at {DateTime.Now}");
  fanSwitch.SwitchOn(cmd.Status == FanStatus.On);
};
The amusing thing about this, as attentive readers will see, is that I am using no new objects whatsoever. All the object types in this are already described in previous posts of this series.
So how does this work?
As soon as the app is loaded, the GpioService, which I already explained in my previous post - is created. Then the fanSwitch object is created. This is a SwitchDevice - also already explained in the previous post as a base class for a class that controls an LED, and that now controls a SRD-05VDC-SL-C - by virtue of using a different GPOI pin. Then there is a FanSwitchQueueClient created - that listens to commands coming from the Azure Service bus. The working of this class is explained in the second post of this series.
Then finally, an event handler is attached to the FanSwitchQueueClient OnDataReceived - a very little piece of code that sets the switch to the status as requested by the command coming from the Azure Service Bus.
There is also this little piece of code reports back not only the temperature but also the current fan status back to whoever is listening to the other service bus
thermometer.OnTemperatureMeasured += async (thObject, data) =>
{
  data.FanStatus = fanSwitch.IsOn ? FanStatus.On : FanStatus.Off;
  await poster.PostData(data);
};
And that, my friends, is basically all. Nothing new - just reuse what is already been built. So why 'waste' a whole blog post on it? Mostly to show that with the right architecture you can make very easily reusable and connectable components - kind of like IoT hardware.
One more thing
There is an oddity to the SRD-05VDC-SL-C in relation to Windows 10 on Raspberry PI2: as soon as you open the pin to which it is connected and set its drive mode to output, the SRD-05VDC-SL-C switches itself on. A very undesirable state of affairs. This is why the constructor of SwitchDevice contains a statement to switch it off immediately:
public SwitchDevice(IGpioService gpioCtrl, int pinId)
{
  _pinId = pinId;
  _gpioCtrl = gpioCtrl;
  SwitchOn(false);
}
Sometimes you can briefly see the red status LED of the SRD-05VDC-SL-C blink red when it is initialized like this. Be aware that there may be a short power spike in the attached mains power, and be sure the device that run on mains power can handle it.
Check the demo solution here.