
 MVP Profile
 Try my app HoloATC!
  HoloLens 2
 Magic Leap 2
 Android phones
 Snap Spectacles
 MetaLense 2
 Buy me a drink ;)
 BlueSky
 Mastodon
 Discord: LocalJoost#3562
Model driven Mixed Reality apps using UniRx and a MRKT extension service, part 2 - showing a ‘list’
In the first part of this series I showed how to make a model, host that in a MRTK Extension service, and then have a single source of truth accessible everywhere. I also explained how to use the Reactive Properties from Reactive Extensions for Unity (UniRx) to get back the kind of magic we had in XAML-MVVM, where INotifyPropertyChanged allowed you to respond to property changes, and I even showed how to combine multiple property changes into one piece of logic. However, in MVVM we also managed lists using ObservableCollection, that - when properly used - automatically created UI elements for objects that were added to the list, and deleted UI elements when objects were removed from the list.
Fortunately, UniRx sports ReactiveCollection, and it can pretty easily be used to do a similar trick.
Demo
What you see here are two buttons:
- The left one adds an object model to a list in a listmodel. Mind you, this is a C# object - not a game object
- The right button simply clears the list
That is all the UI does. And yet you see game objects (green spheres) appear and disappear. If one of the spheres is touched, it disappears as well. Clearly something is observing the list and respond to changes. I will first explain in code, then in schematics, explain what exactly is going on.
Object models
List model
First of all, the State Service now has a second model. For the new Demo2 scene I created a model ListModel and added that to the StateService:
using System;
using Microsoft.MixedReality.Toolkit.Utilities;
using Microsoft.MixedReality.Toolkit;

namespace ReactNativeDemo.State
{
    [Serializable]
    [MixedRealityExtensionService(... stuff omitted...)]
    public class StateService : BaseExtensionService, IStateService,
       IMixedRealityExtensionService
    {
        private StateServiceProfile stateServiceProfile;

        public StateService(string name, uint priority,
           BaseMixedRealityProfile profile) : base(name, priority, profile)
        {
            stateServiceProfile = (StateServiceProfile)profile;
        }

        public ITwoButtonModel ButtonModel { get; } = new TwoButtonModel();

        public IObjectListModel ListModel {get;} = new ObjectListModel();
    }
}
This list model is what controls what is going on in the scene from a business model perspective:
using ReactNativeDemo.Mvc;
using UniRx;

namespace ReactNativeDemo.State
{
    public class ObjectListModel : IObjectListModel
    {
        public ObjectListModel()
        {
            MessageBroker.Default.
              Receive<ObjectDeleteMessage<SimpleDemoModel>>().
              Subscribe(ProcessDeleteMessage);
        }

        public IReactiveCollection<SimpleDemoModel> Shapes { get; } =
           new ReactiveCollection<SimpleDemoModel>();

        private void ProcessDeleteMessage(
            ObjectDeleteMessage<SimpleDemoModel> objectToDelete)
        {
            if (Shapes.Contains(objectToDelete.Model))
            {
                Shapes.Remove(objectToDelete.Model);
            }
        }
    }
}
Here we see two new concepts:
- The UniRx
MessageBroker. This is a simple pub/sub message bus very similar to the messenger I wrote myself earlier (or rather, adapted from a sample) and which I have now stopped using. Kill your darlings - when something better comes along. ReactiveCollection, which I provided as a read-only property to the outside world via an interface. We will see how this will be utilized later.
Like I said, this class is basically managing the business objects. A real business app would of course have stuff like validation, but for the sake of simplicity I leave it at this. The outside world is limited to:
- Adding business objects to the list
- Clearing the list of objects
- Deleting objects from the list (either directly or via a message)
And this is exactly what you see in the ListMenuController. The Add button simply creates a model with a random location and adds it to the list. The Clear button simply empties the list. This is all the interaction the UI has - everything goes via the ListModel.
using Microsoft.MixedReality.Toolkit.Utilities;
using ReactNativeDemo.Controllers.Base;
using ReactNativeDemo.State;
using UnityEngine;

namespace ReactNativeDemo.Controllers
{
    public class ListMenuController : BaseController
    {
        public void Add()
        {
            AppState.ListModel.Shapes.Add(
                new SimpleDemoModel(
                    new Vector3(Random.value, Random.value, Random.value) * 0.5f +
                       CameraCache.Main.transform.forward));
        }

        public void Clear()
        {
            AppState.ListModel.Shapes.Clear();
        }
    }
}
The fact that deleting works (or can work) via a message needs a bit of explanation. In a truly decoupled system, a list knows what objects is holds, but an object does not necessarily has knowledge of what list it’s in, or if it is in a list at all. If a UI element event (in this case, a touch) - needs to trigger an event, we can follow two approaches:
- The UI element finds the list in which the model resides in the state, and deletes is directly
- It just kicks against the model and says “you’re deleted” - and the model yells to the world “I AM DELETED” by throwing out a message - to whom it may concern.
I took the second approach as I think it’s more clean. Hence the ObjectListModel listens to an ObjectDeleteMessage<T>
SimpleObjectModel - the single object business model
The business object itself is called SimpleObjectModel and looks like this:
using UniRx;
using System;
using UnityEngine;
using ReactNativeDemo.Mvc;

namespace ReactNativeDemo.State
{
    [Serializable]
    public class SimpleDemoModel
    {
        public SimpleDemoModel(Vector3 initialPosition)
        {
            this.initialPosition.Value = initialPosition;
        }

        [SerializeField]
        private Vector3ReactiveProperty initialPosition =
           new Vector3ReactiveProperty();

        public IReadOnlyReactiveProperty<Vector3> InitialPosition =>
           initialPosition;

        public void Delete()
        {
            MessageBroker.Default.Publish(
               new ObjectDeleteMessage<SimpleDemoModel>(this));
        }
    }
}
The outside world can only do two things with it: create it and thereby setting its position, and delete it. How it is deleted, is the responsibility of this object itself. Notice the fact Vector3ReactiveProperty InitialPosition is presented to the outside world as an IReadOnlyReactiveProperty<Vector3>. This means the outside world can subscribe to this property’s changes, but it can never change the value of InitialPosition itself. In this case, as nothing can ever change it at all after it has been set by the constructor, it might as well have been an ordinary read only property, but this shows the idea.
Model wrap up
This is all there is for models. I will skip the ObjectDeleteMessage<T> because it’s simply a typed container holding the model. You can see it in the demo project.
Make stuff actually show up and disappear
ObjectListController and DemoObjectListController
The beating heart of ‘list’ display is the class ObjectListController<T>, that I will discus piecemeal to make this not too confusing. It starts like this:
using UniRx;
using UnityEngine;
using System.Collections.Generic;
using System.Linq;

namespace ReactNativeDemo.Mvc
{
    public abstract class ObjectListController<T> : MonoBehaviour
    {
        private CompositeDisposable subscriptions;

        [SerializeField]
        private GameObject viewObject;

        [SerializeField]
        private GameObject parentObject;

        private Dictionary<T, GameObject> views = new Dictionary<T, GameObject>();

        protected virtual void Start()
        {
            if (parentObject == null)
            {
                parentObject = gameObject;
            }
        }
A couple of things to take note of:
CompositeDisposable subscriptions: this object will be handling the display of the collection. This collection may change run time. We cannot simply just add subscriptions to this behaviour usingAddTo(this)and assume they will be destroyed automatically. This is where CompositeDisposable comes in - to manually keep track (and remove) subscriptions. These subscriptions are, by the way, simpleIDisposableobjects.- The dictionary
viewskeeps the track of models and their accompanying game objects, so we know which game object to delete when a model indicates it wants to be deleted.
The next and most important part is SetCollection
public void SetCollection(IReactiveCollection<T> collection)
{
    // Delete previous collection and views
    ClearSubscriptions();
    DestroyAllViews();

    subscriptions = new CompositeDisposable();
    collection.ObserveAdd().Subscribe(evt =>
      ProcessAdd(evt.Value)).AddTo(subscriptions);
    collection.ObserveRemove().Subscribe(evt =>
      ProcessRemove(evt.Value)).AddTo(subscriptions);
    collection.ObserveReset().Subscribe(ProcessReset).AddTo(subscriptions);

    // Add all initial objects
    foreach (var model in collection)
    {
        ProcessAdd(model);
    }
}
Lacking real data binding, ‘something’ needs to call this method to tell this behaviour to actually process a collection. It first resets this behaviour to its default state, then simply adds subscriptions to the collection’s ObserveAdd, ObserveRemove and ObserveReset observables, which will:
- call method
ProcessAddwhen an object is added to the list - call method
ProcessRemovewhen an object is deleted from the list - call method
ProcessResetwhen the list is cleared.
private void ProcessAdd(T model)
{
    var view = Instantiate(viewObject, parentObject.transform);
    var modelHolder = view.GetComponent<ObjectController<T>>();
    modelHolder.Model.Value = model;
    views.Add(model, view);
}
ProcessAdd instantiates a game object from the prefab that is defined in viewObject in the editor. This is current the SphereView prefab. It then assumes there to be an ObjectController<T> (will be explained later) in the prefab, and shoves the model into that. Now the game object is created, and the model is attached to it. The new game object is added to the internal views dictionary with the model as its key.
ProcessDelete is pretty simple: it finds the model that says it wants to be deleted, destroys the game object associated with it, then removes the model-view listing from the internal list as well.
private void ProcessRemove(T model)
{
    if (views.Keys.Contains(model))
    {
        Destroy(views[model]);
        views.Remove(model);
    }
}
And the rest is then rather simple:
private void ProcessReset(Unit obj)
{
    DestroyAllViews();
}

private void DestroyAllViews()
{
    foreach (var view in views.Values)
    {
        Destroy(view);
    }
    views.Clear();
}

protected virtual void OnDestroy()
{
    ClearSubscriptions();
}

private void ClearSubscriptions()
{
    subscriptions?.Dispose();
}
ProcessReset is called when the list is cleared. It simply destroys all views and clears the internal dictionary. This is done using DestroyAllViews which is also called from SetCollection.
The rest is some simple housekeeping.
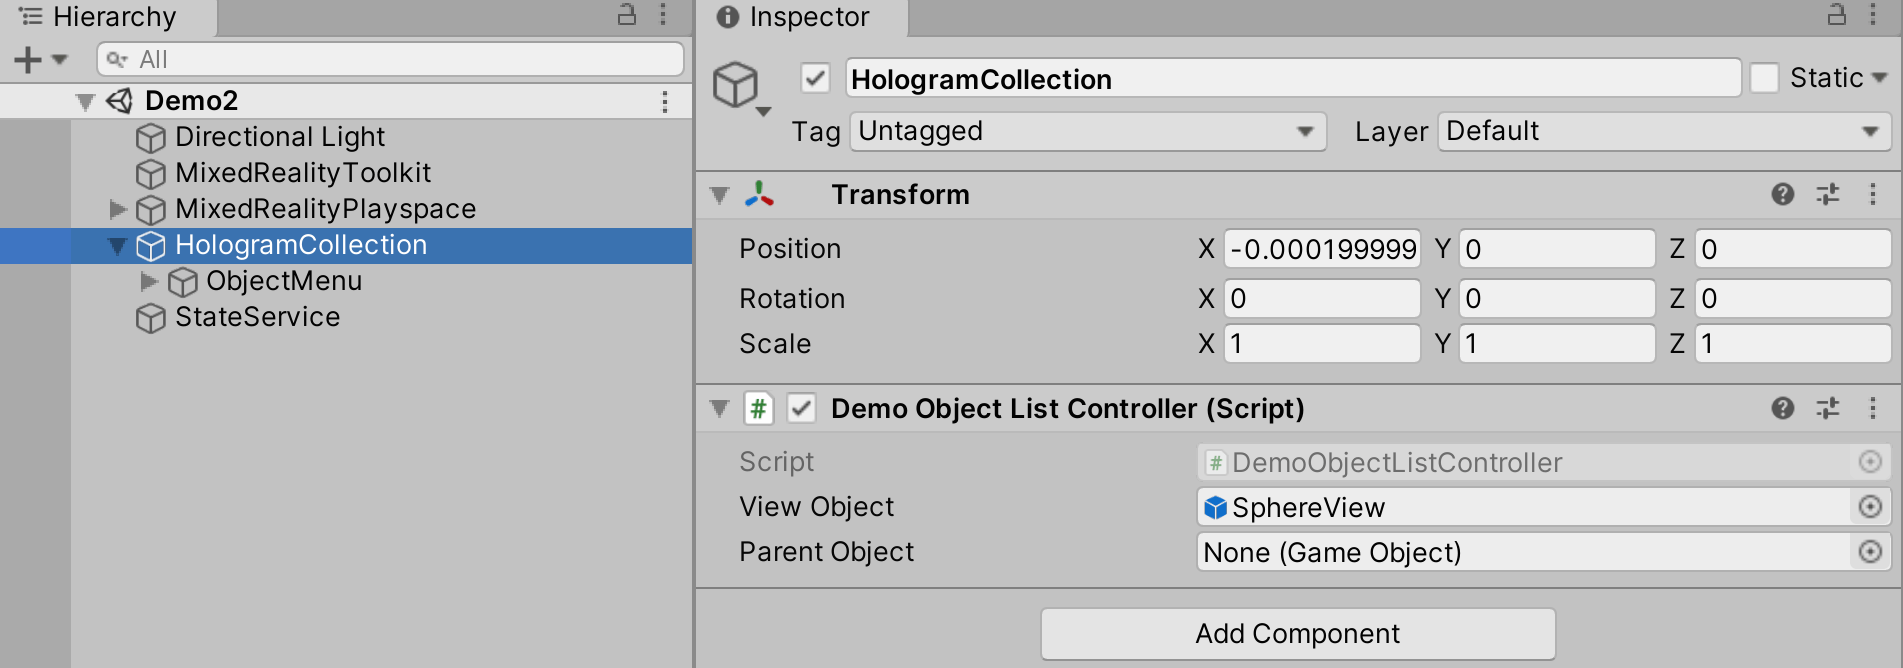
Of course, this is an abstract class that needs to be implemented, and it’s implementation is DemoObjectListController. Which is actually very simple:
using ReactNativeDemo.Mvc;
using ReactNativeDemo.State;
using Microsoft.MixedReality.Toolkit;
using UnityEngine;

namespace ReactNativeDemo.Controllers
{
    public class DemoObjectListController : ObjectListController<SimpleDemoModel>
    {
        protected override void Start()
        {
            base.Start();
            while (!MixedRealityToolkit.IsInitialized && Time.time < 1) ;
            SetCollection(
              MixedRealityToolkit.Instance.GetService<IStateService>().
              ListModel.Shapes);
        }
    }
}
It waits a little to make sure the MRTK is ready initializing, then makes the behaviour listen to events of the Shapes collection in the ListModel by calling SetCollection (in the base class)- so effectively this the way the list in the model is connected to the ‘UI’. We don’t have data binding, so I do it in code.
ObjectController and SimpleObjectController
This is the base class for controller behaviours for holding a single object model inside a single game object. The model is stored in a reactive property so we can subscribe to it - and respond to changes.
using UniRx;
using UnityEngine;

namespace ReactNativeDemo.Mvc
{
    public abstract class ObjectController<T> : MonoBehaviour
    {
        /// <summary>
        /// For display purposes only
        /// </summary>
        [SerializeField]
        private T _model;

        public ReactiveProperty<T> Model { get; } = new ReactiveProperty<T>();

        protected virtual void Start()
        {
            Model.Subscribe(ProcessModelUpdate).AddTo(this);
        }

        protected virtual void ProcessModelUpdate(T model)
        {
            _model = model;
        }

        public abstract void Delete();
    }
}
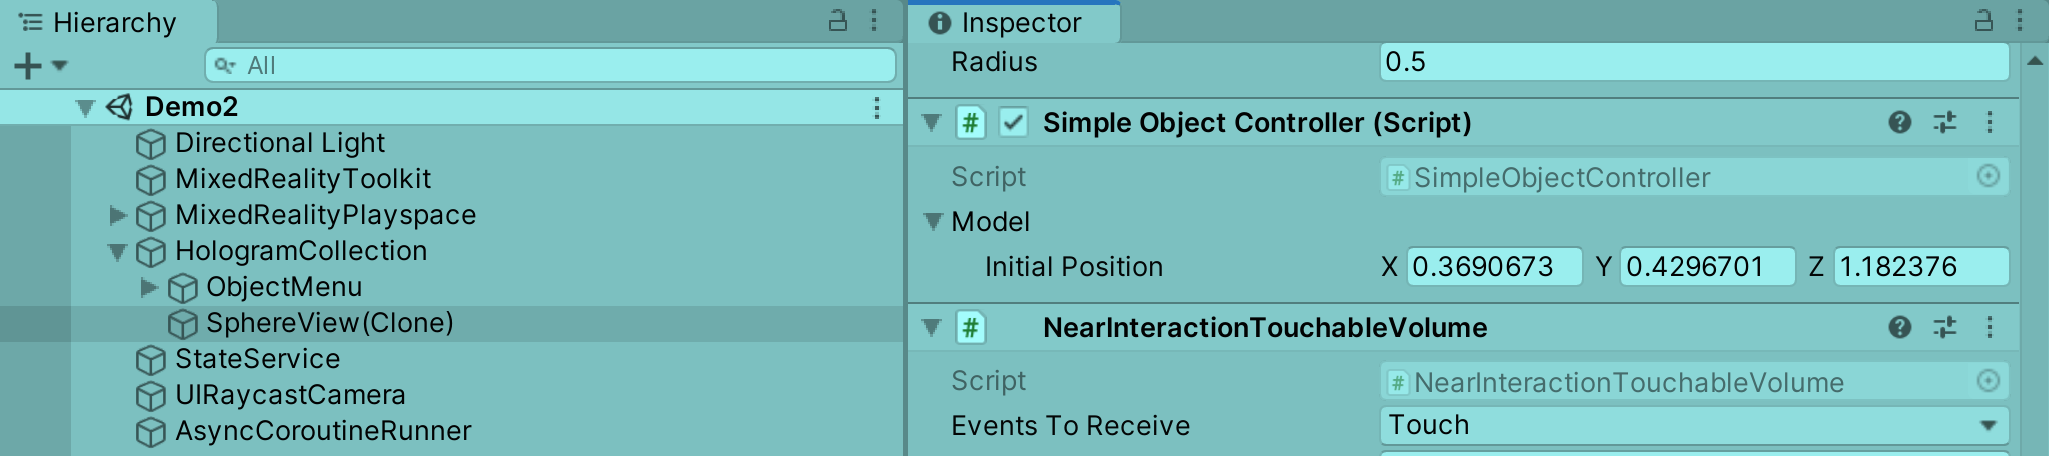
Notice: the model is also shoved into the serialized private property _model - this for in-editor display purposes only. The editor will then show a Model property with all its properties, which is nice for debugging purposes:
The implementation is SimpleObjectController and looks like this:
using ReactNativeDemo.Mvc;
using ReactNativeDemo.State;
using UnityEngine;
using UniRx;
using Microsoft.MixedReality.Toolkit.Input;
using System;

namespace ReactNativeDemo.Controllers
{
    public class SimpleObjectController : ObjectController<SimpleDemoModel>,
       IMixedRealityTouchHandler
    {
        protected override void ProcessModelUpdate(SimpleDemoModel model)
        {
            base.ProcessModelUpdate(model);
            if (Model.Value != null)
            {
                model.InitialPosition.Subscribe(
                    ip => gameObject.transform.position = ip).AddTo(this);
            }
        }

        public override void Delete()
        {
            Model?.Value?.Delete();
        }

        public void OnTouchStarted(HandTrackingInputEventData eventData)
        {
            GetComponent<AudioSource>()?.Play();
            Scheduler.MainThread.Schedule(TimeSpan.FromMilliseconds(200), Delete);
        }
    //... stuff omitted
    }
}
So what you see here is:
- When a new model is set to the
Modelproperty,ProcessModelUpdateis called and from that model theInitialPositionis read and the game object’s position in 3D space is set to the provided position. - The
Deletemethod calls the model’sDeleteto the model - and that in turn launches theObjectDeleteMessageas we have seen. - The
OnTouchStartedimplementation ofIMixedRealityTouchHandlerplays a sound, waits for 200 ms and then callsDelete. And that introduces the last UniRx feature I show off:Scheduler. That simply calls a method with a short delay, on the main thread - kind of like theDispatcherof old in the XAML world.
Some recap in schematics
If you made it to here, you head is probably spinning a bit from all the code. So here is a little video showing the Add and Delete flow in a simple schematics:
Add flow:
- Some UI element adds a model to the list of models
- An
ObjectListControllerchild is subscribed to the list events, and gets notified viaObserveAdd - The
ObjectListController- creates a game object for the received model
- Shoves the model in a
ObjectControllerchild class attached to the game object - And adds both model and created game object to an internal list
Delete flow
- ‘Something’ (in this case, a touch of the game object) calls the Delete method of the model attached to game object
- The model sends an
ObjectDeleteMessagecontaining itself, basically yelling to the world “I wanna be deleted” to whoever it may concern - The
ObjectListController- receives the message,
- finds the game object in its internal list,
- destroys that game object,
- then removes the model from its internal list
Some final words
In the actual scene, there is very little code. Basically you will only find the little model, and the DemoObjectListController controller that is ‘bound’ to the model. That is what responds to model changes, while the UI (the object model) only initiates those model changes - that, and touching a created sphere.
 And thus you can, just like in my previous post, keep the business logic and the ‘UI’ separate, and test it separately. The fact that we hardly have any business logic does not matter - this sample show you how to keep that separated from the UI, and what to put where. A golden rule is - if there is something that remotely resembles state, or data that needs to be accessed or changed from more than one place - it belongs in a model, not in a behaviour.
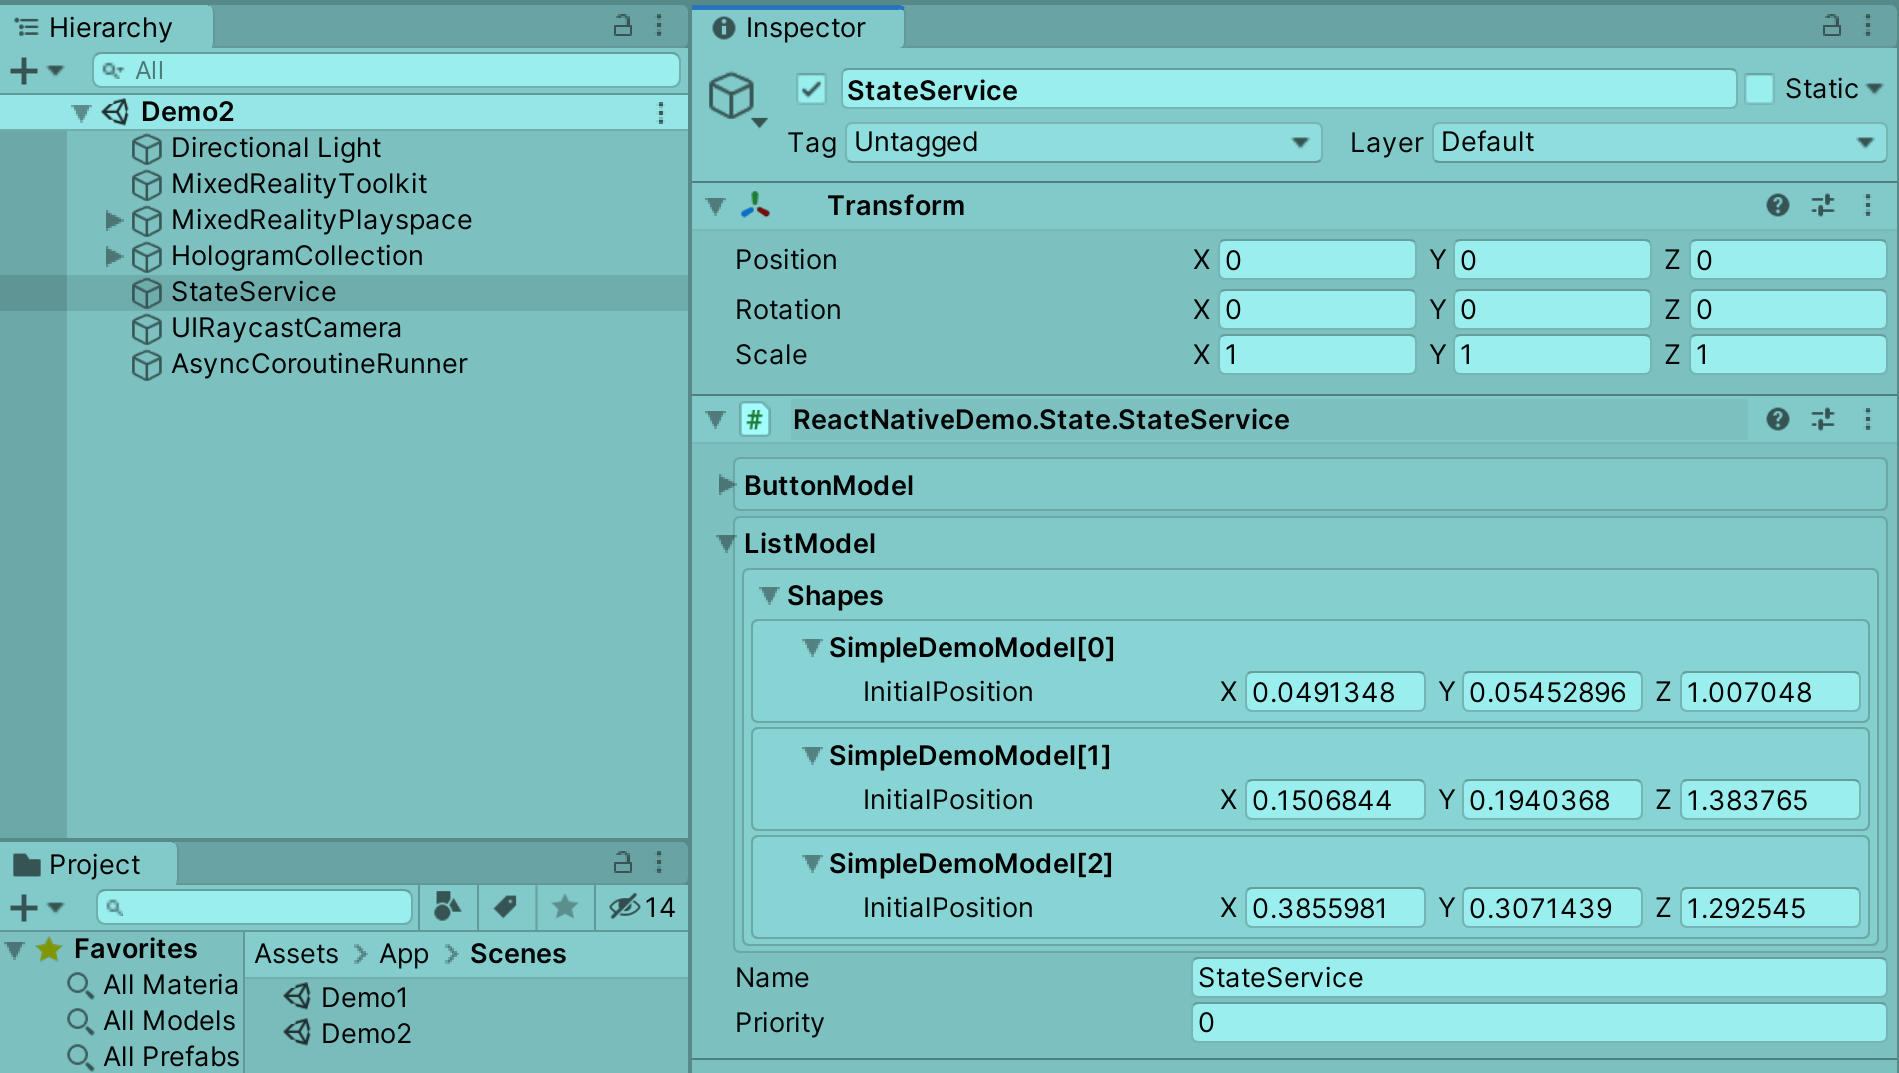
Notice you can also see the internal state of your model using my Generic MRTK2 Extension Service Inspector that I described a few blog posts ago. This really helps you in seeing is the model changes are properly processed by your controllers
I hope this helped your further understanding of this way of developing applications. As always, you can find complete project to play around with on GitHub, branch blog2.