
 MVP Profile
 Try my app HoloATC!
  HoloLens 2
 Magic Leap 2
 Android phones
 Snap Spectacles
 MetaLense 2
 Buy me a drink ;)
 BlueSky
 Mastodon
 Discord: LocalJoost#3562
HoloLens AI - training a YoloV8 model locally on custom pictures to recognize objects in 3D space
In April, I described my experiments with computer vision, using a HoloLens 2, the Unity Barracuda inference engine, and an off-the-shelf YoloV7 model to recognize some objects in space. I really wanted to do that with custom data. I had no idea why until last week. Once again, I returned to my very first Computer Vision experiment: recognizing the model aircraft I made as a teenager. I still have the pictures from the last experiment, so why not re-use them? I trained a YoloV8 model on 33 pictures, adapted my code from April a little, deployed it on my HoloLens 2 ….
… and it works! It even recognizes models that were not in the training set - like the dusty old DC3-Dakota and the yellow Tiger Moth! It’s not a very good model; it does not always recognize planes, but then again - 33 pictures are way too few for a good dataset. However, it does show the principle, and the model works.
So where did I get this wisdom?
Well, basically from this video. The presenter, a guy named Felipe (I could not find a last name), who goes by the nickname “ComputerVisionEngineer”, explains quite adequately how to train a Yolo V8 model. He is obviously brilliant and very knowledgeable. Unfortunately, like a lot of YouTubers, he takes his sweet time explaining: the video is over an hour and explains a lot of things I don’t need or want to know. In addition, he assumes Python knowledge and an environment set up for that. Ironically, the stuff that was most useful to me was not so much in the video itself as on the sites he shows. With utmost respect for Mr. Felipe, I am a bit impatient and decided to condense the fast road down to a few simple steps - with some optional explanation at the end.
Setting up an environment
I am going to explain setting up the environment, assuming you have little or no Python knowledge (like me) and use a Windows machine (ditto).
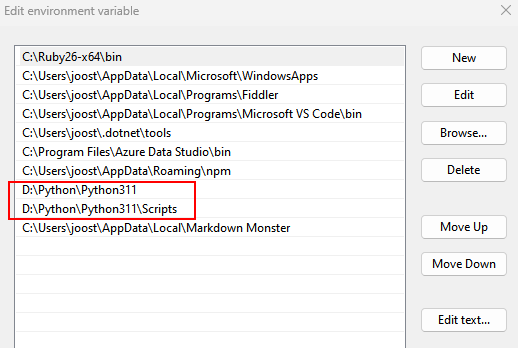
- Install Python. I used Python 3.11.4 for Windows 64 bit. I installed it in a custom root folder, D:\Python. I would very much suggest choosing a short path; the default installer location is something like C:\Users\[username]\AppData\Local (or something like that), which I find very annoying.
- Add your Python and Python\Scripts folder to your PATH. Like this:
- Open a new command window, and enter the following command:
pip install ultralytics
This might take quite some time, but after that, you are done. This is all you need to install. - Pull my sample project - make sure to pull the airplanedetection branch
Training the model
In my sample project, there’s a folder ModelTraining. There’s a command file in it, called “train.cmd”. Click that, and training starts. If all goes well, you will see stuff like this on the terminal window:
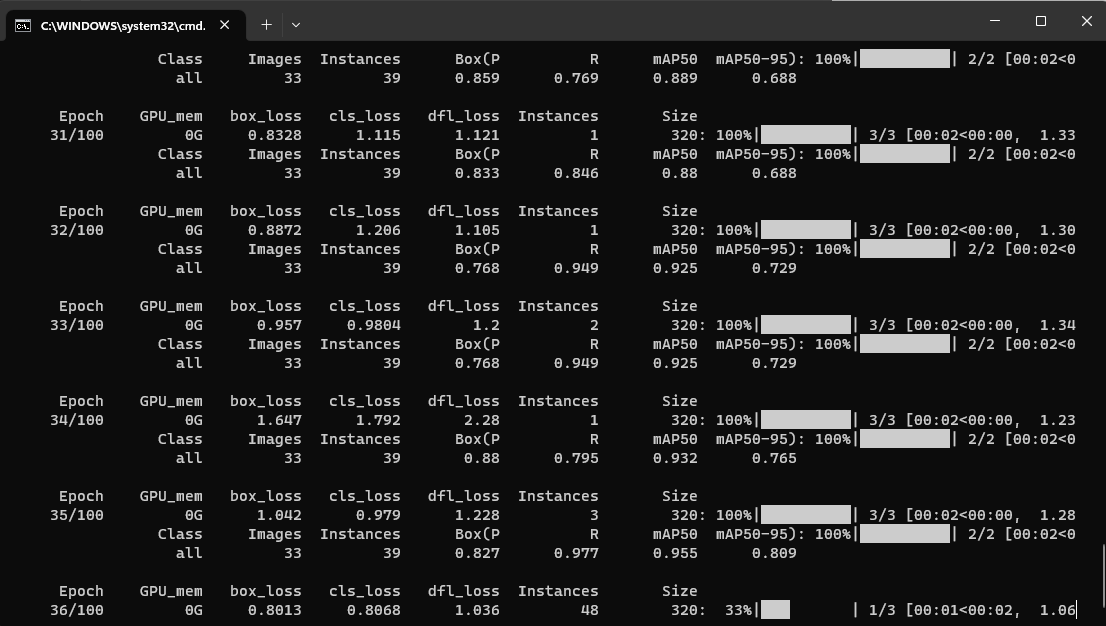
On my machine, it takes about 15 minutes.
Converting the model to ONNX
After the training is done, there will be a lot of stuff added in
ModelTraining. We are mostly interested now in ModelTraining\runs\detect\train\weights. There you will find two files:
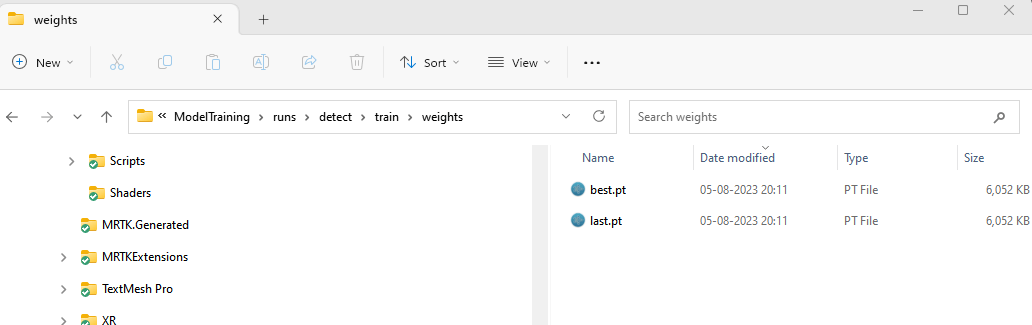
Open a new terminal in ModelTraining\runs\detect\train\weights
Enter the following command:
yolo export model=best.pt format=onnx imgsz=256,320 opset=9
This will give you a best.onnx file. And you are done. You have just trained your first model and made it readable for Unity Barracuda. This can now be deployed in HoloLens to recognize and localize the objects in the pictures you trained on. The Ultralytics tools are awesome - they allow you to use Python, but you can also use simple command line tools. Read more about the CLI here
A little note: I wrote the result of a training will appear in ModelTraining\runs\detect\train\weights. That’s only the first time. The second run will appear in ModelTraining\runs\detect\train2\weights, the third in ModelTraining\runs\detect\train3\weights, etc.
Taking a step back: labeling
Of course, there’s more involved. But this is all the actual machine learning and training that’s going on. There is a step in front, though: preparing your data.
Like I said, I simply took the pictures that I used almost 5 years ago and prepared them using CVAT. Now for this, I also have to credit 100% Felipe the ComputerVisionEngineer; he very adequately explains the process starting at 5:05 till about 22:00. He also says there are lots of other ways to label; I took the first one he showed. Anyway, you will have to label your objects manually or use an existing dataset. I opted to label the 33 pictures manually myself, using CVAT.
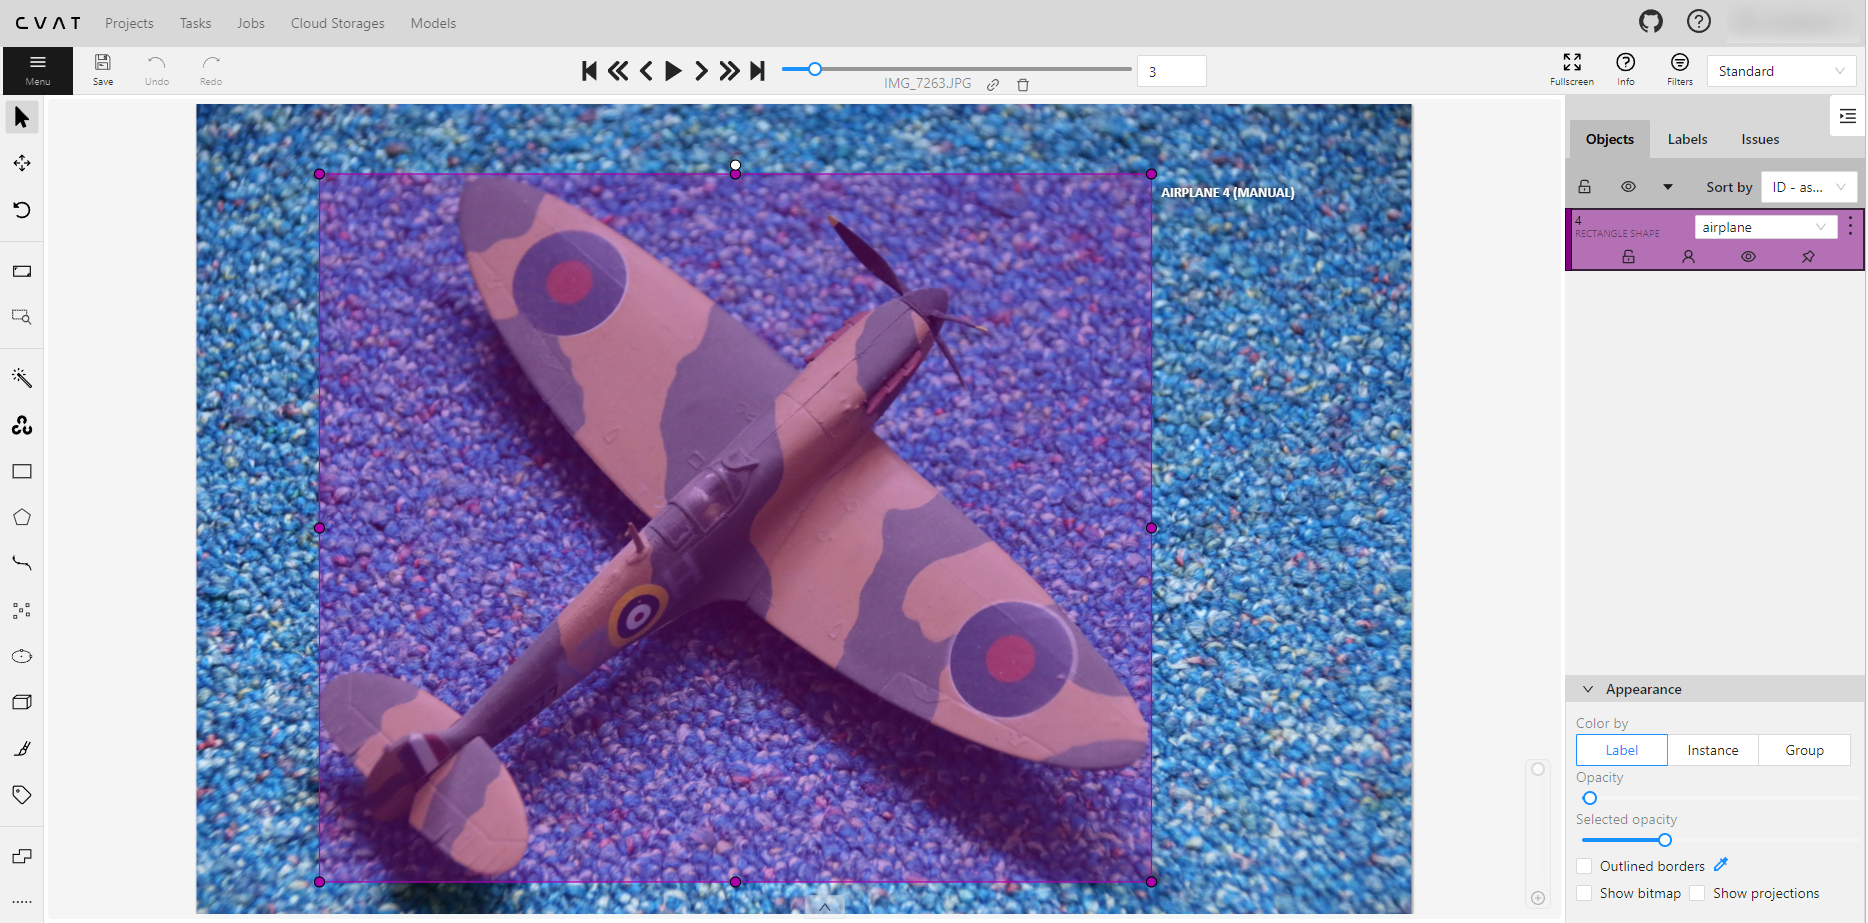
In the end, Felipe explains, you will have to export the project. This will give you a load of text files with the same names as your pictures. The Spitfire above is in file IMG_7263.JPG; therefore, I will get a file IMG_7263.txt from CVAT.
In IMG_7263.txt, it says:
0 0.443600 0.523424 0.684773 0.874073
0 is the classification (we have only one - airplane), and the other numbers describe the bounding box I drew over the part of the image where the airplane is.
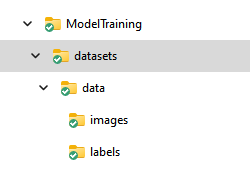
Now, if you look in the ModelTraining folder, you will see this structure: The “datasets” folder is the default root folder for datasets. “data” is the name of my dataset, and that needs to have two mandatory subfolders: “images”, into which your images go (duh), and “labels” where you put the text files
Configuration
In ModelTraining itself, there are only two files. Config.yaml describes the project settings:
train: data
val : data

# Classes
names:
  0: aircraft
The basic idea I took from Felipe again, but I greatly simplified it. This configuration tells the Yolo tool to use the “data” folder (under “datasets”) for training and validation. Under “names” the tool should find the classes it can expect and needs to identify. There is only one class name: aircraft
The command file has three lines, of which only one is interesting:
cd /d %~dp0
yolo train data=config.yaml model=yolov8n.pt imgsz=320
pause
This instructs the tool to take config.yaml for configuration (duh), use the yolov8n (nano) model as a base, and use an image size of 320.
That’s all there is to it. The export line I showed before
yolo export model=best.pt format=onnx imgsz=256,320 opset=9
does not only convert the file to ONNX but takes care of two other things:
- The tool makes models using square images, and with the off-the-shelf model I used in the previous post, I got good results with 320x256 pictures. So the imgsz parameter resizes the model picture usage. For some reason in Yolo land, size is defined in height x width instead of width x height, but whatever
- It created an ONNX model with ‘opset=9’, whatever that may be. But if you don’t include that, Unity Barracuda cannot read it. I got this wisdom from the notes on this Unity documentation page (all the way down)
And now to Unity
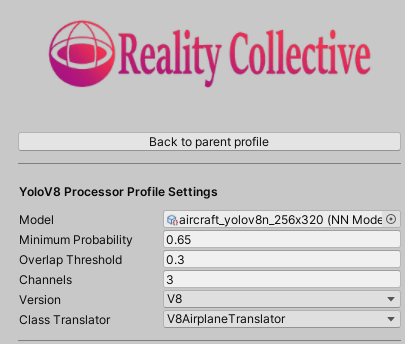
Service config
I actually did not change very much to the existing Unity project. I basically added support for using V8 models next to V7. I have extended the Service Configuration to indicate if we should handle a V7 or a V8 model:
V7 versus V8 (?)
When I opened the V7 model with Netron, I saw this
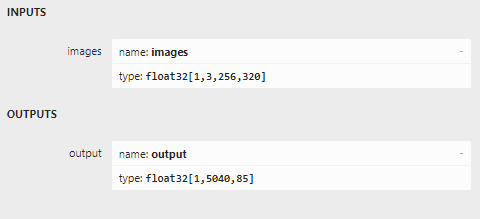
The V8 model shows this:
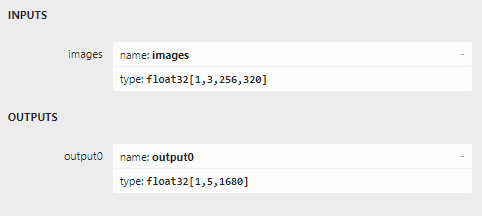
The input seems to be identical, the output is not. You can see the change reflected in the code in TensorExtensions. A V7 dataset was processed like this:
private static List<YoloItem> ProcessV7Item(this Tensor tensor,
  IYoloClassTranslator translator,
    float minProbability, float overlapThreshold, YoloVersion version)
{
    float maxConfidence = 0;
    var boxesMeetingConfidenceLevel = new List<YoloItem>();
    for (var i = 0; i < tensor.channels; i++)
    {
        var yoloItem = YoloItem.Create(tensor, i, translator, version);
        maxConfidence = yoloItem.Confidence >
          maxConfidence ? yoloItem.Confidence : maxConfidence;
        if (yoloItem.Confidence > minProbability)
        {
            boxesMeetingConfidenceLevel.Add(yoloItem);
        }
    }

    Debug.Log($"max confidence = {maxConfidence}");

    return FindMostLikelyObject(boxesMeetingConfidenceLevel, overlapThreshold);
}
And a V8 dataset is now processed like this:
private static List<YoloItem> ProcessV8Item(this Tensor tensor,
  IYoloClassTranslator translator,
    float minProbability, float overlapThreshold, YoloVersion version)
{
    float maxConfidence = 0;
    var boxesMeetingConfidenceLevel = new List<YoloItem>();
    for (var i = 0; i < tensor.width; i++)
    {
        var yoloItem = YoloItem.Create(tensor, i, translator, version);
        maxConfidence = yoloItem.Confidence >
          maxConfidence ? yoloItem.Confidence : maxConfidence;
        if (yoloItem.Confidence > minProbability)
        {
            boxesMeetingConfidenceLevel.Add(yoloItem);
        }
    }

    Debug.Log($"max confidence = {maxConfidence}");

    return FindMostLikelyObject(boxesMeetingConfidenceLevel, overlapThreshold);
}
The difference is extremely subtle: whereas the V7 one loops over the tensor’s channels, the V8 one loops over the tensor’s width
This is also reflected in the YoloItem class, which now has two child classes:
public class YoloV7Item : YoloItem
{
    internal YoloV7Item(Tensor tensorData, int boxIndex,
      IYoloClassTranslator translator)
    {
        Center = new Vector2(tensorData[0, 0, 0, boxIndex],
          tensorData[0, 0, 1, boxIndex]);
        Size = new Vector2(tensorData[0, 0, 2, boxIndex],
          tensorData[0, 0, 3, boxIndex]);
        TopLeft = Center - Size / 2;
        BottomRight = Center + Size / 2;
        Confidence = tensorData[0, 0, 4, boxIndex];

        var classProbabilities = new List<float>();
        for (var i = 5; i < tensorData.width; i++)
        {
            classProbabilities.Add(tensorData[0, 0, i, boxIndex]);
        }
        var maxIndex = classProbabilities.Any() ?
          classProbabilities.IndexOf(classProbabilities.Max()) : 0;
        MostLikelyObject = translator.GetName(maxIndex);
    }
}
The V7 version reads data for a single ‘record’ from the width
public class YoloV8Item : YoloItem
{
    internal YoloV8Item(Tensor tensorData, int boxIndex,
      IYoloClassTranslator translator)
    {
        Center = new Vector2(tensorData[0, 0, boxIndex, 0],
          tensorData[0, 0, boxIndex, 1]);
        Size = new Vector2(tensorData[0, 0, boxIndex, 2],
          tensorData[0, 0, boxIndex, 3]);
        TopLeft = Center - Size / 2;
        BottomRight = Center + Size / 2;
        Confidence = tensorData[0, 0, boxIndex, 4];

        var classProbabilities = new List<float>();
        for (var i = 5; i < tensorData.channels; i++)
        {
            classProbabilities.Add(tensorData[0, 0, boxIndex,i]);
        }
        var maxIndex = classProbabilities.Any() ?
          classProbabilities.IndexOf(classProbabilities.Max()) : 0;
        MostLikelyObject = translator.GetName(maxIndex);
    }
}
The V8 version reads it from the channels. So in V7, you think of the channels as a ‘record index’, while the width is a field index within that record. In V8, it is exactly the other way around. Mind you, I have no idea if this is a difference in specs between Yolo V7 and Yolo V8, or if it’s just an effect of me and the author of the V7 model using different tools.
Testing models in the editor
People who have been trying my code often say it’s hard to test whether the app actually works because it only works when deployed on a HoloLens. I made testing a bit easier. First of all, there is a DebugDisplayer in the scene that is disabled. It should always be disabled in the app deployed on a HoloLens, but if you enable it and run the app in the editor on a PC with a camera, it shows what that camera sees. Debug statements in the console give you a clue about what objects are recognized and with what confidence. Here you see me holding one of the models in front of the camera, and the debug statement shows the model actually recognized an aircraft: 0 is the number of the object found (there might be more than one airplane in view), 0.7648768 the confidence (just over 75%).
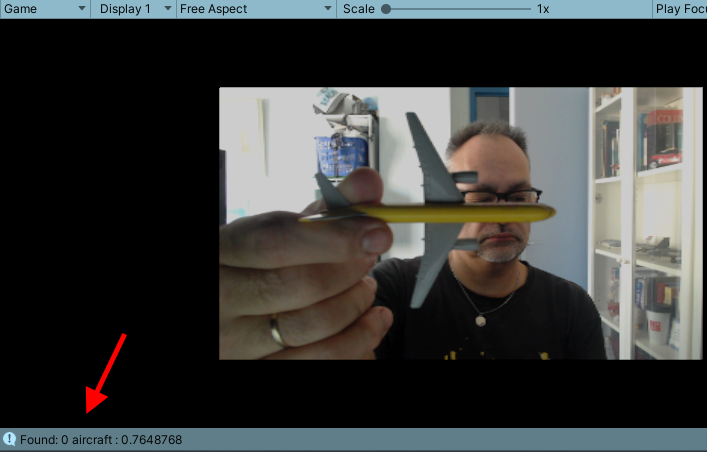
A PC has no depth camera, so it cannot localize the airplane in space and create the little signposts, but that is actually the easy part once the HoloLens has recognized the object
Concluding words and credits
You can find the whole demo project in the airplanedetection branch of the YoloHolo project, including the training data, my scripts, and the model file. You can easily drop in your own pictures and data files, train a different model, plonk that in my project, and off you go. If you are looking for a deeper understanding of what I am doing here, I would very much recommend going back to my article from April first, before diving into the code.
Apart from Felipe, I am very grateful to two Canadian students, Elia Haghbin and Vlad Surdu. Early in July, I was contacted by Elia, who works with Vlad on a complicated research project having to do something with recognizing parts of animals - I didn’t get the fine details. However, searching online for knowledge and samples, they ran into my little Yolo project. Having not much experience with either Unity or HoloLens, they had a bit of difficulty getting it to work. I have a very soft spot for Canadians in general and had some time at my hand anyway, so I did spend an hour or two with them online. I taught them some basic Unity stuff, mainly how to debug and change things around in my app, but while doing so, I got a bit of an understanding of their YoloV8 model and understanding how to adapt my code to it. When I asked them how on Earth they had mastered training models, Vlad told me it’s easy. And then he gave me the video. And he was right. It is easy, once you know how to do it.
I really love this. You give to the community, the community gives back. I hope they will get good grades.