
 MVP Profile
 Try my app HoloATC!
  HoloLens 2
 Magic Leap 2
 Android phones
 Snap Spectacles
 MetaLense 2
 Buy me a drink ;)
 BlueSky
 Mastodon
 Discord: LocalJoost#3562
Setting physical properties to the Spatial Mesh in MRTK2
Long ago, when I made the CubeBouncer for HoloLens 1, I already noticed I could change the so called ‘physical material’ of holograms so they bounced off each other like bouncing balls. Weirdly enough I could not change the physical properties of the Spatial Mesh. Being fairly new to Unity back then, I kind of failed to understand why this was.
‘Behind’ the scenes
This is, of course, because a ‘Hologram’ is nothing more than a Unity game object, and so is the Spatial Mesh. What happens not-so-behind the scenes is the WindowsMixedRealitySpatialMeshObserver observing whatever SurfaceObserver is reporting from the HoloLens spatial mapping engine. It creates Mesh objects from that data, it adds a mesh collider, it applies a material - either the occlusion or the visibility material - and voila: all real objects are wrapped in virtual objects, and the Unity engine seems to interacting with those real objects. This is how occlusion works, and how virtual objects seem to bounce off or disappear behind real objects - in fact they are bouncing off and/or hidden by the virtual ‘wrap’.
The missing piece
The mesh observers (there is in fact more than one) apply a material to the spatial meshes, but materials only determine the display properties of an object, not it’s physical properties. And if you look at the Mixed Reality Toolkit Spatial Awareness settings
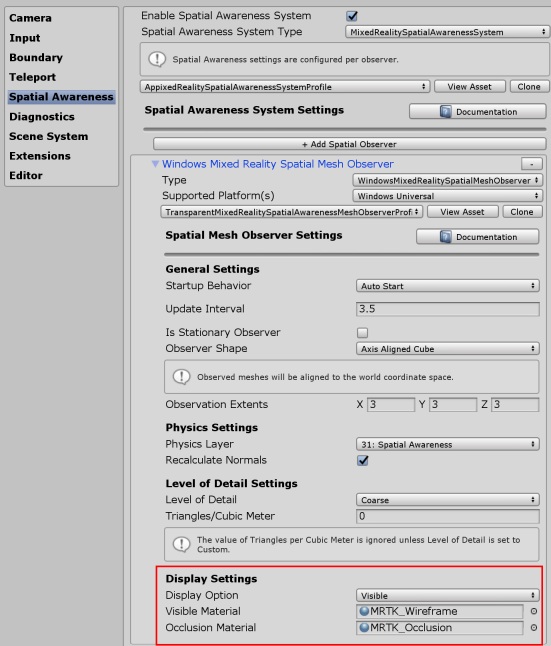
You will see you simply cannot assign a physical material to the spatial mesh.
At least, not now. ;). To make this possible, we actually have to enhance the MRTK2 a little bit.
Hacking Enhancing the MRTK2
We will want to make sure both the ‘real’ spatial mesh observer (WindowsMixedRealitySpatialMeshObserver) as well as the SpatialObjectMeshObserver (that can be used to simulate a spatial mesh inside the Unity editor) will support changing the psychical properties of the spatial mesh. To make this possible, we will need to change the following files in the MRTK2. I have used the MRTK 2.4.1 as a starting point.
In order of appearance:
- MRTK\Core\Definitions\SpatialAwareness\MixedRealitySpatialAwarenessMeshObserverProfile.cs
- MRTK\Core\Providers\BaseSpatialMeshObserver.cs
- MRTK\Providers\WindowsMixedReality\XR2018\WindowsMixedRealitySpatialMeshObserver.cs
- MRTK\Core\Inspectors\Profiles\MixedRealitySpatialAwarenessMeshObserverProfileInspector.cs
Modifying the profile
A profile is a class that contains only settings. It’s used to set properties of components and services in the MRTK2 via the editor. For the Spatial Mesh Observers, that’s MixedRealitySpatialAwarenessMeshObserverProfile and it has quite a number of properties that can be set on a spatial mesh observer. We are simply going to add one.
At the end of the file you simply add a field and a property before the #endregion
[SerializeField]
[Tooltip("Material to use when observed meshes should occlude other objects")]
private Material occlusionMaterial = null;

/// <summary>
/// The material to be used when observed meshes should occlude other objects.
/// </summary>
public Material OcclusionMaterial => occlusionMaterial;

// start addition
[SerializeField]
[Tooltip("Optional physics material to apply to spatial mesh")]
private PhysicMaterial physicsMaterial;

public PhysicMaterial PhysicsMaterial => physicsMaterial;
// end addition

#endregion IMixedRealitySpatialAwarenessMeshObserver settings
Ingesting the profile PhysicMaterial property
This happens in BaseSpatialMeshObserver. We need to make two additions to this file. The first one near the end again:
// start addition
public PhysicMaterial PhysicsMaterial  { get; private set; }
// end addition

#endregion IMixedRealitySpatialMeshObserver Implementation
And the second one at the end of the ReadProfile method:
    RecalculateNormals = profile.RecalculateNormals;
    TrianglesPerCubicMeter = profile.TrianglesPerCubicMeter;
    VisibleMaterial = profile.VisibleMaterial;
    // start addition
    PhysicsMaterial = profile.PhysicsMaterial;
    // end addition
}
Applying the PhysicsMaterial
For this, we need to adapt WindowsMixedRealitySpatialMeshObserver. This is child class of BaseSpatialMeshObserver. Find the method SurfaceObserver_OnDataReady and make the following addition
if (displayOption != SpatialAwarenessMeshDisplayOptions.None)
{
    meshObject.Renderer.enabled = true;
    meshObject.Renderer.sharedMaterial =
        (displayOption == SpatialAwarenessMeshDisplayOptions.Visible) ?
        VisibleMaterial :
        OcclusionMaterial;

    // start addition
    if (PhysicsMaterial != null)
    {
        meshObject.Collider.material = PhysicsMaterial;
    }
    // end addtion
}
else
{
    meshObject.Renderer.enabled = false;
}
Changing the inspector UI
If you want to edit properties of a Unity MonoBehaviour or a ScriptableObject, Unity will try to provide a default user interface for simple properties. If you want more complex things, you can define a custom editor. The advantage is that you can make beautiful user-friendly editors for your MonoBehaviour or a ScriptableObject, the drawback is that you have to create a UI for every field you add manually from then of - Unity does not show those automatically anymore. It’s an either-or choice. Either you let Unity handle it, or you handle everything yourself.
The editor for MixedRealitySpatialAwarenessMeshObserverProfile is MixedRealitySpatialAwarenessMeshObserverProfileInspector. You can see the declaration on top of the inspector:
[CustomEditor(typeof(MixedRealitySpatialAwarenessMeshObserverProfile))]
public class MixedRealitySpatialAwarenessMeshObserverProfileInspector :
   BaseMixedRealityToolkitConfigurationProfileInspector
{
In this class you will have to make three additions: First we need to add a private field:
// Display settings
private SerializedProperty displayOption;
private SerializedProperty visibleMaterial;
private SerializedProperty occlusionMaterial;
// start addition
private SerializedProperty physicsMaterial;
// end addition
At the end of the OnEnable method you need to add the following line to have the property retrieved from the serialized object (these are the ‘.asset’ files the MRTK makes when you clone profiles):
visibleMaterial = serializedObject.FindProperty("visibleMaterial");
occlusionMaterial = serializedObject.FindProperty("occlusionMaterial");
// start addition
physicsMaterial = serializedObject.FindProperty("physicsMaterial");
// end addition
And finally we will we to add a UI field for it.
EditorGUILayout.LabelField("Display Settings", EditorStyles.boldLabel);
{
    EditorGUILayout.PropertyField(displayOption, displayOptionContent);
    EditorGUILayout.PropertyField(visibleMaterial);
    EditorGUILayout.PropertyField(occlusionMaterial);
    // start addition
    EditorGUILayout.PropertyField(physicsMaterial);
    // end addition
}
The result of this last addition should become visible pretty much immediately if you look at the Spatial Mesh Observer display settings
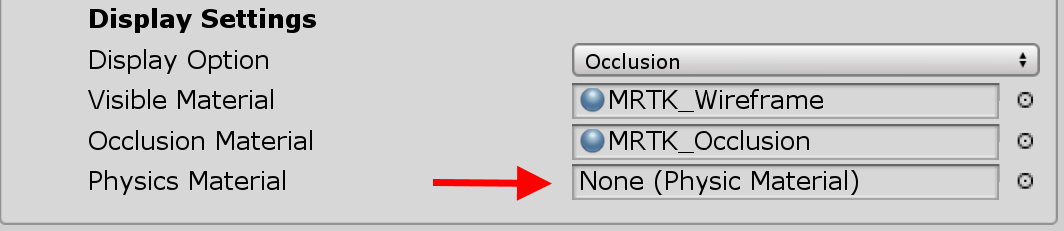 And you can simply create and drag a physical material on top of that.
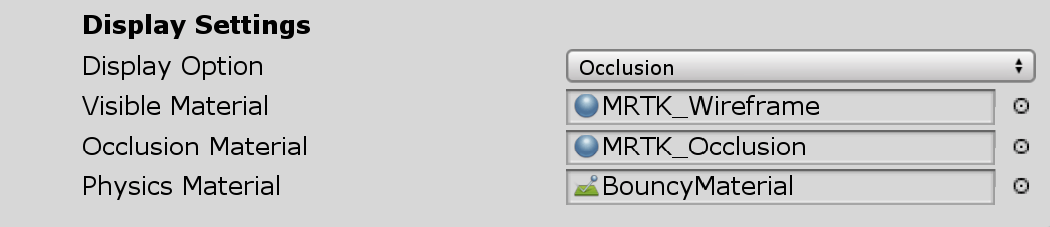 Depending on the settings of the physical material assigned to the spatial mesh, this will pretty much change the behavior of objects hitting it
Having the same effect in the Unity editor
As I wrote before, there’s a special Observer that will allow you to simulate a spatial mesh inside the Unity editor. We can adapt that too. But because of the groundwork we did, we only have to edit two more classes:
- MRTK\Providers\ObjectMeshObserver\SpatialObjectMeshObserver.cs
- MRTK\Providers\ObjectMeshObserver\SpatialObjectMeshObserverProfileInspector.cs
In SpatialObjectMeshObserver you only have to find the method ApplyMeshMaterial, where you will find the exact same piece of code you found in WindowsMixedRealitySpatialMeshObserver. You will have to adapt that accordingly.
In SpatialObjectMeshObserverProfileInspector you will basically repeat the changes you made in MixedRealitySpatialAwarenessMeshObserverProfileInspector. And then you are done.
Playing around with the physical properties
In a demo project I have created two Physical Materials. One for the ball, one for the mesh.
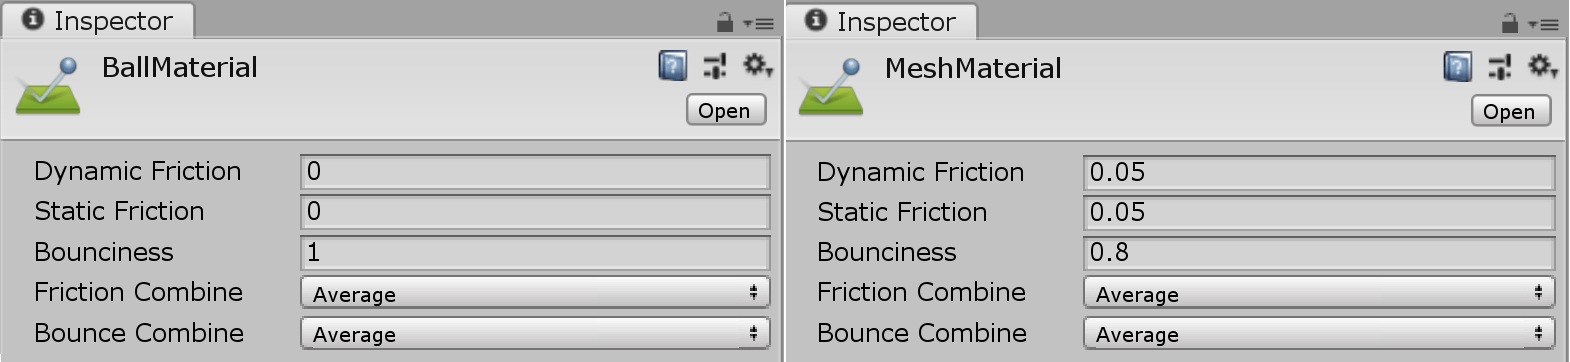 If you run the demo project in the Unity Editor, you can press the = (equals) button to launch a ball. With the settings displayed in the image, you will get about this:
If you will change the bounciness of the Spatial Mesh from 0.8 to 0.95 you will see this:
If you run this in an actual HoloLens 2,I have found things tend to work a little differently than in the editor. So to get the effect you want, you need to test this really in a HoloLens. You can do so by running the demo app and launch balls by saying “fire”. Balls will spawn 50 cm from your viewpoint in the direction of the camera view (i.e. your head’s rotation, this app does not use eye tracking to aim).
A thought on bounciness in general
If you just want to bounce things off the Spatial Map like crazy, you can also follow a (much) simpler approach:
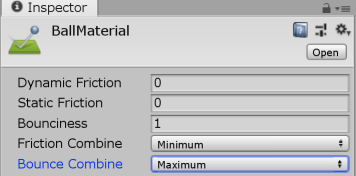
Because for this object this is applied to, it always takes minimum of both friction levels (which is 0) and the maximum for bounciness level (which is 1). Settings on the object you are bouncing off are effectively ignored, at least for unmovable objects like a spatial mesh - like a wall or a floor.
The aim of this blog is to add physical properties to the spatial mesh and have your object interact with in a desired way, not just to make it possible to things bounce off like crazy.
Disclaimer
You should realize that by making these changes you are messing with some basic functionality of the MRTK2. This may complicate future upgrade paths. If you update the MRKT2 later, any changes you make yourself might be reverted and this might break your app. If you apply these changes you are taking responsibility for future problems, not me ;).
You could also simply wait for the pull request I made on the MRTK2 implementing this same self functionality to be accepted. At the point of this writing, it still needs some work, apparently.
Conclusion
Although I foresee little practical use in the business scenario’s HoloLens 2 typically aims for, it might be of some use in some game-like scenario’s. I made this mostly for fun.
A little demo app implementing this proposed feature, including the modified MRTK2, can be found here.